Breaking FileVault 2 Encryption Through iCloud
August 29th, 2016 by Oleg AfoninCategory: «Clouds», «Did you know that...?», «General», «Tips & Tricks»
FileVault 2 is a whole-disk encryption scheme used in Apple’s Mac OS X using secure XTS-AES encryption to protect the startup partition. Brute-forcing your way into a crypto container protected with a 256-bit key is a dead end.
FileVault 2 volumes can be unlocked with a password to any account with “unlock” privileges. We have tools (Elcomsoft Distributed Password Recovery) that can brute-force user passwords, which can also unlock the encrypted volume. However, this is still not easy enough and not fast enough. The result is not guaranteed either.
Today we’ll talk about decrypting FileVault 2 volumes without lengthy attacks by using FileVault 2 escrow keys extracted from the user’s iCloud account.
When setting up FileVault 2 encryption, OS X creates a Recovery Key. This Recovery Key allows users to decrypt their files if they happen to forget their password or if they move the disk to a different computer. While Apple suggests users to print these keys and store them in a safe place, there is another convenient escrow option available for those users who log in to their Macs using their Apple ID credentials. If this is the case, OS X will offer to back up this key into iCloud.
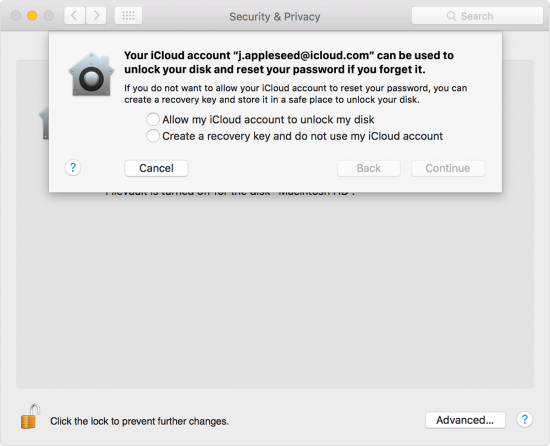
Users who opt to use iCloud to store their FileVault 2 recovery keys may later use that same account to unlock the encrypted volume. Under the hood, this Recovery Key can be translated into the correct AES key, which can be used to decrypt the data. Unfortunately, no official documentation is provided by Apple to detail how it works and what is needed to unlock the disk when moving it to a different PC. The entire mechanism is unclear and not well documented. In typical Apple manner (and unlike Microsoft BitLocker Recovery Keys), the user cannot see the key or extract it from iCloud, having to rely on undocumented process to decrypt their disk.
Extracting FileVault 2 Keys from iCloud
Even though Apple does not provide a clear path for using FileVault 2 recovery keys, we were able to extract Recovery Keys from the user’s iCloud account, and use them to decrypt FileVault 2 volumes. We built this technology into the latest version of Elcomsoft Phone Breaker. In version 6.0, you can we can pull FileVault 2 recovery keys from iCloud, and use these keys to access data stored in FileVault 2 containers.
Pre-requisites
You will need a disk image in DMG, DD or EnCase format. You will also need the user’s Apple ID and password (if two-step verification or two-factor authentication is enabled, you will need access to the secondary authentication factor as well). Alternatively, you may use a non-expired binary authentication token extracted from the user’s computer (in this case, two-factor authentication can be bypassed).
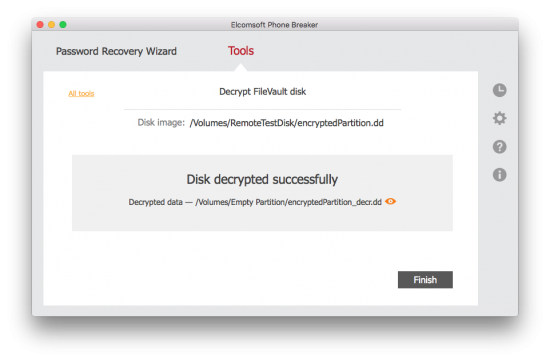
Steps to decrypt FileVault volumes
- Download Elcomsoft Phone Breaker 6.0 and activate it with your product key.
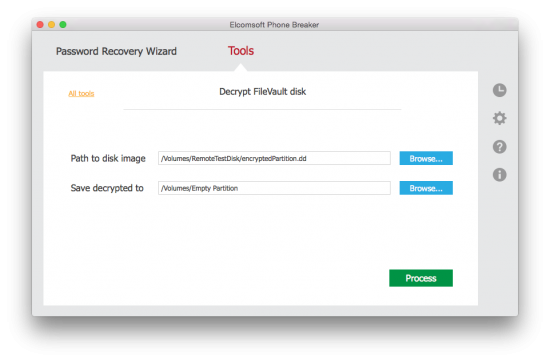
- Launch Elcomsoft Phone Breaker and select Tools > Decrypt FileVault 2 disk
- Specify path to the disk image in DMG, DD or EnCase format
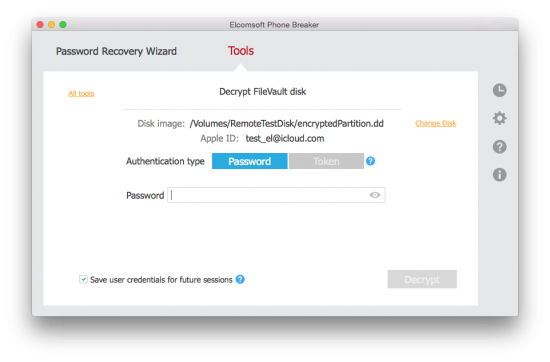
- The tool will automatically extract the user’s Apple ID. You’ll need to provide authentication credentials (password or token) for that Apple ID.
- Elcomsoft Phone Breaker 6.0 extracts the Recovery Key from the user’s iCloud account and begins decrypting the disk.
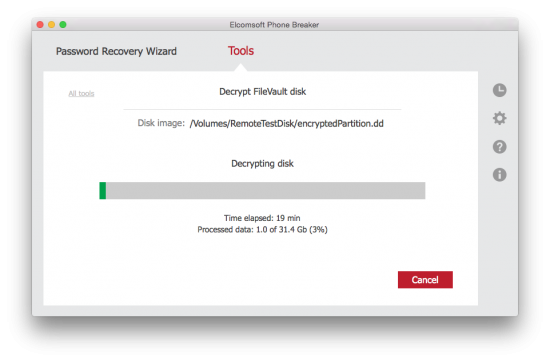
- In a few minutes, the disk is successfully decrypted.
Imaging a Macbook
In order to decrypt a FileVault 2 container, you will need to make a disk image first. While you are free to use any forensic tool to make a disk image, we compiled a brief walkthrough just in case.
- Prepare OS X installation disk. Here is the Apple way: https://support.apple.com/en-us/HT201372 Alternatively, you can use a free third-party utility such as DiskMakerX: http://diskmakerx.com/
- Insert an external USB drive or Thunderbolt drive with enough free space to fit the complete disk you want to get the image of.
- Boot the computer to [Startup Manager] by pressing and holding the {Option} key immediately after you turn on your Mac and hear the startup sound. Keep holding the {Option} key until you see Startup manager. Boot from the USB flash drive prepared on the first step.
- Launch Disk Utility. Once the system boots from the pen drive, you’ll see a list of options. From the list of available options (which includes OS X installation), select [Disk Utility].
- Once Disk Utility is started, locate and select the (internal) disk that has an encrypted partition(s) on the left pane.
- Select [File]|[New image][Image from “Untitled”] or {Alt}{Command}N, and set the following: Save As: specify the name of the image file that will be created (.DMG extension will be added automatically) Tags: (empty) (do not change) Where: external USB drive prepared on the second step Format: read-only (do not change) Encryption: none (do not change)
- Now press [Save] and wait till image creation process completes.
- Remove OS X installation disk and external disk (the one that has the image) and shut down the computer.
Notes:
- Your Mac computer may have shipped with installation media (USB flash drive), so you can use one of those. If you do not have one, we recommend creating the disk with the latest OS X veresion (10.11 El Capitan).
- You can use a separate drive for booting and saving the disk image, or use the same drive (HDD or SSD) for both purposes (just make sure that the disk has enough free space).
- The disk may have more than one partition, and any partition may be encrypted.
- Do NOT create an image from the partition (instead of the disk), even if the disk contains just one partition, as such an image will not contain enough data for extracting the recovery key (some mandatory data is located on the other/unencrypted partition that is hidden).
Conclusion
As you can see, with a bit of luck decrypting a FileVault 2 volume can be easy if you use the right tool. With Elcomsoft Phone Breaker 6.0, we are offering yet another way of unlocking access to encrypted information – this time without lengthy attacks or GPU-accelerated brute-force.


- Elcomsoft Phone Breaker 11.03: universal binary for Macs, SMS two-factor authentication restored16 July, 2026
- iOS Forensic Toolkit 10.10 adds pairing-free sideloading of the extraction agent24 June, 2026
- Elcomsoft Phone Breaker 11.2: downloads iOS 26 iCloud backups18 June, 2026
- Elcomsoft Phone Breaker 11.1: reliable iCloud backup extraction26 May, 2026
- ElcomSoft Phone Breaker 11: full overhaul of iCloud extraction30 April, 2026