Extracting and Analyzing Apple sysdiagnose Logs
June 27th, 2025 by Oleg AfoninCategory: «Mobile», «Tips & Tricks»
Apple’s unified logging system offers a wealth of information for forensic investigators analyzing iOS, iPadOS, watchOS, tvOS, and other devices from Apple ecosystems. Originally designed for debugging and diagnostics, these logs capture a continuous stream of detailed system activity – including app behavior, biometric events, power state changes, and connectivity transitions. In digital forensics, where traditional sources of evidence like backups or app data may be encrypted or inaccessible, the logs provide an alternative and often untapped reservoir of forensic artifacts. This article explores the content, availability, and forensic value of Apple logs collected via sysdiagnose across different device types, focusing on practical methods for extraction and analysis using modern forensic tools.
There are two major things we’d like to discuss in this article: Apple unified logs and sysdiagnose snapshots as applicable to mobile forensics.
Apple unified logs
Apple’s unified logging system is a valuable forensic asset that records detailed, timestamped system and user activity across iOS, watchOS, and other Apple platforms. Far from being just a fallback when other evidence is missing, unified logs can enhance traditional sources by providing a continuous timeline of interactions. These logs capture biometric events like Face ID and Touch ID usage, unlock attempts, system reboots, orientation changes, and more – all of which can indicate user presence, intent, and device manipulation. Core events such as app launches, network activity, and AirDrop usage also appear in the logs, offering investigators insight even when app-level data is unavailable due to encryption or deletion. With their granular timestamps and wide coverage, unified logs play a critical role in reconstructing sequences of events during forensic analysis.
sysdiagnose logs
Sysdiagnose logs are comprehensive diagnostic snapshots that capture the device’s most recent system state and package it into a single archive. A sysdiagnose includes a wide range of system data – such as crash reports, memory usage, kernel logs, and a portion of Apple’s unified logging system – collected at the moment the sysdiagnose is triggered. These logs are primarily intended for technical analysis and debugging. In contrast, Apple unified logs are a continuously generated, structured stream of system and app-level events maintained by the OS logging framework. Unified logs provide a high-resolution timeline of system behavior across multiple days (depending on TTL/retention period), and are better suited for analyzing long-term patterns of activity. While sysdiagnose archives may contain a brief snapshot of unified logs, they represent a point-in-time capture, whereas logs collected via tools like log collect offer broader historical visibility.
Log retention and time-to-live
A critical point in working with Apple’s unified logs is understanding their limited lifespan. Most log entries have a limited Time-To-Live (TTL), meaning they expire quickly – sometimes within minutes or hours – and become inaccessible regardless of whether you use sysdiagnose or the log collect CLI. While the CLI can retrieve logs with longer TTL values (such as 10, 20, or 30), these entries are relatively rare and, in many cases, less useful for forensic purposes. The idea that logs are always retained for 30 days is largely incorrect, as explained in detail in this article.
In practice, this means the logs must be extracted (log collect CLI) or at least generated (sysdiagnose) as soon as possible after the incident to maximize the amount of useful data.
For those working with .logarchive files from sysdiagnose, the CLI, or third-party forensic tools, Lionel Notari has developed a free tool, “iOS Unified Logs v2”, that can parse these archives. It produces a filtered database and a forensic report to help verify data integrity. This tool has received good feedback from the community and is available at the bottom of this post.
Forensic implications of unified logs and sysdiagnose
In Thesis Friday #7: Apple Unified Log or Sysdiagnose?, Tim Korver tested the effect of the way these logs are extracted on the amount and quality of the data returned. He compared the logarchive generated via sysdiagnose with one manually created using the log collect CLI command on iOS, iPadOS, and macOS, and discovered significant differences between the logs obtained via the two different methods. His findings align with the analysis by Christian Peter in Logs in a Sysdiagnose – It’s about time. To sum it up, sysdiagnose logs provided the most detailed coverage of the day they were generated, but contained little to no useful information from previous days. In contrast, logs obtained via the log collect CLI provided detailed coverage spanning up to the last 10 days on an iOS device.
This aligns with our own findings. The sysdiagnose logs we collected from a test iOS device partially aligned with these findings. Mobile Installation Logs, which contain apps historical data, install/ininstall and some other events, only went back 10 days. On the other hand, Sysdiagnose logs such as Shutdown Log Processes and Shutdown Log Reboots went back all the way to 2022, when the test device was first activated. Same goes for Wi-Fi connection logs.
What does that mean for mobile forensics? Sysdiagnose logs are most valuable when collected on the same day as the incident being investigated, as they contain only a limited window of high-resolution log data—typically focusing on the time of collection. If captured later, they may lack relevant historical events. Unified logs collected via the log collect CLI, on the other hand, typically provide a broader timeline of user and system activity, often covering up to 10 days of detailed interactions, making them more useful for retrospective forensic analysis.
sysdiagnose extraction
Apple’s sysdiagnose logs are not persistently stored by default and must first be generated on the device via a specific procedure. This process differs depending on the device type – iPhone, iPad, Apple Watch, Apple TV, and so on – and will be covered in later sections.
After sysdiagnose logs are generated, they can be extracted using various methods. Apple’s official documentation describes various techniques that, while suitable for developers, are not designed for forensic workflows. Third-party tools like UFADE and iOS Unified Log Tool can be used instead.
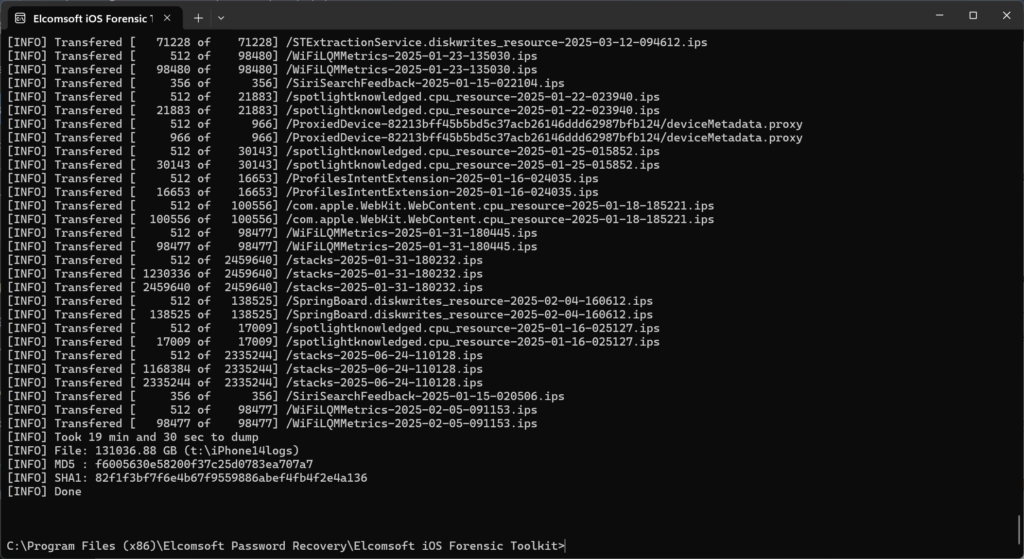
We in turn will use our own tool, Elcomsoft iOS Forensic Toolkit (EIFT), a command-line tool purpose-built for mobile investigations. Once the target device is unlocked and paired with the forensic workstation (requiring the device passcode on iOS/iPadOS), unified logs can be extracted using the following command (Windows):
eift_cmd normal dumpcrash -o FILEPATH\FILENAME
For Linux and macOS, the following syntax should be used instead:
./eift_cmd normal dumpcrash -o FILEPATH/FILENAME
This command retrieves diagnostic data and saves it in to a file specified via the ‘FILENAME’ parameter at a specified path (‘FILEPATH’). Note that the logs will be saved into a single TAR archive, so your FILENAME should be named something like “unifiedlogs.tar”. We’ll use that file name in all future examples.
Notes:
- If you are using Windows, you must have Apple Devices (previously iTunes) installed on your computer and run it at least once.
- The sysdiagnose logs must be generated on-device prior to extraction. On some platforms one must wait for several minutes before the logs are gathered.
- Device must be unlocked and paired to the forensic workstation, which requires a passcode (iOS/iPadOS).
- /DiagnosticLogs/sysdiagnose/sysdiagnose extraction can be slow if there is a high number of records. You may have to wait for half an hour or more. If your wait time is much longer than that, try using a different cable or connection.
Analyzing sysdiagnose logs
IMPORTANT: The process described below only analyzes a small portion of sysdiagnose logs and has limited real-life forensic value. The described method cannot be used to analyze system_logs.logarchive, which comprises a major part of the snapshot. The system_logs.logarchive file captures a snapshot of the unified system log at the moment the sysdiagnose was generated. You would need these logs in JSON for iLEAPP to process system_logs.logarchive. You may want to use a different log extraction method (such as producing a JSON via CLI), or use a different (likely commercial) product for analysis.
After extracting sysdiagnose logs from a device (EIFT saves them as a .tar archive), the next step is to analyze them for forensic artifacts. iLEAPP (iOS Logs, Events, And Plist Parser), an open-source tool, automates parsing of iOS diagnostic data, including sysdiagnose logs. It supports artifacts like unlock attempts, biometric events, app usage, orientation changes, and power activity. If you used iOS Forensic Toolkit, extract the sysdiagnose folder from the tar archive first. It’s typically located in the following path:
your-extracted-logfile.tar\private\var\mobile\Library\Logs\CrashReporter\DiagnosticLogs\sysdiagnose
In that folder, you will find a gzipped tar archive, e.g.
sysdiagnose_2025.06.24_11-01-29+0200_iPhone-OS_iPhone_22F76.tar.gz
Extract that file. You can either extract the .tar file from it (in which case you will pass the -t tar argument to iLEAPP), or just use it as is (in which case the argument will be -t gz).
To analyze a log archive and generate a report, use the following command:
python3 iLEAPP.py -t tar -o /path/to/output/folder -i /path/to/sysdiagnose.tar
Alternatively, if you are using the executable version of the tool downloaded from the Releases page, use the following command:
ileapp.exe -t tar -o /path/to/output/folder -i /path/to/sysdiagnose.tar
If you are passing the compressed file, use the following command:
ileapp.exe -t gz -o /path/to/output/folder -i /path/to/sysdiagnose.tar.gz
- -t tar tells iLEAPP that the input is a .tar archive, such as the one produced by the eift_cmd normal dumpcrash command.
- -i specifies the path to the input archive.
- -o specifies the path to the output directory where the report will be saved.
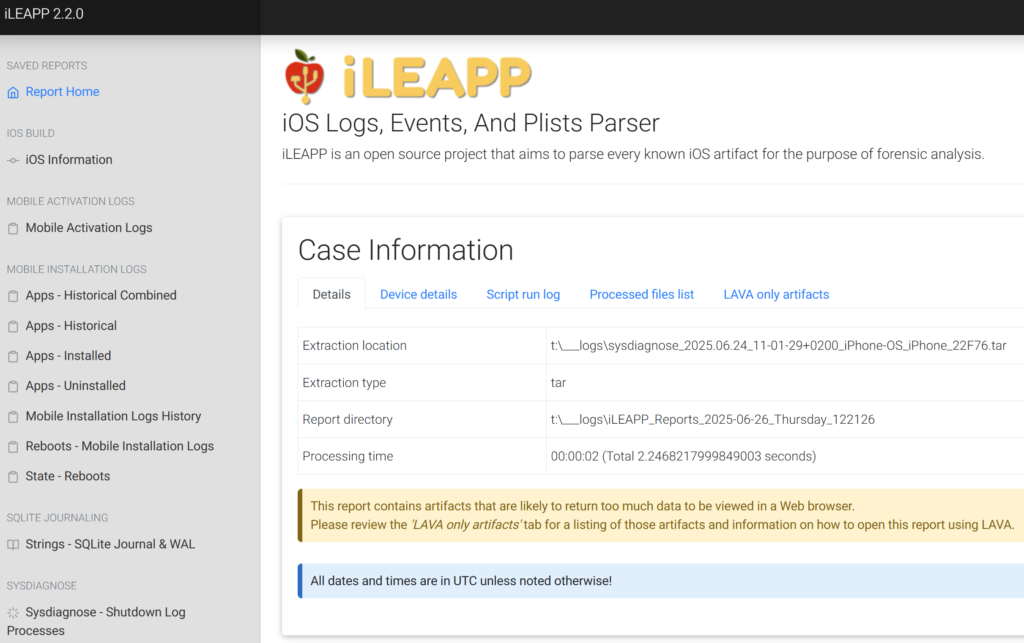
The generated report includes a number of browsable HTML pages, CSV exports, and extracted artifacts grouped by category. iLEAPP’s modular plugin architecture allows it to surface key data points from the logs with minimal manual intervention.
Reninder: This method does not provide access to the major part of sysdiagnose, which is system_logs.logarchive. To parse that with iLEAPP, you’ll need logarchive in JSON format.
Devices that can generate sysdiagnose logs
Apple’s unified logging system is embedded across nearly all its devices, with a consistent infrastructure but platform-specific content. While the log format remains uniform, each device class produces logs tailored to its functions, hardware, and use cases. Forensic investigations typically focus on mobile and consumer-facing Apple devices, where logs offer the most actionable insights.
iPhones and iPads are central to mobile forensics and produce rich logs covering biometric authentication (Face ID, Touch ID), unlock attempts, app usage, and system state transitions. These logs are continuously generated and, when captured properly, offer a minute-by-minute timeline of user and system activity.
Apple Watch logs emphasize health, motion, connectivity, and communication events. Though less detailed than iOS logs, they are valuable when paired with a host iPhone – particularly because the Watch lacks a backup daemon, making its logs one of the few available data sources in some scenarios.
Apple TV devices log media playback, system transitions, network activity, and UI interactions. While less commonly examined, these logs can be relevant for shared-device usage, establishing physical presence, or assessing content interaction in domestic environments.
HomePod logs center around Siri interactions, network connectivity, audio playback, and user presence. They are typically useful in determining voice command activity, contextual location, and household behavior—sometimes helping to confirm presence during specific events.
Though not a primary focus here, macOS devices also rely heavily on unified logging. In fact, macOS often produces more detailed logs due to its broader functionality and open architecture. These can include user logins, file system activity, and network events – making macOS logs a powerful resource in forensic analysis. However, differences in access methods mean they are not explored in depth in this article.
In subsequent follow, we’ll explore how sysdiagnose logs are generated and extracted from each of these platforms, along with the types of forensic artifacts they can reveal.
iPhone & iPad (iOS / iPadOS)
Forensic Potential
iPhones and iPads produce extensive logs that cover a wide range of user and system activities. Logs reveal biometric events (Face ID and Touch ID scans and results), unlock attempts (both successful and failed), app launch times, screen orientation changes, network activity, and power state transitions. These entries provide a high-resolution view into user behavior – especially valuable when app-level logs or backups are inaccessible or encrypted.
Generating sysdiagnose Logs
There are several methods to produce logs for these devices. Apple recommends the following procedure:
Triggering a Sysdiagnose With Buttons
Trigger a sysdiagnose by simultaneously pressing and releasing both volume buttons + the Side (or Top) button for 250 milliseconds. Holding too long (>1s) will lock the device instead.
Notes:
- A screenshot will also be taken when the buttons are pressed and released.
- The sysdiagnose is triggered upon button release.
- On an iPhone you will feel a short vibration when a sysdiagnose is successfully triggered. (The vibration will not occur on an iPad).
Wait 10 minutes for the diagnostic gathering to complete.
There is also an alternative procedure, which is significantly more complex and should be used only if there is a mechanical malfunction preventing the creation of the logs via buttons.
Enabling Logging Using AssistiveTouch
- Enable AssistiveTouch by going to Settings > Accessibility > Touch > AssistiveTouch. – Notice the floating home button that appears on the screen.
- Go to Settings > Accessibility > Touch > Customize Top Level Menu.
- Select Custom > Analytics. A small checkmark (✓) will appear next to your selection.
- Trigger a sysdiagnose by using the CUSTOM ACTION you selected above. (Example: Double-Tap).
Notes:
- A gray bar will appear along the top indicating that the log gathering has started, and another will appear when its complete.
- It can take up 10 minutes for the diagnostic gathering to complete.
Apple Watch (watchOS)
Forensic Potential
Apple Watch sysdiagnose logs capture motion and health data, connectivity events, app interactions, and pairing information with the host iPhone. While less verbose than iOS, these logs can still shed light on physical activity, user presence, and watch-based authentication or app use – even if minimal data is stored locally.
Generating sysdiagnose Logs
Apple documents how to capture Watch logs via a developer profile. A .mobileconfig profile is installed on the paired iPhone, enabling future logging. After installation, triggering sysdiagnose on the Watch itself collects sysdiagnose logs tied to watchOS processes.
- Profiles: Apple Developer (one will need an Apple developer account for that, even a free one will suffice).
Detailed Instructions
First, you will need to enable logging. To do that, you will need to install the watchOS logging profile to the paired iPhone. (Note: The profile will expire after 3 days.)
Then, follow these steps (from sysdiagnose_Logging_Instructions.pdf):
- Download the watchOS logging profile to the paired iPhone.
- Tap the profile in the body of the email.
- Choose ‘Apple Watch’ when prompted.
- Tap Install (enter passcode, if prompted), agree to the consent form and tap Install.
- Restart the device.
- Trigger a sysdiagnose by pressing and holding both the Side and Digital Crown buttons on the Watch for two seconds and release.
Gathering the Logs
There are several methods for accessing the logs. Choosing one or another depends on twhether or not you have an adapter to connect the Watch to your workstation.
If you have an adapter
If you have a custom adapter, you can simply connect and pair the watch to your workstation, then use iOS Forensic Toolkit to collect the logs in exactly the same way you’d use it with an iPhone.
If you don’t have an adapter
If you do not have an Apple Watch adapter, you can still access the logs by making the watch send them to the tethered iPhone, then extracting the logs from the iPhone.
- Place the Apple Watch on the charging puck.
- Make sure the iPhone is within range of the watch.
- Wait for up to 15 minutes for the Apple Watch to sync the files to the iPhone.
Notes:
- Depending on the Watch hardware, generating logs may take significant time (10 minutes or more).
- First-generation model (Series 0) is particularly slow.
- You can only connect the Watch directly to your workstation if you have a dedicated adapter. Otherwise, use the workaround described above.
Apple TV (tvOS)
Forensic Potential
Apple TV sysdiagnose logs include media playback metadata, user interface navigation, network communications, AirPlay events, and system state transitions. In forensic scenarios involving shared devices, these logs can help establish physical presence and offer insights into usage times, content accessed, and remote control activities.
Generating sysdiagnose Logs
Apple provides developer-focused instructions for creating sysdiagnose archives. Using a tvOS-specific sysdiagnose profile from the Profiles Portal, logs can be triggered remotely via a paired Mac or through Apple Configurator once enabled.
Alternatively, logs can be produced (on the 4th generation Apple TV at least) by pressing and holding the PLAY/PAUSE and VOL- buttons on the remote for 6 seconds. After you release the buttons, a dialog confirmation will appear on the TV screen. You can then use AirDrop to transfer the logs to your Mac. (sysdiagnose_Logging_Instructions.pdf)
Notes:
- If you are investigating a 4th generation Apple TV with a USB-C port, or if you have a dedicated adapter to connect the Apple TV, you can use that port or adapter to connect the device to your workstation and extract the logs with iOS Forensic Toolkit.
- If there is no USB-C port available, you can produce the logs and AirDrop them onto a Mac.
HomePod (audioOS)
Forensic Potential
HomePod sysdiagnose logs emphasize Siri interactions, network behavior, audio playback, voice intent, and home automation events. Investigators can use these logs to identify when Siri was activated, commands were issued, and how users interacted with their HomePod devices in a forensic context.
Generating sysdiagnose Logs
Like tvOS, HomePod requires a developer profile from Apple’s Profiles and Logs portal. Once a logging profile is installed, sysdiagnose captures relevant logs when manually triggered via the Home app or pairing signals.
Apple provides the following instructions.
- Download the profile and install it on the iOS device. Important: Install logging profile onto the iOS device, not the HomePod. If the profile is installed on the HomePod the ‘Export Analytics’ button will not show up when collecting logs.
- Restart the device if prompted.
Then, trigger a sysdiagnose using the following steps:
- Open the ‘Home’ app on the iOS device.
- Long press on the HomePod tile to reveal options.
- Tap ‘Settings’ (Previously called ‘Details’).
- Tap ‘Analytics’.
- Tap ‘Export Analytics’.
- Keep iOS device unlocked until AirDrop from HomePod is received and wait for the logs to finish gathering. When logs are collected, the HomePod will AirDrop them to the iOS device.
- From the AirDrop menu, choose ‘iCloud Drive’ or the ‘Files app’ and tap ‘Add’.
- Tap ‘Done’ when the file transfer has completed.
Extracting the logs
If you have an adapter to connect the HomePod to your workstation, extracting the logs from the HomePod is no different than obtaining them from the iPhone, iPad, or Apple TV; please refer to the extraction chapter above. If you don’t have an adapter, use the sequence described above (via the ‘Home’ app on the iOS device).
More information
Apple unified logs and sysdiagnose snapshots are well-studied; there is no lack of information about them. We selected several publications we found particularly interesting.
Tools for parsing and analyzing the logs:
- iOS Unified Logs – My parsing tool is out!
- cheeky4n6monkey/iOS_sysdiagnose_forensic_scripts: Mattia Epifani, Heather Mahalik and Cheeky4n6monkey
- EC-DIGIT-CSIRC/sysdiagnose: Forensic toolkit for iOS sysdiagnose feature
- Hexordia Sysdiagnose Log Toolkit — Hexordia
- abrignoni/iLEAPP: iOS Logs, Events, And Plist Parser
General information:
- They are Still Together!: iOS Unified Logs II
- iOS Unified Logs: The Myth of 30 Days Retention
- Using sysdiagnose logarchive files to provide access to system logging | Der Flounder
- #UFADE now also offers a “slimmed down” version of the PRFS backup for Apple Watches (and Apple TVs). | Christian Peter
- Heather Mahalik-Using Apple Bug Reporting for Forensic Purposes
- Checkra1n Era – Ep 6 – Quick triaging (aka from the iPhone to APOLLO, iLEAPP and sysdiagnose in 6 minutes)
- Sysdiagnose in iOS 16: a first look from a Digital Forensics perspective
- iOS Crash Dump Analysis, Second Edition
- Sysdiag -who? | WithSecure™ Labs
- 8 Log files you can collect from iOS and Android devices – Magnet Forensics
- Initialization vectors: Extraction, Processing, & Querying Apple Unified Logs from an iOS Device
- iOS Mobile Installation Logs · DFIR Review
What’s inside:
- Understanding Apple Unified Log: interpreting Key Artifacts – FaceID
- iOS Unified Logs – Introduction, Screen Unlock and App opening
- Don’t Trust the Clock: Timestamp Discrepancies in iOS Unified Logs
- Logs in a Sysdiagnose – It’s about time…
- Understanding Apple Unified Log: interpreting Key Artifacts – FaceID
- Thesis Friday #2:Screen Orientation as a Forensic Artefact in Apple Unified Logs
macOS logs:
- The ultimate diagnostic tool: sysdiagnose – The Eclectic Light Company
- More useful information gleaned from sysdiagnose – The Eclectic Light Company
Final remarks
An updated release of iOS Forensic Toolkit with marked improvements in the log extraction is just around the corner. Stay tuned!
REFERENCES:

Elcomsoft iOS Forensic Toolkit
Extract critical evidence from Apple iOS devices in real time. Gain access to phone secrets including passwords and encryption keys, and decrypt the file system image with or without the original passcode. Physical and logical acquisition options for all 64-bit devices running all versions of iOS.
Elcomsoft iOS Forensic Toolkit official web page & downloads »

- Elcomsoft Phone Breaker 11.03: universal binary for Macs, SMS two-factor authentication restored16 July, 2026
- iOS Forensic Toolkit 10.10 adds pairing-free sideloading of the extraction agent24 June, 2026
- Elcomsoft Phone Breaker 11.2: downloads iOS 26 iCloud backups18 June, 2026
- Elcomsoft Phone Breaker 11.1: reliable iCloud backup extraction26 May, 2026
- ElcomSoft Phone Breaker 11: full overhaul of iCloud extraction30 April, 2026