Sanderson SQLite Forensic Toolkit on a Mac OS X using CrossOver
March 5th, 2015 by Shafik PunjaCategory: «General»
Revision 1 of this article was initially published on January 6, 2015 on Sanderson Forensics Forum: http://sandersonforensics.com/forum/entry.php?19-Sanderson-SQLite-Forensic-Toolkit-on-a-Mac-OS-X-using-CrossOver.
In Revision 2, I have added a small section, to highlight the importance of understanding SQLite databases and using SQLite tools in order to analyze the information contained within SQLite database files.
This article is related to running Sanderson SQLite Forensic Toolkit on a Mac OS X system. I apologize in advance for the lengthy read but please take the time to read everything and understand the concepts. I had to peruse the CrossOver wiki and support areas in order to understand what needed to be accomplished for unsupported applications to work.
Disclaimer: I am not affiliated with either CrossOver, Sanderson Forensics or any other product developer mentioned in this article. The process or steps I describe in this post are not the only way to install Windows applications into CrossOver. This document is not a thorough and complete understanding of the capabilities or limitations of CrossOver. Use at your own risk!
Author’s Environment
In my case I am using Mac OS 10.10.1 with Crossover 14.0.3.28476 in full trial mode.
CrossOver
What is CrossOver (or I refer to as ‘CO’)? This is a software program developed by Codeweavers (https://www.codeweavers.com/), which allows Mac and Linux users to run Windows software on a Mac or Linux environment. CO creates a virtual Windows environment for the Windows applications to operate under, without having to have a Windows licence or have a Windows operating system installed.
CrossOver differences versus virtual machines or dual booting: https://www.codeweavers.com/products/faq/differences
CrossOver is not a free software; the trial version is 14 day free fully functioning with no restrictions. The cost to buy CrossOver is 59.95 USD with 12 months of email support and upgrades and one free phone support incident. https://www.codeweavers.com/products/faq/upgrade_policy
Yes, there are other free emulation environments like Wineskin Winery (http://wineskin.urgesoftware.com/tiki-index.php) that can port Windows software to Mac OS X. But I have not had the time to try this yet and not sure if I will.
Why am I using CrossOver to run my Windows software? I am on my Mac 90% of the time doing things when not in the lab and using Windows machines and there are times when (on my Mac) I need to run my most often used Windows forensic tools. I thought for those examiners that would like to approach running their tools in this manner (without Parallels or VM Fusion) it might be an option as virtual machines can be resource hogs.
CrossOver does have support for specific applications that have already been ported and have a pre-configured porting profile (also referred to as bottle). https://www.codeweavers.com/compatibility/search/
More than likely, most forensic tools will have to be approached as installed through ‘Unsupported Application -> Other Application’ process.
Sidebar
Let me digress briefly from the main article to elaborate on the importance of SQLite database analysis.
Why SQLite Database Analysis?
My desire to use CrossOver was a need to use both Oxygen Forensic SQLite Viewer (OFSV) and Sanderson SQLite Forensic Toolkit on a Mac (not in Bootcamp or through a Virtual Machine appliance). Both of these tools are excellent for analyzing SQLite files.
There are no Mac OS X equivalents that I am aware of that allow a Mac user the same functionality. Sure I could use an array of Python scripts custom made (by others) but these scripts only take me so far. To be fair, I am not a coder so to try and customize the scripts to have the same or similar functionality would be pointless. And besides I work better in GUI tools than command line. Hence, when I am not on my Windows machines, I am using my Mac and I don’t want to necessarily boot into my Windows to run these tools.
SQLite database files can be found in non-mobile device applications like Skype, Firefox, and Google Chrome Browser, to name a few. Therefore, it is important for digital forensics examiner to understand how to obtain both live and deleted records from an SQLite database.
Most specifically in relation to mobile forensics, SQLite database files are encountered in at least three of smart phone operating systems already mentioned. The prevalent and widespread use of SQLite database files has become so widespread that, as a digital forensics examiner, it would be prudent to understand the structure of these files and their associated journaling mechanisms (.journal, .shm, .wal files).
For example the popular WhatsApp third party messaging app (available for iOS, Android and BlackBerry) uses an SQLite database structure to store messaging data in an encrypted format. Call history data in an iPhone is stored in an SQLite database file called ‘call_history.db’. BlackBerry Messenger data on a BlackBerry 10, iOS and Android device is stored in an SQLite database file called ‘master.db’.
There are a number of mobile forensic software tools (Oxygen Forensic Suite, Cellebrite, Micosystemation’s XRY, IEF (Magnet Forensics), EnCase 7, BlackLight, Lantern to name a few) that can parse SQLite database files, from the extracted device smart phone data specific to the mobile forensics software tool’s capabilities.
Unique tools such as Elcomsoft Phone Viewer (EPV) can access cloud backup data for Apple iOS 6.x to 8.x (iTunes and iCloud backups) and BlackBerry 10, keeping in mind device support. Another related product, Elcomsoft Phone Breaker (EPB) deals with decrypting backup data that is password protected and or encrypted.
One important consideration for the examiner to take caution of is that SQLite tools (command line and GUI) have the ability to alter the data. It is for this reason the examiner clearly articulate what actions were performed upon the database files. There may be standalone “forensic” SQLite analysis tools, which are read only, that can perform a read only analysis of the database files. If you are not sure then ask the developer of the product.
SQLite Data Analysis Articles and Tools
Some excellent sources on SQLite analysis that I strongly recommend you read:
1. Forensic Analysis of SQLite Databases: Free Lists, Write Ahead Log, Unallocated Space and Carving: http://articles.forensicfocus.com/2015/02/16/forensic-analysis-of-sqlite-databases-free-lists-write-ahead-log-unallocated-space-and-carving/
2. Forensic examination of SQLite Write Ahead Log (WAL) files: http://sandersonforensics.com/forum/content.php?197-Forensic-examination-of-SQLite-Write-Ahead-Log-%28WAL%29-files
3. Dealing with records found in SQLite Rollback Journals: http://sandersonforensics.com/forum/content.php?208-Dealing-with-records-found-in-SQLite-Rollback-Journals
4. Using the Forensic Browser for SQLite to examine ANY SQLite database: http://sandersonforensics.com/forum/content.php?207-Using-the-Forensic-Browser-for-SQLite-to-examine-ANY-SQLite-database
5. Basic SQL Joins: http://sandersonforensics.com/forum/content.php?203-Basic-SQL-Joins
The following are SQLite tools that I use for analysis of SQLite database files:
- Sanderson SQLite Forensic Toolkit (Forensic).
- Oxygen SQLite Viewer (Forensic).
- Epilog (Forensic).
- Valentina Studio Free (Cross Platform Windows, Linux and Mac): This tool specifically has the ability to show you a linked related record, if one exists, between tables within an SQLite database. No other SQLite database tool (forensic or non-forensic) has the ability to do this yet, that I am aware of.
- SQLite Personal Free Version.
- SQLite2009 Free Version.
With the sidebar portion completed let’s carry on with the main purpose of this article.
Using CrossOver to Install Sanderson SQLite Forensic Toolkit
The following steps are intended for a first time install of a Windows application, and presume you don’t have any other bottles installed. To install your unsupported software ensure you have access to your Windows programs. In my case I have stored my windows exe files under ‘MacVolume/Users/username/Downloads/win’.
- Install Cross Over, with the CO app being found in the ‘Application’ directory.
- Start CO. Now when I start it my interface looks like this, because I have some Windows forensic software ‘Bottles’ installed.
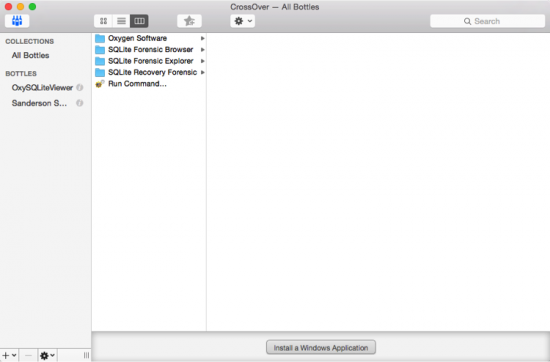
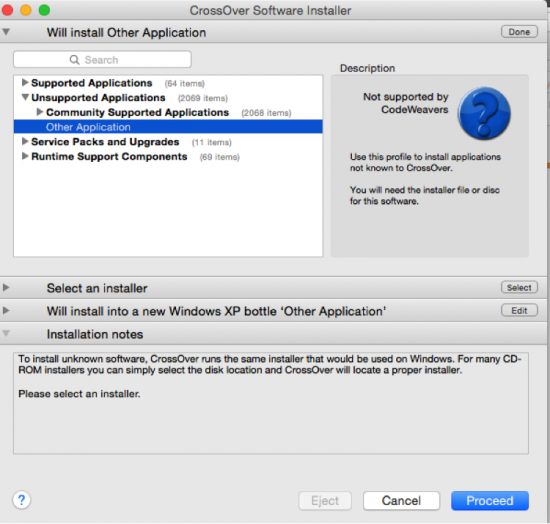
- In CO select ‘Install Windows Applications’ choose select Unsupported Applications -> Other Application and click Proceed. Or alternately you can also choose Configure -> Install Software to invoke the CO Software Installer.
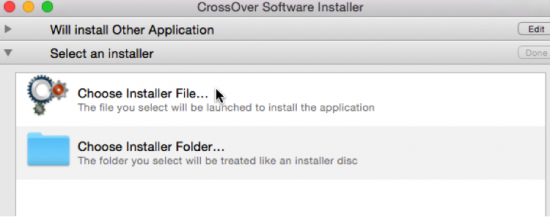
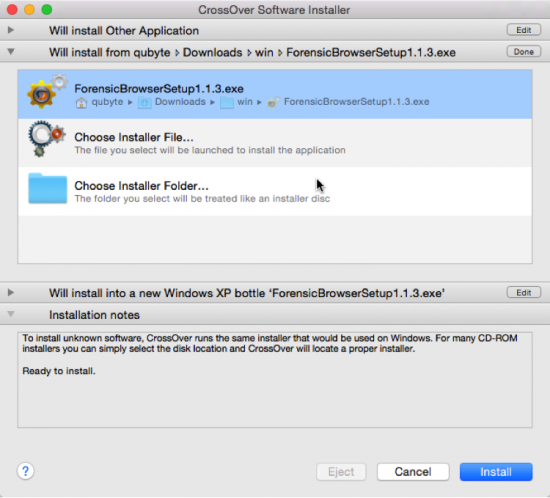
- After clicking Proceed, the CO Software Installer go to the next drop down area ‘Select Installer’. Please select ‘Choose Installer File’ if you are using an Windows executable installer or standalone Windows EXE file. This will prompt you to navigate to the location where you have stored the EXE file.

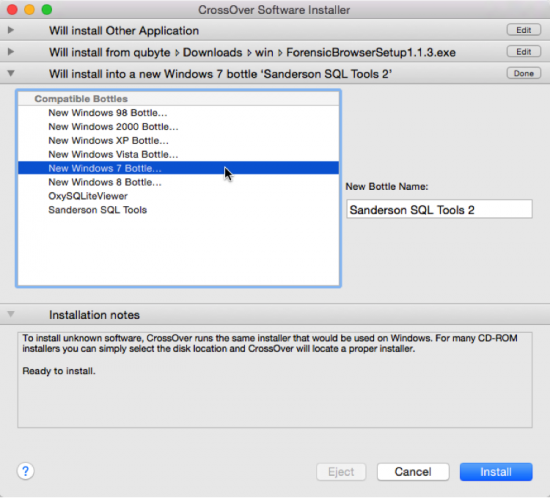
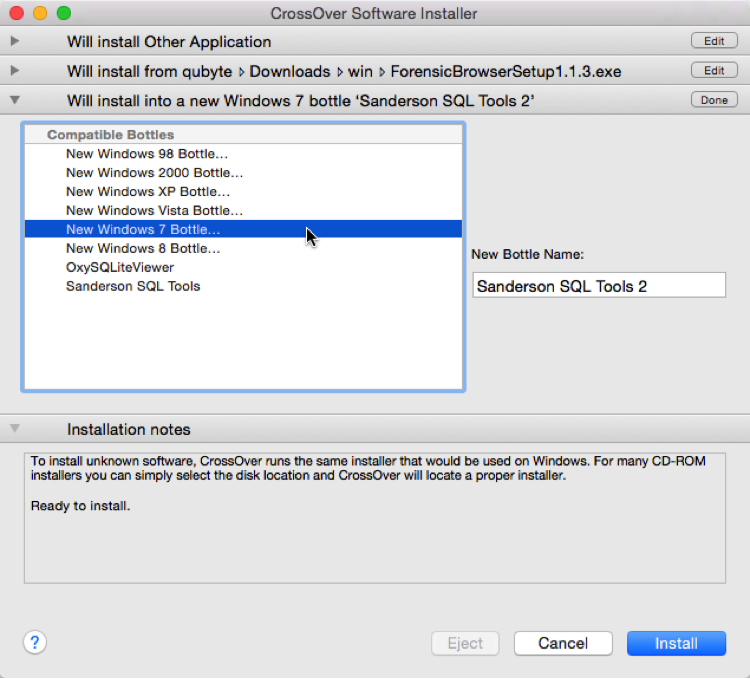
- Highlight the installer and click on ‘Use this installer’. Proceed to the next (third) window area and choose the operating system bottle. The default is Windows XP.
- Highlight the installer and click on ‘Use this installer’. Proceed to the next (third) window area and choose the operating system bottle. The default is Windows XP. Change it from Windows XP Bottle to Windows 7 Bottle AND also give your bottle a name from the default provided. In this case I have renamed my bottle name to Sanderson SQL Tools 2 because I have already installed the Sanderson SQL Tools into its own bottle. The operating system bottle provides the operating system context for the Windows application you are installing.
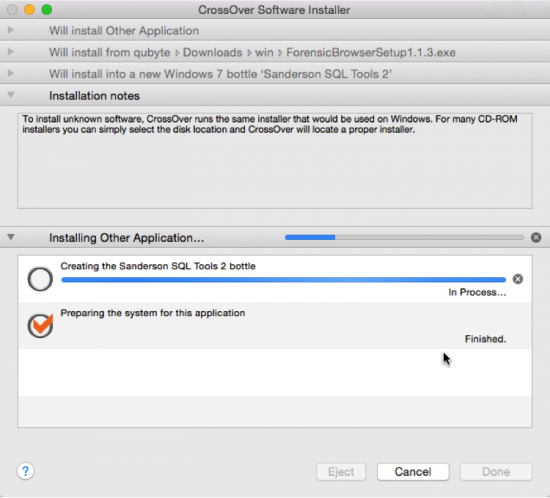
- Now you are ready to install by clicking on ‘Install’. What you should see is confirmation that Sanderson SQL Tools 2 bottle is being created.
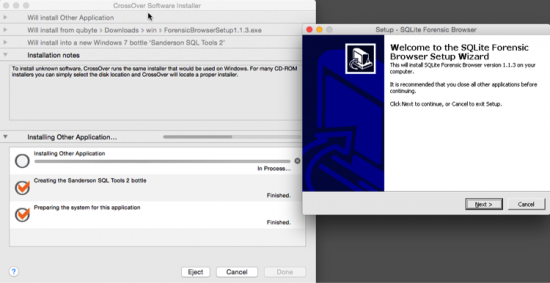
- You should see the familiar setup installer now. Proceed with installing the software as you normally would on a Windows machine. Pretty neat eh?
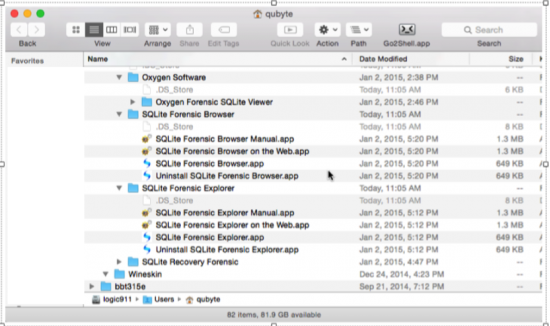
- Your application will be installed to these locations/areas:
9a. The users Application directory. You can see that each software application (and its associated components) is now contained in its own .app file.
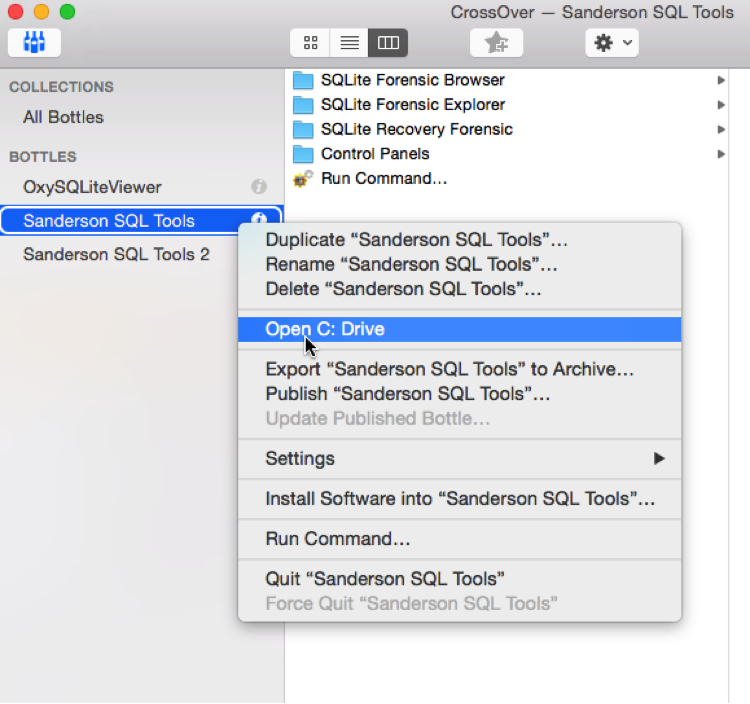
9b. From within the CO Interface that shows the all the bottles, under the ‘BOTTLES’ area highlight a bottle you created and then right click and select ‘Open C: Drive’
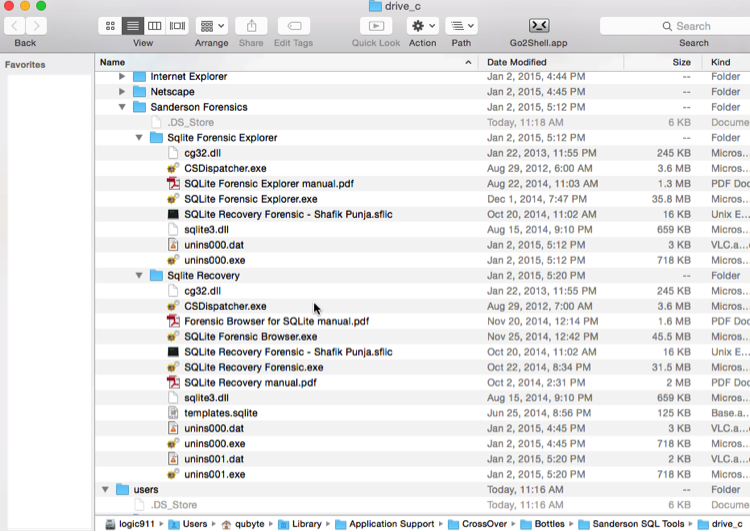
9c. This opens the folder path/location for drive_c. A familiar Windows environment can be observed from the three main root level directories: Program Files, users and windows. Each bottle you create will contain this same basic structure.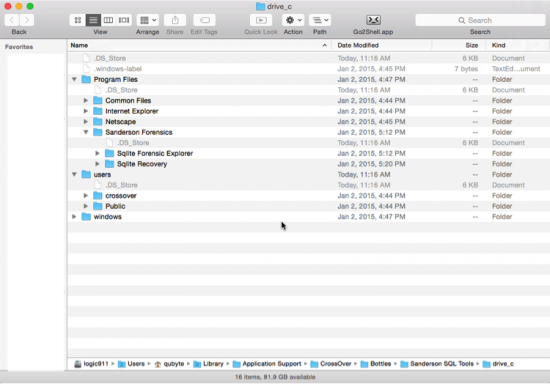
9d. Sanderson SQLite Forensic Toolkit requires software licence to be in the correct application path location, otherwise it will start in a demo mode. Place the .sflic file into the appropriate application folder locations as shown below. Generic path path will be /Mac Volume Name/Users/username/Library/Application Support/CrossOver/Bottles/BottleName/drive_c/Sanderson Forensics/<name of sanderson application>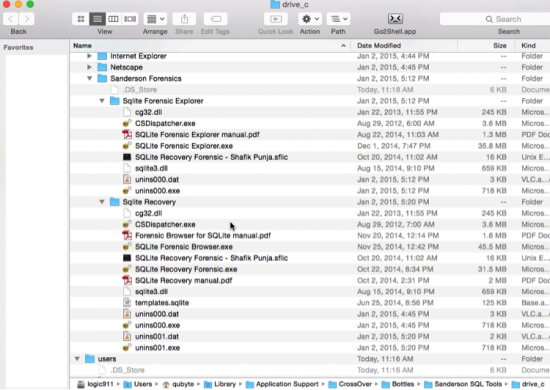
9e. The process to copy the licence file to an application folder for the Sanderson tools, will be the same for any other application that also uses this same method of licence file. Forensic software tools like the standalone version Oxygen Forensic SQLite Database Viewer use a software licence key which can be inserted into the application by a copying the licence key character strings and pasting them into the software interface. - Now let’s start the software. You can invoke the software application in a few different ways:
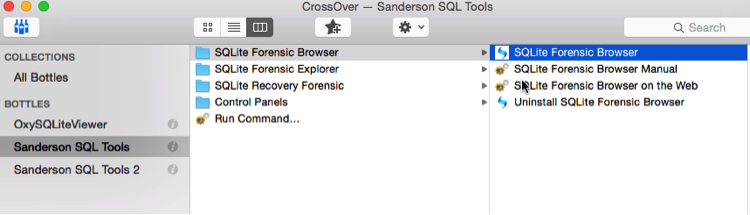
a. The easiest manner is through the CO Interface that shows the all the bottles, highlight the bottle where you application is installed into and select the application. In this case I am choosing to the launch SQLite Forensic Browser.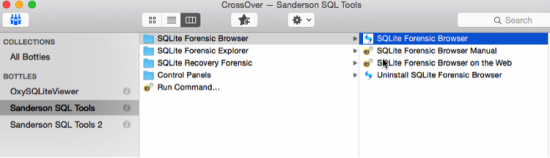
b. The next method is through
/Mac Volume Name/Users/username/Library/Application Support/CrossOver/Bottles/BottleName/drive_c/Sanderson Forensics//name of exe file.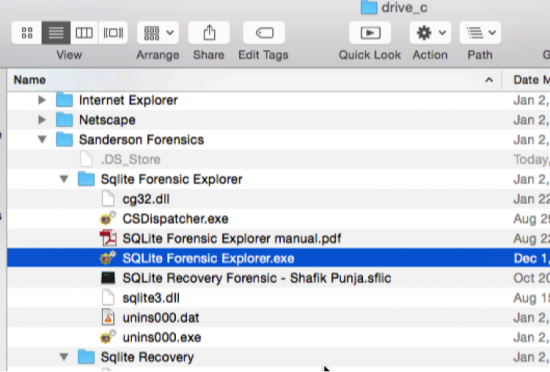 c. The last method is through the path location /Mac Volume Name/Users/username/Applications/CrossOver/SQLite Forensic Browser/SQLite Forensic Browser.app.
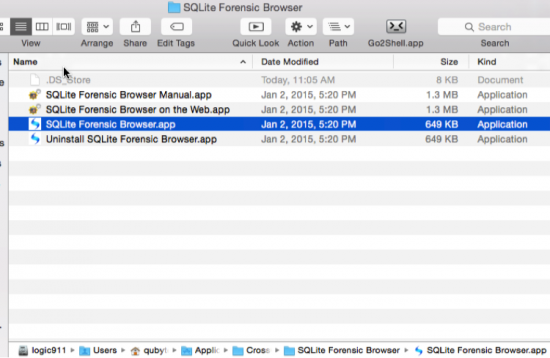
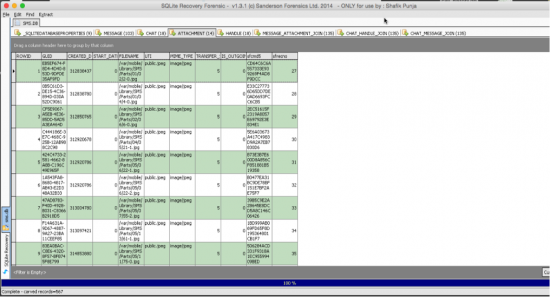
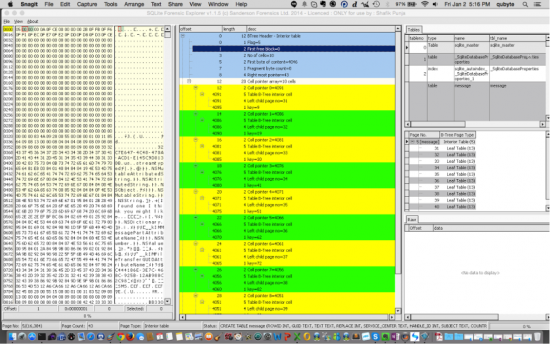
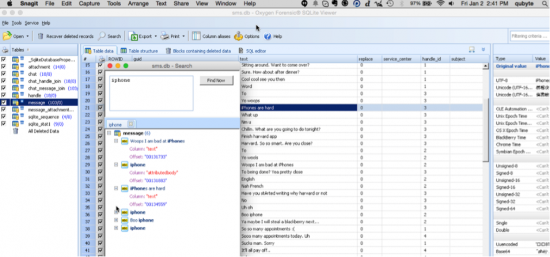
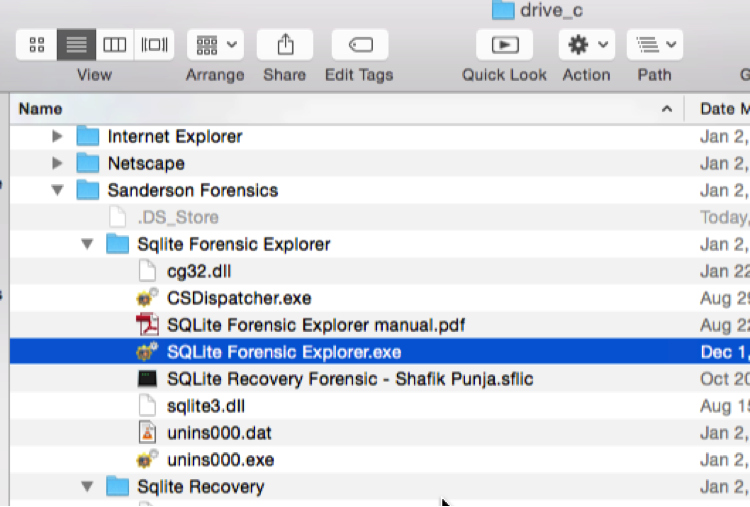
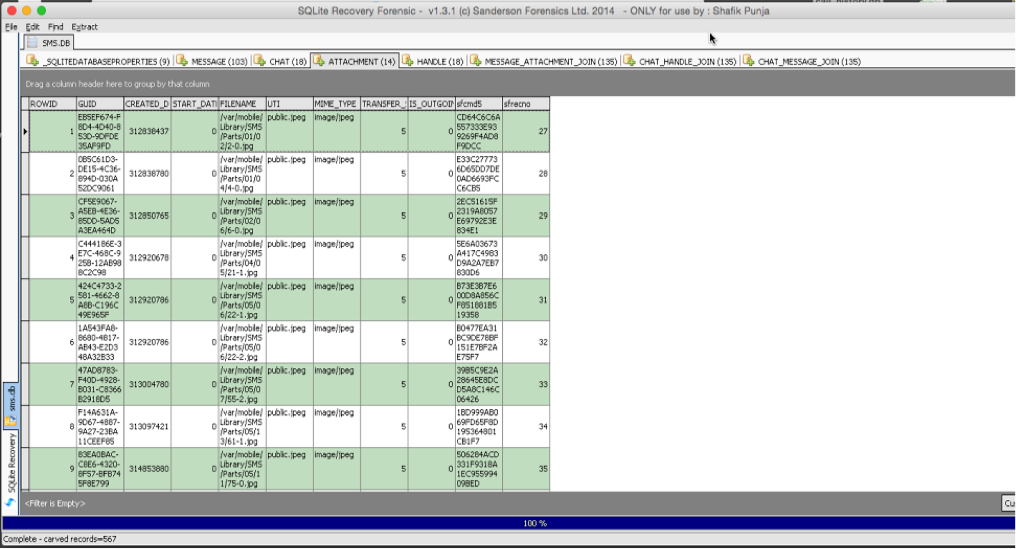
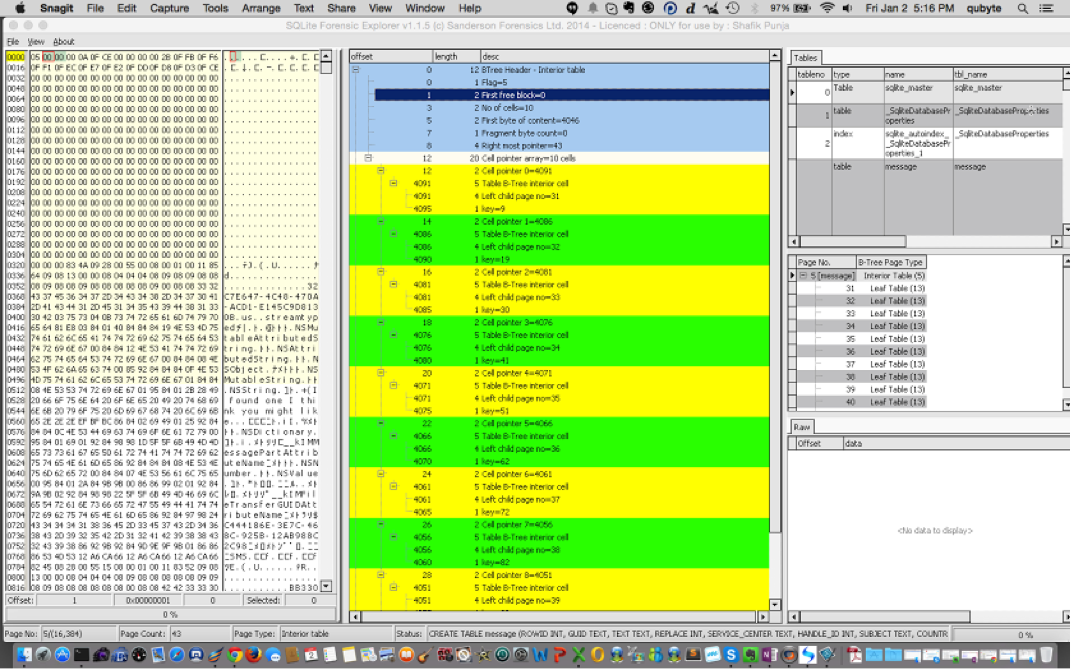
d. Methods b and c are all pointers back to CO Interface that shows the all the bottles.e. The next three screenshots depict the three Sanderson SQLite Forensic Tools working on a Mac OS X MacBook Pro laptop using CrossOver.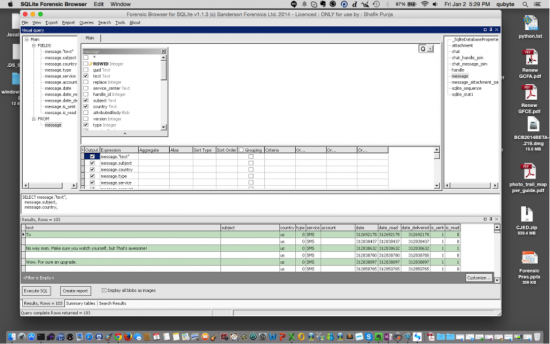
- Now that you have at least one application installed within a bottle you can install the other Sanderson tools you have into the same Sanderson SQL Tools bottle by selecting the bottle you are going to add another application to in the CO interface and right clicking and choosing ‘Install Software into “…..”. This will install another application within the same bottle. I decided to use a bottle for the Sanderson SQL Tools so that all three Sanderson SQLite Forensic Tools are contained with the same bottle. When an update is released to any of these applications I will use the ‘Install Software into’ option to update the software.
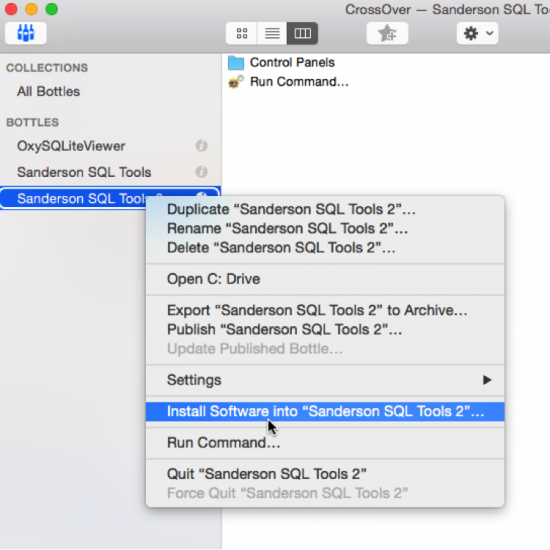
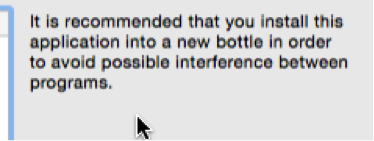
a. But if you are going to install more than application into the same bottle, be mindful of the recommendation by CO, that it is recommended that each application be in its own bottle in order to avoid any conflict between programs. Please be aware that there is more than one method by which to install applications. Essentially you can have each in its own bottle or group them into bottles of a common theme (being aware of the recommendation not to do this).
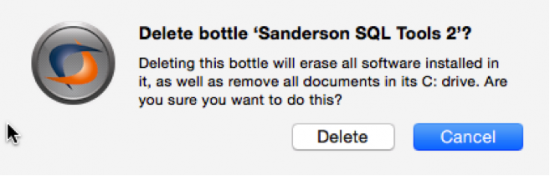
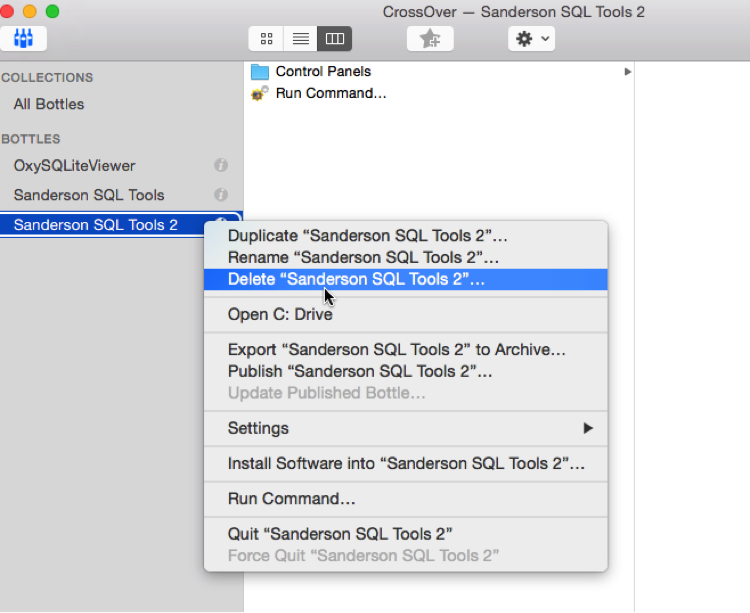
- Uninstalling/Deleting an application: Select the bottle you are going to remove by right clicking in the CO interface and chose ‘Delete “name of bottle”.

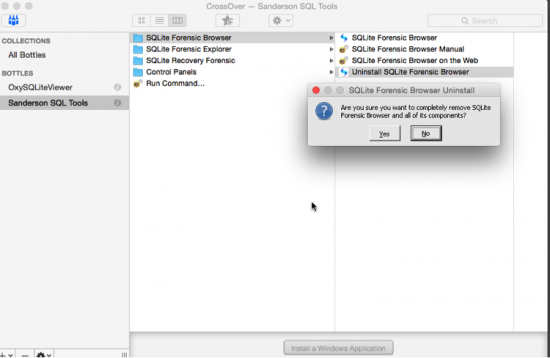
- You can also choose to uninstall an application but keep the bottle by using the Uninstaller for that application if one is present, although, based on my testing this may leave behind trace folders and files in the drive_c path location.
Considerations/Thoughts
- Whilst using CO may not be perfect, as you may encounter application errors, it allows an examiner to explore using their most frequently used Windows forensic tools in a Mac OS X environment without having a Windows operating system installed or without using Parallels, VM Fusion or Virtual Box. Remember that CrossOver creates a port of the Windows application by providing a virtual Windows environment in which the application can be installed and run.
- If your Windows application is not working correctly, remember this: It may not work as designed in an emulated/ported environment, especially if it works fine in the Windows environment. And for this reason please do not go back to the Windows forensic software developer asking them to fix it so it will work in an emulated environment on your Mac or Linux platform. For example the CCL Forensic tools Dunk! and Epilog did not to work through CrossOver. I was not able to start either application nor invoke the ‘Show Hardware ID’.
- Well what about other tools that use dongles? Don’t hold your breath. I have tried the following tools with varying results:
- X-Ways Forensics (XWF): XWF installed fine but the dongle is not recognized, as I suspected, but XWF does start in a no dongle mode which is still useful.
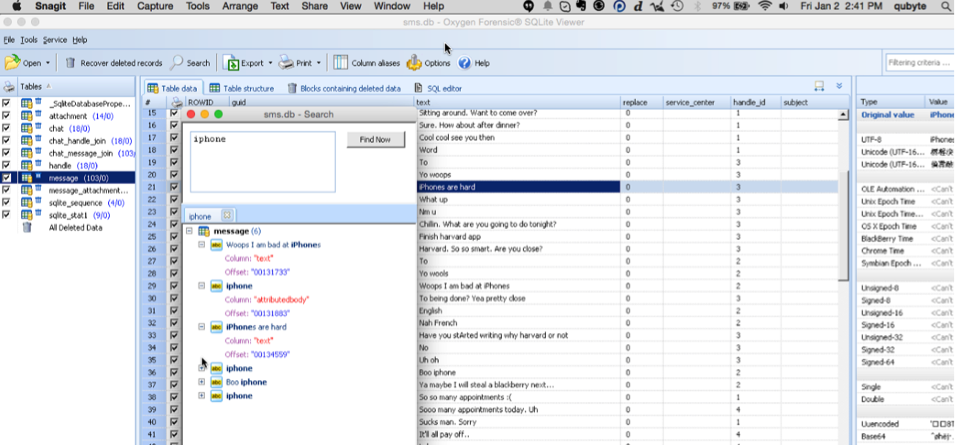
- Oxygen Forensic SQLite Database Viewer (OFSDV): This worked quite nicely in CrossOver.
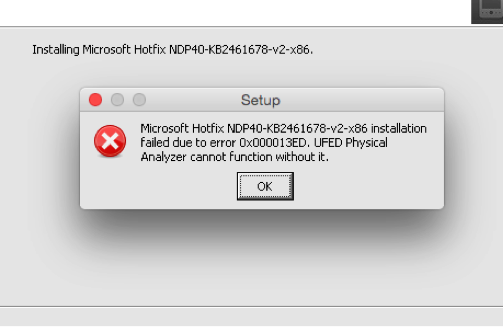
- UFED Physical Analyzer, (UFED PA): This was an interesting experiment in patience. I had to create a Windows 7 bottle called UFED PA and then install the Microsoft .NET Framework 3.5 SP1 as UFED PA requires this. But I could not get past the issue of trying to manually install a Microsoft Hotfix which is also required by UFED PA. So this ended in a sad failure as I love using UFED PA for analyzing mobile phone data.
- My two favourite Windows time/date decoders, Dcode and TimeLord: Both are portable and standalone and did not work. Another sad moment. 🙁
- CCL Forensic Tools Epilog and Dunk!: After trying to get these two tools to work, which they did not, I didn’t bother trying bother with PIP or Rubus. Sorry Alex Caithness! I tried my best at getting these to work as I also like using the tools he has developed.
- FTK Imager: The installation and application appears to work fine
- It seems that software licenced applications will work (if they can be installed) over those that use dongles. For those applications I could not get to work, I may have been using an incorrect approach to the installation.
- Something else that Paul Sanderson noted when I first contacted him about using SQLite Recovery Forensic, on a Mac through CO: “However, the only problem I really see is with SQLite Forensic Recovery as this accesses the different devices (files/image/disk) through a driver and as the disk portion of this is low level through windows/bios subsystems it could cause a problem. I would be surprised if the disk access at physical/logical level works at all, there may be issues with carving from other sources as they go through the same driver – although I would hope these would work.”
His thought should act as a cautionary note for anyone attempting this. Like I mentioned in point # 2 and #3 above, not everything or nothing may work as intended. I have not had an opportunity to use SQLite Recovery Forensic against a disk or disk image but I have used it against SQLite database files in a limited testing capacity with no issues. - CrossOver is not meant to replace your native Windows environment. So don’t go crazy installing every Windows application you can think of because you think you need it. In that case you’re better off going to your Windows system and using it or using TeamViewer (or similar) to access your Windows system.
- Resource Link for CrossOver that you should review: https://www.codeweavers.com/support/wiki/

- Elcomsoft Phone Breaker 11.2: downloads iOS 26 iCloud backups18 June, 2026
- Elcomsoft Phone Breaker 11.1: reliable iCloud backup extraction26 May, 2026
- ElcomSoft Phone Breaker 11: full overhaul of iCloud extraction30 April, 2026
- iOS Forensic Toolkit 10.02 adds agent-based extraction for iOS 2629 April, 2026
- Elcomsoft Quick Triage receives a major update28 April, 2026