iOS Low-Level Acquisition: How to Sideload the Extraction Agent
April 26th, 2022 by Oleg AfoninCategory: «Mobile», «Tips & Tricks»
Regular or disposable Apple IDs can now be used to extract data from compatible iOS devices if you have a Mac. The use of a non-developer Apple ID carries certain risks and restrictions. In particular, one must “verify” the extraction agent on the target iPhone, which requires an active Internet connection. Learn how to verify the extraction agent signed with a regular or disposable Apple ID without the risk of receiving an accidental remote lock or remote erase command.
What’s this all about
Elcomsoft iOS Forensic Toolkit utilizes an advanced low-level extraction technique for imaging the file system and, for many iOS devices, decrypting the keychain. Utilizing the unique extraction agent, this technique is second best to checkm8 extraction. Unlike checkm8, the extraction agent supports iPhone and iPad devices equipped with Apple A12 and newer SoC (this includes the iPhone Xr/Xs and newer, as well as the corresponding iPad models). While agent-based acquisition provides numerous benefits over logical extraction, the extraction agent must be sideloaded onto the device, which poses certain difficulties if you are not using an Apple ID enrolled in the Apple’s developer program. In particular, sideloading the extraction agent with a regular Apple ID only works on Mac computers, and the process requires the expert to “trust” the signing certificate by connecting to an Apple server.
Allowing the device being investigated to make an Internet connection is risky due to potential sync issues and the probability of receiving a remote lock or remote wipe command via Find My. Sideloading the extraction agent with an Apple ID enrolled in Apple’s developer program completely avoids the issue. If a developer account is not available, mitigating this risk is possible by restricting on-device connectivity to a single subdomain of apple.com that is required to verify the signing certificate. We’ll talk about the two methods in detail.
Why you need to become an Apple developer
It’s common knowledge that Apple restricts its mobile ecosystem to apps distributed through the company’s App Store. For obvious reasons, Elcomsoft low-level extraction agent is not available in the App Store, and will never be. A workaround must be used to sideload the extraction agent onto an Apple device being investigated.
Developers use an alternative method of sideloading apps without having to submit them to App Store. This method requires becoming a registered developer by enrolling an Apple ID into Apple’s developer program. You can enroll by using the following link: Enrollment – Support – Apple Developer
Alternatively, you can install the Apple Developer app and enroll through the app: Enrolling and Managing your Account in the Apple Developer App – Support – Apple Developer
You can apply as an individual developer or as a company. In the past, individual and accounts registered as an organization were functionally identical for the purpose of sideloading apps. Recently, Apple limited personal developers in such a way that they can only sideload apps from macOS computers. Accounts registered as an organization accounts do not have this limitation, and can be used to sideload apps from either macOS or Windows computers.
The limit of 100 devices a year
Both types of accounts only allow sideloading to 100 devices of each type a year (for example, 100 iPhones plus 100 iPads plus 100 Apple TV’s and so on). Removing a previously enrolled device does not reset the counter; the limit resets automatically on yearly basis. As a result of this limitation, you will be only able to sideload the extraction agent on up to 100 devices a year for each Apple ID enrolled in the developer program. This and other restrictions, as well as the cost of participation, waiting time, and relatively low acceptance rate make experts consider the use of regular (non-developer) Apple ID’s for sideloading the extraction agent.
Sideloading with a non-developer Apple ID
If a developer account with Apple is not an option, there is a limited possibility to sideload the extraction agent using a regular (non-developer) Apple ID. For this, you would use your personal account or disposable (single-use) Apple ID; not the suspect’s Apple ID. This method has two limitations:
- It is only available if you have a macOS computer (Windows is not supported).
- You will have to validate the signing certificate on the iPhone/iPad, which requires connecting the device to the Internet.
Authentication
There are also differences in how you authenticate depending on the type of account (regular/non-developer, individual developer, or organization) and the host OS of the computer you are sideloading the extraction agent from. In some cases, you will have to create and use an app-specific password, while in other cases your regular account password followed by two-factor authentication must be used. The following table explains the differences.
| Windows | macOS | |
| Non-dev account – normal password+2fa | – | + |
| Non-dev account – app-specific password | – | – |
| Developer (individual) – normal password+2fa | – | + |
| Developer (individual) – app-specific password | * | * |
| Developer (organization) – normal password+2fa | – | + |
| Developer (organization) – app-specific password | + | + |
* feature disabled by Apple; error message “Failed to retrieve development certificate for the entered Team ID. Please check your Team ID and try again”
In a word, if you are sideloading the agent from a Mac, authenticate with your login, password and second authentication factor. If you are using Windows, you will be only able to use a developer account registered as an organization, in which case you can also authenticate with your login and password or use an app-specific password.
Mitigating the risks
As mentioned above, if you use a non-developer Apple ID to sideload the extraction agent, you will have to validate the signing certificate on the iPhone/iPad. This in turn requires bringing the device online, exposing the device to the Internet with all the risks involved. To reduce the risks of exposing the iPhone device being remotely tampered with, one needs to restrict it’s online connectivity. Ideally, the iPhone should be only able to connect to a single certificate validation server – with all other communications being terminated.
Using wireless router
The easiest way is creating a dedicated Wi-Fi network on your wireless router, whitelisting a single server:
Apple Certificate Validation Server: ppq.apple.com (17.173.66.213), port 443.
You can then connect the iPhone to that Wi-Fi network without further ado.
Creating a wired bridge
If you are not familiar with your wireless router settings, or if your wireless router does not allow firewall rules, you may use a Mac computer to create a wired bridge to the iPhone.
Pre-requisites: you will need a Mac computer running macOS 10.14 Mojave or newer. The iPhone being investigated must remain in Airplane mode with all radios switched off until you install the firewall rules.
The firewall script: https://www.elcomsoft.com/download/firewall.zip
You can use your Mac to share the Internet connection with the iPhone while preventing the iPhone from connecting to unwanted services. To do that, you will need to create a simple firewall rule that allows the iPhone accessing the Apple Certificate Validation Server exclusively.
Step 1. Disconnect the Mac from the Internet (disable al wired and wireless connections). Connect the iPhone being investigated to the Mac. Open [Settings] | [Shared] and make sure that Internet Sharing in “To computers using:” contains the “iPhone USB” item.
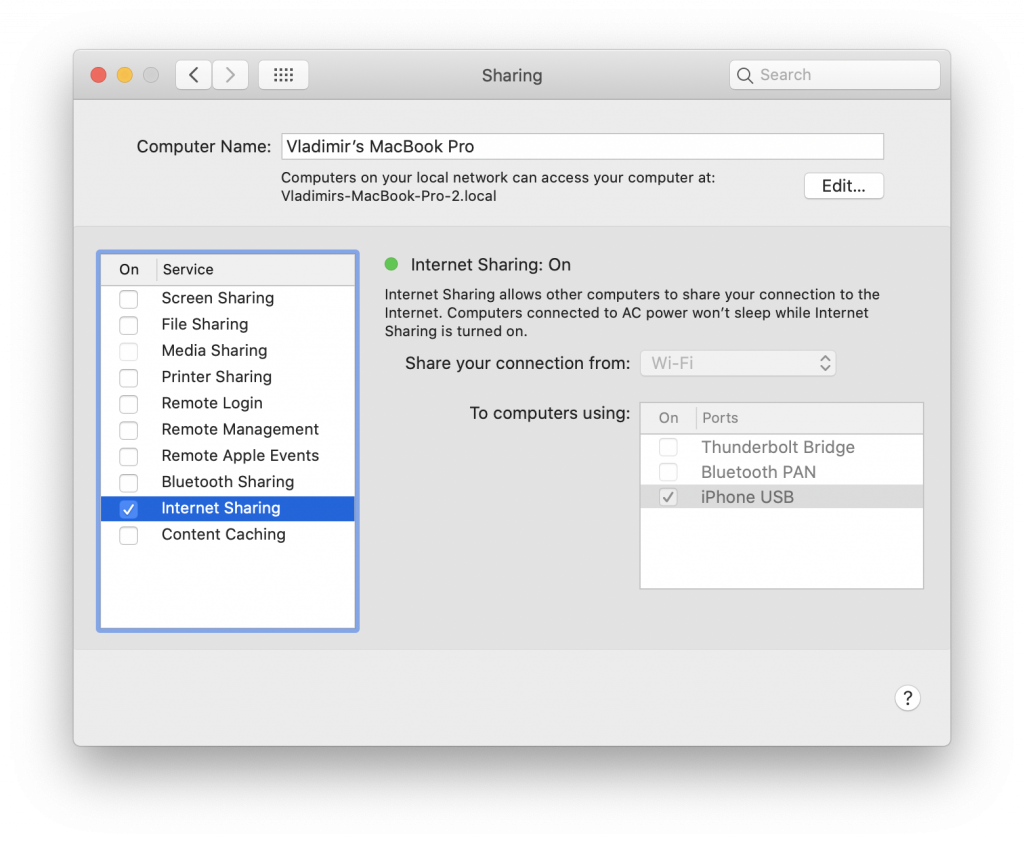
Step 2. Make sure that the iPhone is connected to the Mac, and activate firewall (for this specific interface only, i.e. iPhone USB), allowing access to ppq.apple.com only. That can be easily done by running our script as a root user, e.g.:
sudo ./install_firewall.sh
The script detects all potential bridged connections on the computer, and applies the blocking rules just for them. The computer itself will remain connected to the Internet, while the iPhone connected to the USB bridge will be able to connect to a single server for validating the certificate.
Important: all the changes are made in the computer’s RAM. This means that simply rebooting the computer removes the temporary firewall rules. You can also restore the original configuration without rebooting by running the uninstall_firewall script.
Step 3. Restore Internet connectivity on the Mac.
Step 4. Sideload the extraction agent to the iPhone and enable Internet Sharing to iPhone USB.
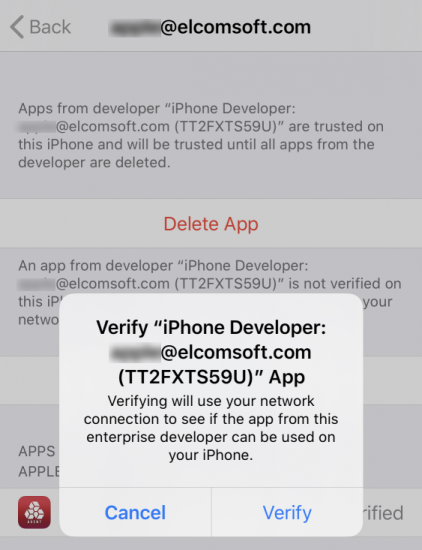
Step 5. Approve/verify the certificate (issued to the Apple ID you used for sideloading the agent).
Step 6. Do the extraction with EIFT.
Step 7. You can uninstall the firewall rules now by running the second script, again as a root user:
sudo ./uninstall_firewall.sh
If you reboot the computer, the original firewall rules will be restored even if you don’t run the second script.
You can also keep the current setup for further extractions (if you ever need to install the agent onto other iPhones). From now on, any iPhone connected to this Mac (after the firewall setup) will only have access to the particular Apple server required for certificate approval; it will not sync (neither the system nor any applications) or have access to any remote lock/wipe commands.
That’s it, you can now acquire the data from the device, including the full file system and keychain.
A new version of iOS Forensic Toolkit is on the way with broader compatibility and greater support for the many iPhone models. Stay tuned!
REFERENCES:

Elcomsoft iOS Forensic Toolkit
Extract critical evidence from Apple iOS devices in real time. Gain access to phone secrets including passwords and encryption keys, and decrypt the file system image with or without the original passcode. Physical and logical acquisition options for all 64-bit devices running all versions of iOS.
Elcomsoft iOS Forensic Toolkit official web page & downloads »

- Elcomsoft Phone Breaker 11.2: downloads iOS 26 iCloud backups18 June, 2026
- Elcomsoft Phone Breaker 11.1: reliable iCloud backup extraction26 May, 2026
- ElcomSoft Phone Breaker 11: full overhaul of iCloud extraction30 April, 2026
- iOS Forensic Toolkit 10.02 adds agent-based extraction for iOS 2629 April, 2026
- Elcomsoft Quick Triage receives a major update28 April, 2026