Preventing BitLocker Lockout and Recovering Access to Encrypted System Drive
April 19th, 2022 by Oleg AfoninCategory: «Tips & Tricks»
Encrypting a Windows system drive with BitLocker provides effective protection against unauthorized access, especially when paired with TPM. A hardware upgrade, firmware update or even a change in the computer’s UEFI BIOS may effectively lock you out, making your data inaccessible and the Windows system unbootable. How to prevent being locked out and how to restore access to the data if you are prompted to unlock the drive? Read along to find out.
Why am I locked out?
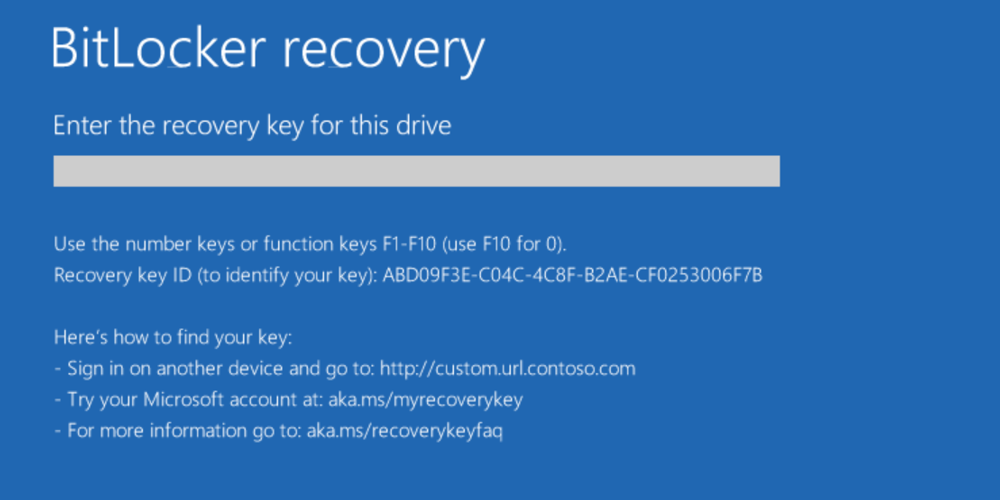
If you are seeing the following screen, you have been locked out of your system because of BitLocker encryption.
The lock-out often occurs if the computer is equipped with TPM, and one of the following things had occurred:
- You removed the disk from the original computer and are attempting to read it on a different device.
- You updated the computer’s UEFI BIOS or installed a firmware update to a certain component such as a video card, fingerprint reader, etc.
- You modified security-related settings in the computer’s UEFI BIOS.
- Root of trust was altered (e.g. by malware).
What can I do if I am locked out?
If you are locked out of your Windows system and are prompted for a BitLocker recovery key, this can mean that the recovery key might be the only option to unlock the disk. If this is the case, read the prompt carefully. In modern versions of Windows 10 (and all versions of Windows 11), such prompts usually have a hint as to when the backup copy of the BitLocker key was produced and where it was stored.
In some cases, there may be other ways to unlock the disk such as a PIN code or password. You can check if this is the case by booting your computer with Elcomsoft System Recovery and examining the BitLocker-protected drive. We have comprehensive instructions here: Unlocking BitLocker: Can You Break That Password? | ElcomSoft blog
If no password is available, Elcomsoft System Recovery will display the following screen:
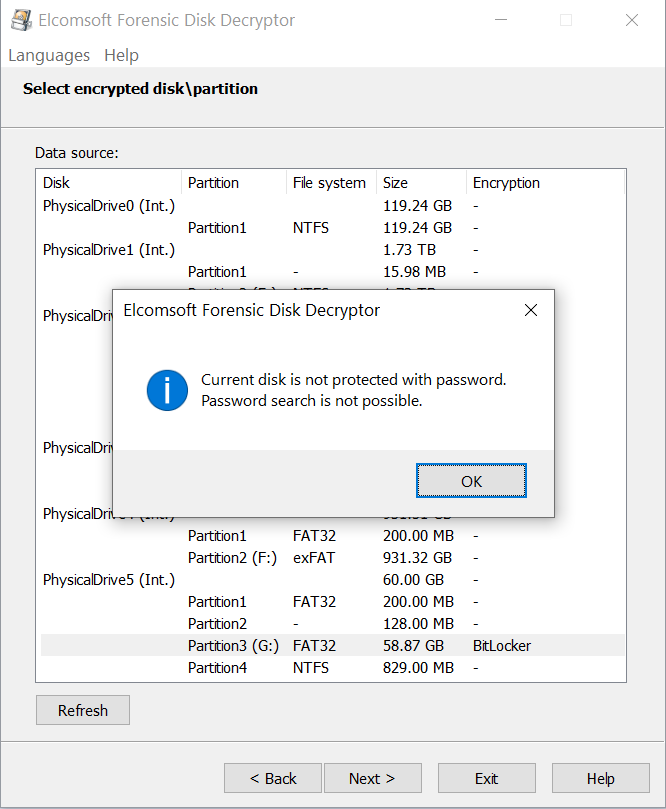
If this is what you see, a BitLocker recovery key is the only way to unlock the encrypted disk.
I do not recall enabling encryption
In certain cases, your computer’s boot drive might be encrypted with BitLocker Device Encryption without you even knowing. According to Microsoft, modern Windows devices are increasingly protected with BitLocker Device Encryption out of the box. In Overview of BitLocker Device Encryption in Windows – Windows security, Microsoft explains how BitLocker Device Encryption works.
Beginning in Windows 8.1, Windows automatically enables BitLocker Device Encryption on devices that support Modern Standby. With Windows 11 and Windows 10, Microsoft offers BitLocker Device Encryption support on a much broader range of devices, including those that are Modern Standby, and devices that run Windows 10 Home edition or Windows 11.
Unlike a standard BitLocker implementation, BitLocker Device Encryption is enabled automatically so that the device is always protected. The following list outlines how this happens:
- When a clean installation of Windows 11 or Windows 10 is completed and the out-of-box experience is finished, the computer is prepared for first use. As part of this preparation, BitLocker Device Encryption is initialized on the operating system drive and fixed data drives on the computer with a clear key (this is the equivalent of standard BitLocker suspended state). In this state, the drive is shown with a warning icon in Windows Explorer. The yellow warning icon is removed after the TPM protector is created and the recovery key is backed up, as explained in the following bullet points.
- If the device is not domain joined, a Microsoft account that has been granted administrative privileges on the device is required. When the administrator uses a Microsoft account to sign in, the clear key is removed, a recovery key is uploaded to the online Microsoft account, and a TPM protector is created. Should a device require the recovery key, the user will be guided to use an alternate device and navigate to a recovery key access URL to retrieve the recovery key by using his or her Microsoft account credentials.
- If the user uses a domain account to sign in, the clear key is not removed until the user joins the device to a domain and the recovery key is successfully backed up to Active Directory Domain Services (AD DS). […] With this configuration, the recovery password is created automatically when the computer joins the domain, and then the recovery key is backed up to AD DS, the TPM protector is created, and the clear key is removed.
- Similar to signing in with a domain account, the clear key is removed when the user logs on to an Azure AD account on the device. As described in the bullet point above, the recovery password is created automatically when the user authenticates to Azure AD. Then, the recovery key is backed up to Azure AD, the TPM protector is created, and the clear key is removed.
In plain English, the important consequences are:
- If your device supports BitLocker Device Encryption (most laptops and some modern desktops do), the system disk will be automatically encrypted. A clear encryption key will be saved in the disk header. At this point, the data on the disk is encrypted, but the volume encryption key is not.
- The clear key is only removed when the BitLocker recovery key is backed up. This is very important: Windows will never remove the clear key without a backup.
- For personal users, a cloud copy of the BitLocker recovery key will be made into the Microsoft account of the first Microsoft account user who signs-in to the computer with administrative privileges.
- For corporate users, Active Directory and Azure AD can be used to back up the BitLocker recovery key.
All this means that if you are locked-out of your BitLocker-encrypted system, there always is a backup copy of the recovery key. Finding that recovery key is often the only way to regain access to the encrypted system.
You (still) have access to BitLocker-encrypted data: preventing the lockout
If you have a working Windows system, and your system drive is protected with BitLocker or BitLocker Device Encryption, you can easily prevent the lock-out by saving your BitLocker recovery key. That Recovery Key can then be used to unlock the encrypted disk regardless of the type of protector used.
Ensuring that you have a BitLocker recovery key available and accessible is crucial to safeguard your BitLocker-encrypted disk. A unique recovery key is produced for every encrypted volume, so make sure to familiarize yourself with the recovery process.
There are generally two ways to save the recovery key, one is using the Windows GUI, and another using the command-line interface.
Saving the BitLocker recovery key through Windows UI
To produce the recovery key, launch the “BitLocker Drive Encryption” applet in the Windows Control Panel. You can do this by either going through the Control Panel, or by typing “bitlocker” in the Windows search and launching “Manage BitLocker”.
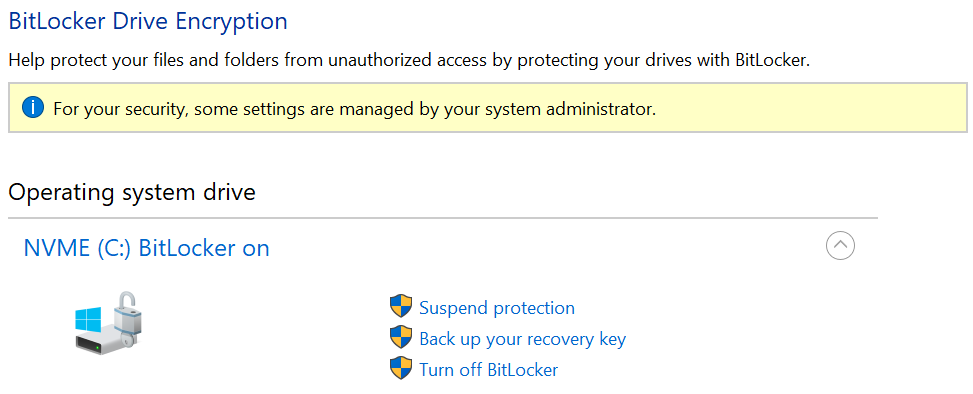
If your system disk is encrypted, you will have several options: Suspend protection, Backup your recovery key, or Turn off BitLocker. To save a BitLocker recovery key, click “Backup your recovery key”. Note: these activities require that your Windows account has administrative privileges.

You will have the opportunity to save the recovery key into your Microsoft account (if you used one for Windows sign-in), save it to a file (preferably onto a USB flash drive, but a folder on an unencrypted disk will do as well), or print it out on a piece of paper.
Note: since Windows 10, version 1903 (or any version of Windows 11) the system will save information about when and where the BitLocker recovery key was backed up. You won’t be able to see that information anywhere but toe BitLocker recovery screen.
Saving the BitLocker recovery key via command-line
Alternatively, you can produce the recovery key by using the command line. Launch the command line with administrative privileges with “Run as administrator”, then type the following command:
manage-bde -protectors -get C:
You will receive the following output:
C:\WINDOWS\system32>manage-bde -protectors -get C:
BitLocker Drive Encryption: Configuration Tool version 10.0.19041
Copyright (C) 2013 Microsoft Corporation. All rights reserved.

Volume C: [NVME]

All Key Protectors

TPM:
ID: {XXXXXXXX-XXXX-XXXX-XXXX-XXXXXXXXXXXX}
PCR Validation Profile:
0, 2, 4, 11

Numerical Password:
ID: {YYYY-YYYY-YYYY-YYYY-YYYYYYYYYYYY}
Password:
123456-123456-123456-123456
Here, the “Numerical Password” field will contain the required recovery key. You can save it into a file or print it out. Make sure to record the corresponding key ID.
Saving the BitLocker recovery key via PowerShell
Windows has a powerful replacement of the classic command line. We created a PowerShell script that extracts all BitLocker recovery keys for all encrypted disks.
Save the script below as a .ps1 file (for example, “backup-bitlocker.ps1”) by creating a text file and pasting the following content:
# Export the BitLocker recovery keys for all drives and display them at the Command Prompt.
$BitlockerVolumers = Get-BitLockerVolume
$BitlockerVolumers |
ForEach-Object {
$MountPoint = $_.MountPoint
$RecoveryKey = [string]($_.KeyProtector).RecoveryPassword
if ($RecoveryKey.Length -gt 5) {
Write-Output ("The drive $MountPoint has a BitLocker recovery key $RecoveryKey")
}
}
Launch the script on the computer with BitLocker drives mounted from a Windows account with administrative privileges. Run PowerShell with “Run as administrator”, then type the name of your script file (e.g. “backup-bitlocker.ps1”). You will see all BitLocker recovery keys as the output.
Preventing BitLocker lock-out when upgrading computer hardware or updating UEFI BIOS
When updating the computer’s UEFI BIOS, removing or installing hardware (such as a video card), or modifying UEFI security settings, your BitLocker-encrypted drive may no longer mount when you attempt to boot Windows. This happens because your computer’s chain of trust is broken (we have a comprehensive article on how it works), and the computer’s TPM module does not release the encryption key.
If you followed the steps from the previous chapter, you already have the BitLocker recovery key, and mounting the encrypted BitLocker drive will be as simple as keying in that recovery key into BitLocker recovery screen. You can identify the required key by its Recovery key ID.

However, this situation can be easily avoided altogether if you simply suspend BitLocker protection temporarily before updating BIOS or altering computer hardware. To suspend BitLocker protection, open the BitLocker applet in the Windows Control Panel and click “Suspend protection”.
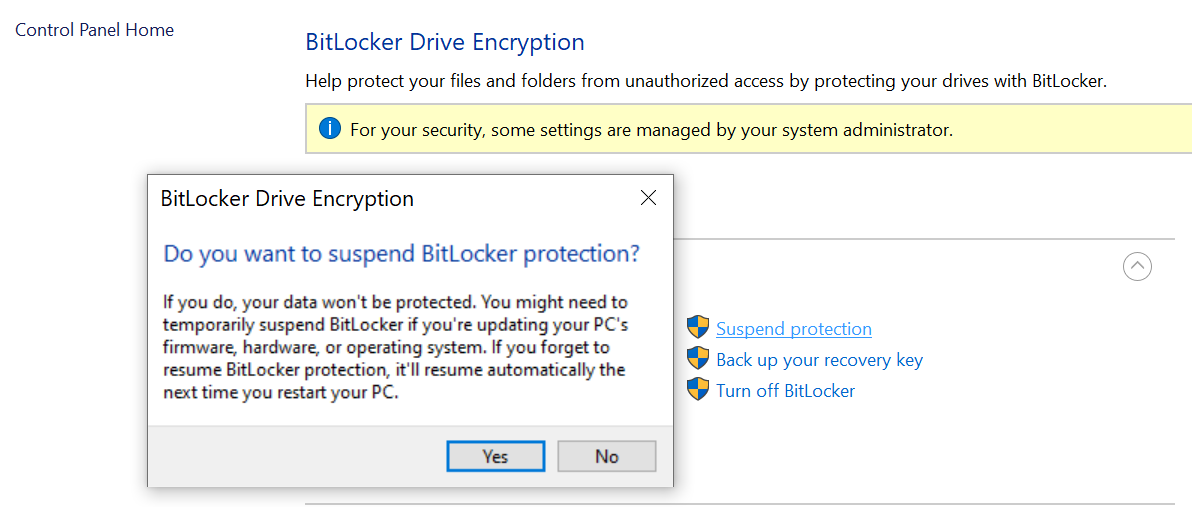
Once you do that, the decrypted volume key is stored in the disk header, allowing the system to pick it up the next time it boots. After suspending BitLocker protection, shut down the computer and perform the planned upgrade or update. When you turn it on, Windows will boot normally, establish a new chain of trust and provision the TPM accordingly. After that, Windows will automatically re-enable BitLocker protection.
You are locked out
If you own the computer that has its system drive encrypted with BitLocker Device Encryption and manage to break the system’s boot chain of trust, you will be unable to boot. If this happens, you will see a screen that looks like the one below:
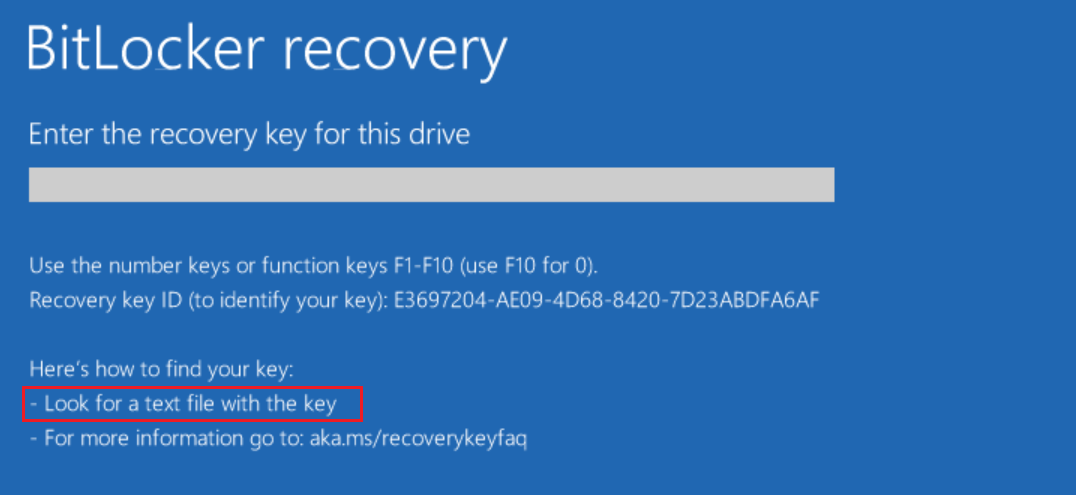
On that screen, Windows is asking you to unlock the drive by providing a valid BitLocker recovery key that corresponds to the displayed Recovery key ID. If you’ve come to that point, there might be no other way to unlock the system but enter the valid recovery key. Your Windows account password or any other password cannot be used to unlock the system drive because the actual binary encryption key is or was stored in the computer’s TPM module. If the TPM module does not want to provide that encryption key, or if the TPM module was reset or re-initialized, you no longer have access to that key. The BitLocker recovery key contains the encoded encryption key that can be used to decrypt and unlock the protected drive.
Important: if the computer was equipped with TPM, there may be no other way to unlock the disk except the BitLocker recovery key.
Where do I get the recovery key?
In Windows 10 and Windows 11 one cannot enable BitLocker encryption without saving a copy of the recovery key. In the case of automatic BitLocker Device Encryption, the recovery key is automatically saved into the cloud account of the first user who signs in as a system administrator with their Microsoft Account (as opposed to a local Windows account).
Important: BitLocker Device Encryption will not be enabled until the first eligible sign-in. It will not be enabled until the BitLocker recovery key is saved into that user’s Microsoft Account.
So where do you get the BitLocker recovery key? If you are using a recent version of Windows 10 or any version of Windows 11, you will get a hint as to the location of the recovery key. According to Microsoft, “BitLocker metadata has been enhanced in Windows 10, version 1903 or Windows 11 to include information about when and where the BitLocker recovery key was backed up. This information is not exposed through the UI or any public API. It is used solely by the BitLocker recovery screen in the form of hints to help a user locate a volume’s recovery key. Hints are displayed on the recovery screen and refer to the location where the key has been saved. Hints are displayed on both the modern (blue) and legacy (black) recovery screen. This applies to both the boot manager recovery screen and the WinRE unlock screen.” BitLocker recovery guide (Windows 10) – Windows security | Microsoft Docs
According to Microsoft, this is where you can find the recovery key:
In your Microsoft account: Sign in to your Microsoft account on another device to find your recovery key. If other users have accounts on the device you can ask them to sign in to their Microsoft account to see if they have the key.
On a printout you saved: Your recovery key may be on a printout that was saved when BitLocker was activated. Look where you keep important papers related to your computer.
On a USB flash drive: Plug the USB flash drive into your locked PC and follow the instructions. If you saved the key as a text file on the flash drive, use a different computer to read the text file.
In an Azure Active Directory account: If your device was ever signed in to an organization using a work or school email account, your recovery key may be stored in that organization’s Azure AD account associated with your device. You may be able to access it directly or you may need to contact a system administrator to access your recovery key.
Held by your system administrator: If your device is connected to a domain (usually a work or school device), ask a system administrator for your recovery key.
Conclusion
Read more about BitLocker protection and BitLocker recovery in our blog:
Unlocking BitLocker Volumes by Booting from a USB Drive
Unlocking BitLocker: Can You Break That Password?
Understanding BitLocker TPM Protection
REFERENCES:

Elcomsoft Distributed Password Recovery
Build high-performance clusters for breaking passwords faster. Elcomsoft Distributed Password Recovery offers zero-overhead scalability and supports GPU acceleration for faster recovery. Serving forensic experts and government agencies, data recovery services and corporations, Elcomsoft Distributed Password Recovery is here to break the most complex passwords and strong encryption keys within realistic timeframes.
Elcomsoft Distributed Password Recovery official web page & downloads »

Elcomsoft Forensic Disk Decryptor
Elcomsoft Forensic Disk Decryptor offers forensic specialists an easy way to obtain complete real-time access to information stored in popular crypto containers. Supporting desktop and portable versions of BitLocker, FileVault 2, PGP Disk, TrueCrypt and VeraCrypt protection, the tool can decrypt all files and folders stored in crypto containers or mount encrypted volumes as new drive letters for instant, real-time access.
Elcomsoft Forensic Disk Decryptor official web page & downloads »

Elcomsoft System Recovery
In order to preserve digital evidence, the chain of custody begins from the first point of data collection. Elcomsoft System Recovery employs a forensically sound workflow to ensure that digital evidence collected during the investigation remains court admissible. The workflow implements read-only, write-blocking access to the target computer, and saves collected evidence in the form of digitally signed, verifiable disk images, making Elcomsoft System Recovery a viable alternative to hardware-based write blocking disk imaging devices while offering real-time access to crucial evidence.


- Elcomsoft Phone Breaker 11.03: universal binary for Macs, SMS two-factor authentication restored16 July, 2026
- iOS Forensic Toolkit 10.10 adds pairing-free sideloading of the extraction agent24 June, 2026
- Elcomsoft Phone Breaker 11.2: downloads iOS 26 iCloud backups18 June, 2026
- Elcomsoft Phone Breaker 11.1: reliable iCloud backup extraction26 May, 2026
- ElcomSoft Phone Breaker 11: full overhaul of iCloud extraction30 April, 2026