Do you think you know everything about creating and using backups of Apple iOS devices? Probably not. Our colleague and friend Vladimir Bezmaly (MVP Consumer security, Microsoft Security Trusted Advisor) shares some thoughts, tips and tricks on iTunes and iCloud backups.
iPhone Backups
Mobile phones are everywhere. They are getting increasingly more complex and increasingly more powerful, producing, consuming and storing more information than ever. Today’s smart mobile devices are much more than just phones intended to make and receive calls. Let’s take Apple iPhone. The iPhone handles our mail, plans our appointments, connects us to other people via social networks, takes and shares pictures, and serves as a gaming console, eBook reader, barcode scanner, Web browser, flashlight, pedometer and whatnot. As a result, your typical iPhone handles tons of essential information, keeping the data somewhere in the device. But what if something happens to the iPhone? Or what if nothing happens, but you simply want a newer-and-better model? Restoring the data from a backup would be the simplest way of initializing a new device. But wait… what backup?
Users in general are reluctant to make any sort of backup. They could make a backup copy once after reading an article urging them to back up their data… but that would be it. Apple knows its users, and decided to explore the path yet unbeaten, making backups completely automatic and requiring no user intervention. Two options are available: local backups via iTunes and cloud backups via Apple iCloud.
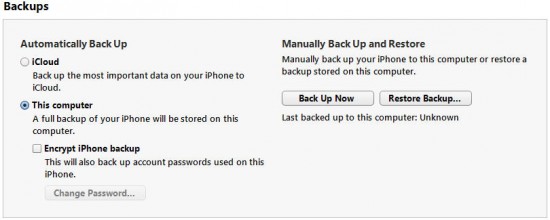
Figure 1 Making backups
With Apple, it’s an either-or scenario. Should we choose local backups for more security or take the iCloud option for more versatility?
The choice is yours. iTunes or iCloud? Local or cloud storage? Or both? The answer depends on your own priorities and considerations. Do you place higher value to convenience or security? Privacy or accessibility? In this article we’ll discuss both options in detail, allowing you to make a weighed decision.
iTunes
Apple posted several Knowledge Base articles on iTunes backups:
The first KB article contains information on what data, exactly, is stored in a backup, where these backup files are on the computer, how to delete redundant files, how to protect backups with a password, and some other information.
The second article discusses both local and cloud storages, and describes the process of creating and restoring backups.
A local backup is creates as follows:
- Automatically when syncing with iTunes (disabled if iCloud backups are enabled);
- Manually with a right click (or Ctrl + right click) on an iOS device name in iTunes, then selecting Create Backup from the pop-up menu.
Apple backups are different, so please note:
- Unlike other systems such as Windows Phone or Android, you may not choose which types of data will be backed up. iTunes will always create the almost complete copy of your device.
- The almost complete copy does not include content synced with the device, including movies, music, podcasts and applications.
- Physically, the backup is not created as a single file. Instead, iTunes creates a number of files in a proprietary format. Users have no tools to do anything meaningful with the data contained in these backups; they can only restore them onto a device.
- The backup can be protected with a password. Interestingly, in Apple security model, the password is a property of the device rather than the backup. There is a major difference between password-protected and non-password protected backups that is not directly related to security (more on that later).
- Backups created from different types of devices such as iPhone, iPad or iPod Touch feature the same structure but are only partially compatible. Just to give an example, when recovering information from an iPad backup to an iPhone or iPod Touch (or vice versa), the system will not restore photos.
- For each device, the system maintains a single backup (unless you manually copy files from the backup folder to another location before creating a fresh backup).
Local backups are old-school technology, and can be preferred over the cloud technology if any of the following applies to you:
- You are using the PC with iTunes all the time.
- You don’t have an iCloud account or you simply don’t trust the cloud (after all, your peace of mind is at least as important as actual security).
- You want to supplement iCloud backups with a local copy.
- You want to ensure that your data is securely protected against third party access (of course, this implies restricted access to your computer).
- Your Apple device uses iOS 4 or older (which means cloud backups are unavailable).
- The amount of information stored in your device is more than available cloud storage.
Creating a local backup for the very first time requires entering device password. iTunes will request you to “unlock your device” with a passcode. The devil is in the detail. Subsequent backups on the same computer will not require a passcode. Moreover, if are you somehow able to access the computer, you can copy a single small file, place it to another PC and backup the iOS device without being requested a passcode. You don’t even have to know the file name as you can simply use a tool called Oxygen Forensic Suite, which will be discussed below.
iCloud
Official information about iCloud backups is rather scarce:
iCloud backups are automatic; you’ll only need to enable them once on your device via Settings > iCloud > Storage and backups. The device will be backed up daily if all of the following conditions are met:
- The device is connected to the Internet via Wi-Fi
- The device is connected to a power source
- The screen is locked
Of course, you can also initiate a backup manually if the device has a Wi-Fi connection. This can be done via Settings > iCloud > Storage and backups > Create backup.
There are several things to consider.
- You are only allocated 5 GB of storage free of charge per Apple account, regardless of the number of Apple devices. If you run out of space, you can purchase additional storage capacity, up to 55 GB in total.
- Three last backup copies are stored for each device registered to your Apple account.
iCloud backups are perfect for those who want to make backups without connecting to a local PC. iCloud backups are right for you if any of the following applies to you:
- You prefer your backups to be created automatically on your behalf every time you charge your iPhone within the range of a Wi-Fi network.
- You enjoy the ability to restore information anywhere with a Wi-Fi connection.
- You don’t have a desktop computer or use it occasionally.
- You want to have a spare backup (in addition to iTunes).
- You are not a CIA employee, so top secrecy is not your primary concern.
In order to configure your device to create or restore iCloud backups, you will need your Apple ID and password. Apple ID credentials are securely protected and fiercely guarded. Apple ID passwords are never stored or transmitted in plain text. It’s impossible to break, as Apple will lock your account after a certain unspecified number of unsuccessful attempts. Of course, it can be recovered with social engineering or simply guessed if you re-used the same password over multiple accounts and documents that could be much easier to break.
iTunes and/or iCloud?
So which backup method will you prefer? Each has its strengths and weaknesses.
iCloud backups are created automatically without requiring the connection to your PC. They can be made every time you come home and plug your phone into a charger. You can supplement iCloud backups with local copes by making a full iTunes backup on a monthly basis. We’ll discuss the convenience of having a local copy later on.
Storage capacity is an important consideration. With iCloud, you only get 5 GB of free storage, and can top your account at 55 GB regardless of the number of devices you have registered on that account. With Apple devices ranging from 8 GB to 128 GB memory and considering that most Apple users have at least two devices (e.g. an iPhone and an iPad), you can quickly outgrow even the 55 GB maximum.
Cost of storage is another consideration. At the time of this writing (March 2014), Apple charged about $20 per 10 GB of storage a year (current pricing at http://support.apple.com/kb/HT5879), with a $100 annual plan if you opted for the maximum storage capacity of 55 GB (including the 5 free gigabytes).
Another thing to consider is the fact that iCloud may store certain application data such as Apple Pages/Numbers/Keynote (for Windows users, these are Microsoft Office lookalikes), as well as some data belonging to third-party applications. These files are not directly connected with backup copies. The only thing Apple wants you to do with these files is using them with their respective application. You can also delete them, but that’s it. There is no Apple tool to copy these files to a local PC, for example. On the other hand, you can access these files from any Apple device registered with the same Apple ID.
Speed is yet another consideration. Local backups are fairly quick. A typical local backup is usually created in 5 to 15 minutes depending on how much information you have. Cloud backups are significantly slower. Initial backup or restore can take many hours (subsequent backups are faster as they are incremental). Their speed is limited by the speed of the cloud storage, which is far from amazing and is much slower than your typical DSL or cable Internet connection.
If you ask me, I have a firm preference for both backup methods. iCloud and iTunes backups are not mutually exclusive. It’s true you can’t configure them both to occur automatically. However, you can set up your phone to make cloud backups automatically, and manually create iTunes backups every now and then.
Passwords
Passwords are an important topic that must be covered separately. There is no question as to whether or not you should password-protect and encrypt your backups. You most definitely should. However, make sure to remember your password! This is no joke. The password is only entered once when configuring the backup. With time passing by, it’s easy to lose track of the password you used to create your backup, forgetting all about it when it comes to restoring the data. With no password, the backup will be utterly useless.
Okay, not “utterly useless”. There is a theoretical possibility to recover the password with specialized software, which will be discussed later on, but it’s much easier (and faster!) just to keep the password in your head.
What happens if you lost your backup password and were unable to recover it? The backup is then officially utterly useless. There is no way to reset the password. It’s a property of a device rather than a property of a certain file. As a result, in order to reset the password you’ll need to reset your Apple device, losing all information along the way. Write your password down, remember where you put it, and make sure not to lose it.
Make sure you have clear understanding of the fact that setting a backup password means that all backup copies of that device, all of them with no exception, wherever and whenever you make them, will be protected with that same password up to the moment you change it. And, you can only change that password by entering an old one. Even if you don’t need your old backups, you cannot “reset” the password without knowing the old one or resetting the device, losing all data in the process and having no ability to restoring from a password-protected backup.
Keychain: a Key to Your Secure Deposit Box?
iOS has a highly secure system storage called “keychain”. The keychain is somewhat similar to Windows Registry. The keychain stores the following data:
- Secure certificates
- Tokens (e.g. Twitter, Facebook etc.)
- Browser stored passwords
- Mail passwords to all mail accounts
- Wi-Fi passwords for all networks a device was connected at least once
- Passwords, tokens and certificates stored by various applications
In the context of this article, we’ll mention that the keychain is present in both password-protected and non-password protected versions of backups. However, the security implications are vastly different and non-obvious for these cases.
If the backup is password-protected, the keychain is encrypted with the backup password. This is common practice and barely worth mentioning.
If, howeer, the backup is not protected with a password, you won’t get the keychain stored there unencrypted. Instead, the keychain is being encrypted with a hardware sort of key (or, to be precise, with a key specific to a particular device). This encryption key is persistent to the device and can never change, even if you perform a full factory reset. Obtaining this key is extremely difficult and not always possible depending on the model. However, if you got that key, you can decrypt the keychain for all future backups, even created after resetting the device.
So what is the practical meaning of this?
If you made an unencrypted backup and want to restore it onto the same Apple device, no problem. The device-specific keychain encryption key remains the same throughout the life of the device, so you’ll get your keychain items back.
The problem begins when you attempt to recover your backup onto a different device (e.g. after upgrading to a new model, or if your old device grows legs). If your backups are not password-protected, the keychain remains encrypted with a highly secure key specific to your old device. As a result, keychain items will NOT be available on your new Apple device.
If, on the other hand, your backup WAS password-protected, the keychain is encrypted with that password and will be restored to a new device without a sweet (that is, if you still remember the password).
Keychain and iCloud
Before going any further, I’ll say that iCloud backups are identical in their content to a local backup with no password protection. According to Apple, iCloud backups are intended for a sole purpose of restoring a device after factory reset or initializing a new device. You can only restore cloud backups onto a freshly initialized device, either new from Apple store or immediately following a factory reset.
You can’t restore from a backup over existing content. Consider the backup to be a “disk image” of a sort (although the backup itself occurs on a file system level). Just as you can’t write a disk image without overwriting content previously available on that disk, you cannot restore Apple backups without destroying content previously available on the device.
Now, considering that iCloud backups are not password-protected, the keychain stored in the cloud is encrypted with a hardware-specific key. Therefore, you can easily recover secured items from the keychain onto the same device, but cannot do the same for a new device. As a result, iCloud is not a perfect backup solution when upgrades and changes in hardware are concerned.
Consider another argument in favor of keeping local backups. As you can only use iCloud restore via Wi-Fi and not via 3G or iTunes via your PC, your recovery options become even more limited. This is yet another argument in favor of local backups.
How iCloud Backups are Stored
Did I say that the content of iCloud backups is identical to that of local backups? While this is true content wise, the actual storage format is quite different between local and cloud backups. We won’t go into much technical detail, so let’s just make a few points:
- In iCloud, all files are split into chunks
- The chunks are encrypted, but encryption keys are stored side by side with the chunks
- On a physical level, Apple uses Microsoft Azure and Amazon clouds. Apple does not specify whether two copies of each backup exist and are stored on both servers (more reliable) or if parts are stored on Microsoft servers and other parts on Apple servers (more secure).
- Backups are incremental. Every time a subsequent backup is made, the server received only the differences.
- Three last backups are kept
- iCloud backups are not subject to two-step authentication
- Encryption is not dependent on Apple ID and password, which are only used for authentication
- Apple always backs up the full content of the device. You cannot select categories to back up or to skip, as e.g. in Windows Phone.
One Password Lost, Another Broken
The reasons of having passwords protecting your backups are now apparent. But what are you going to do if you lost it? You won’t be able to change the password without entering an old one, and you won’t be able to restore from a password-protected backups without entering the password. Bummer.
Of course, you may have partial solutions available. You can, for example, reset the device and restore it from the cloud backup, then enter a new password for local backups. But what if you don’t have a cloud backup? Or what if you no longer have the original Apple device and are trying to initialize a replacement? If this is the case, the keychain will not be restored onto the new device. Finally, what if you are investigating a crime and have no password available? Whatever the cause, there is a solution: Elcomsoft Phone Password Breaker (EPBB).
This tool can access data stored in password-protected backups produced by all models of iPhone (up to and including iPhone 5S), iPad (including iPad Mini and Air), iPod Touch, and some non-Apple devices such as BlackBerry.
Elcomsoft Phone Password Breaker can brute force a password or use a smart dictionary attack. If you remember anything about the password (e.g. the minimum length, or whether or not you used the numbers, capitals or special characters), EPBB can use that information to speed up the recovery. Finally, if your computer is equipped with a gaming video card made by AMD or NVIDIA, Elcomsoft Phone Password Breaker will make use of its powerful GPU’s to speed up the recovery (no joke, a single mid-range video card can increase the speed of breaking passwords some 10 or 20 times).
Of course, Elcomsoft Phone Password Breaker can also decrypt the keychain; in particular, it can show passwords to mail accounts, Web sites and third-party applications.
If you are running Elcomsoft Phone Password Breaker on a PC that has iTunes installed, EPBB will display the list of all backups to all iOS devices synced to that computer, complete with their names, versions and phone numbers.
If iTunes is not installed (or if you are breaking a backup you manually copied from a different PC), you’ll need to specify path to “manifest.plist” from the backup file you are recovering. As noted above, an AMD or NVIDIA video card can greatly speed up the recovery, so if you have a choice, go with a PC with a faster video card rather than one with a faster CPU.
If you’re about to use a dictionary attack, EPBB supplies English, German and Russian dictionaries at C:\Program Files (x86)\Elcomsoft Password Recovery\Elcomsoft Phone Password Breaker.
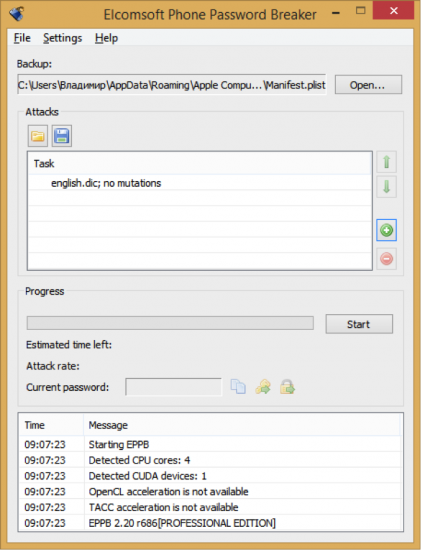
Figure 1: Main windows of EPPB
If you click +, you will get…
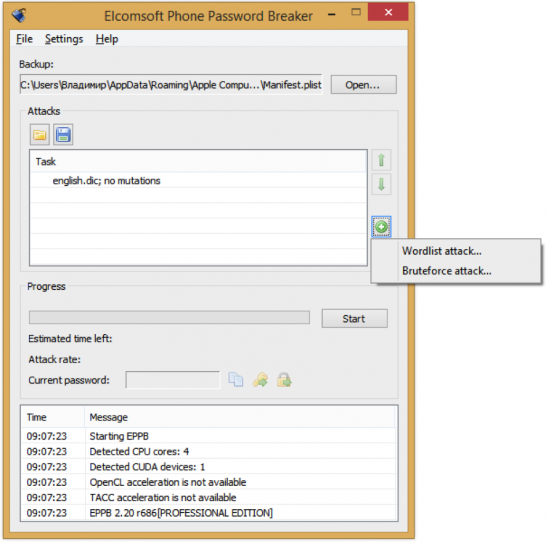
Figure 2: The type of attack
If choosing Wordlist attack, you’ll be able to pick the dictionary next.
Additional dictionaries are available:
- http://www.uinc.ru/forum/faqs/wordlist.shtml
- http://www.outpost9.com/files/WordLists.html
- http://wordlist.sourceforge.net/
- http://www.insidepro.com/eng/download.shtml
- http://www.passwords.ru/dic.php
If you choose Bruteforce attack, prepare to wait: even with GPU acceleration hardware, the recovery speed is not blazing fast.

Figure 3: Password recovery speed
As you can see from Figure 4, the current maximum recovery speed is about 50,000 passwords per second.
A dictionary attack is shown on the following figure.
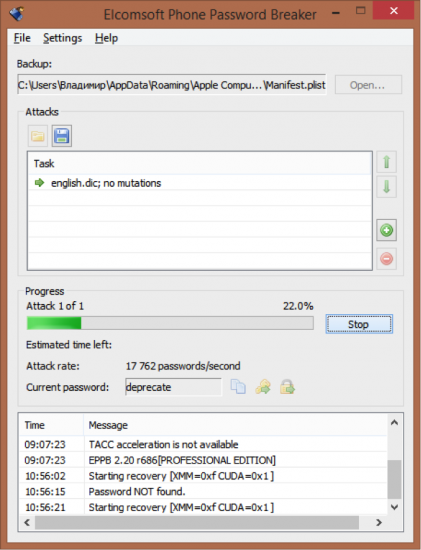
Figure 4: Wordlist (dictionary) attack
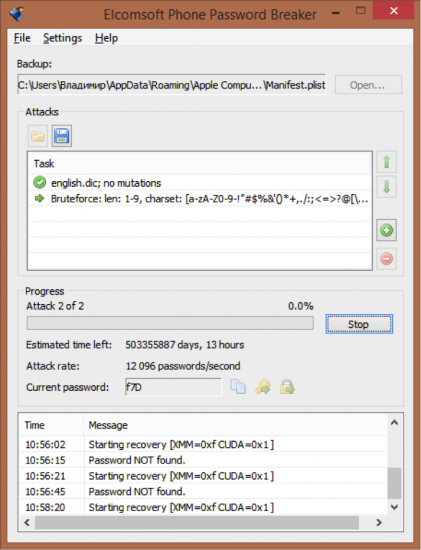
Figure 5: Brute force attack
You can optimize brute force attack by supplying known information about the password. For example, you can specify password length or range (1 to 9 characters) and provide included character sets. If you know for sure the password did not contain any numbers or special characters, you can speed up the recovery by removing these sets.
Reaching the Cloud
As you remember, Apple does not provide any tools to work with data backups. All you can do with a backup is restoring it onto a fresh device.
Elcomsoft Phone Password Breaker is the only publicly available tool to download backups from the iCloud, either saving iCloud backups in the same binary format as local iTunes backups (good for forensic analysis) or extracting all individual files with their original names (good for getting just the files you need).
When connected to the cloud, EPBB lists all backups of all devices registered on the same Apple ID, including serial numbers and names of these devices. Three last backups are available.
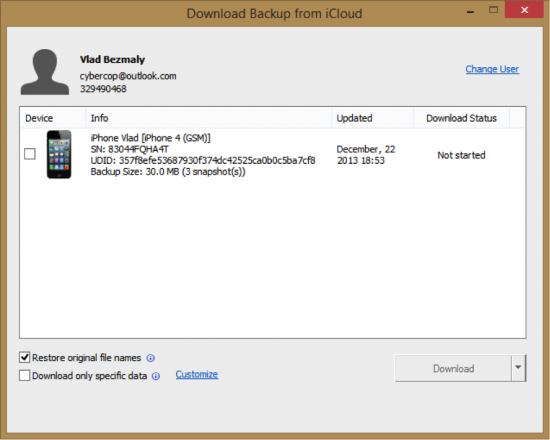
Figure 6: Downloading backups from the iCloud
If you opt to download individual files by checking the Restore original file names option, you’ll be able to specify categories to download (e.g. only download the address book, call log, SMS database etc., as shown in Figure 8).
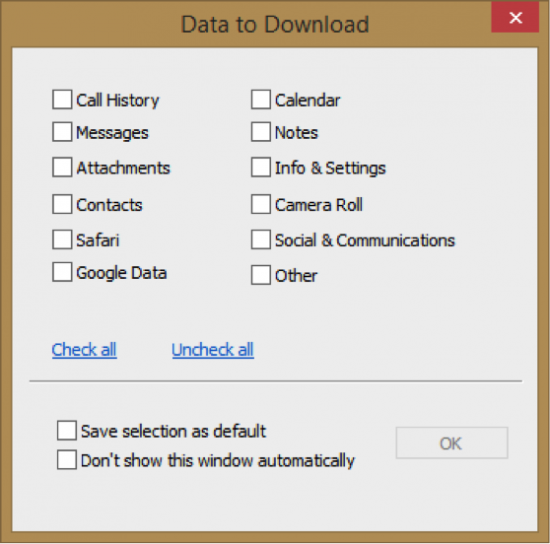
Figure 7: Specifying categories to download
Let’s See What’s Inside
Apple is different, and so are its backups. Unlike Android or Windows Phone, iOS backups contain a lot of interesting data.
iOS backups include virtually the whole content of your iPhone (except iTunes library), and store some of your personal information. According to Apple KB, backups contain the following data:
- Address books and favorite contacts
- App Store data
- Application parameters, preferences and data
- Form fill data for Web pages
- CalDAV and signed calendar accounts
- Calendar accounts
- Calendar events
- Call history
- Pictures
- The list of purchased applications
- Keychain
- External sync sources (Mobile Me, Exchange ActiveSync)
- Microsoft Exchange account settings
- Mail accounts
- Network accounts and settings (Wi-Fi, VPN settings)
Although the files have a binary structure, non-password protected local backups as well as iCloud backups are not encrypted (except keychain data). In fact, they are merely two-item sets in a popular SQLite database format. Don’t worry if you don’t understand its format or can’t view browse the internal files. The only thing that really matters is the fact that these backups contain a lot of your personal information stored on your PC in plain, unencrypted format.
The backup folder contains files with long, binary-looking names. Each file is a named as a hex value with 40 registers. There is no extension. A sample file name can look like this: f968421bd39a938ba456ef7aa096f8627662b74a.
This 40-digit hexadecimal file name is a SHA1 hash of a string in the “DomainName-filepath” format, where DomainName is a corresponding name of a database (don’t confuse it with a www.something.com domain name), while “filepath” is a path to the file. In iOS 5, all applications and system data belongs to one of the 12 domains (including 11 system domains and 1 application domain). The list of system domains is available in the /System/Library/Backup/Domains.plist file on your iPhone.
iPhone backups store lots and lots of information about the user. Table 7 lists some files that are normally analyzed by forensic experts.
| File name |
Description |
| AddressBook.sqlitedb |
Contacts and personal information (name, email, date of birth, occupation etc.) |
| AddressBookImages.sqlitedb |
Contact pictures |
| Calendar.sqlitedb |
Calendar and events |
| Call_history.db |
Incoming and outgoing call history, including phone numbers and call time |
| Sms.db |
Sent and received SMS and MMS messages including time and date |
| Voicemail.db |
Voice mail messages |
| Sfari/Bookmarks.db |
Browser bookmarks |
| Safari/History.plist |
Internet search history |
| Notes.sqlite |
Apple Notes data |
| Maps/History.plist |
Map search history |
| Maps/Bookmarks.plist |
Stored map locations |
| consolidated.db |
This DB contains geolocation coordinates of network base stations the device was connected to, complete with time and date. Discovered by independent researchers some 2.5 years ago, analyzing this database allowed visualizing historic geolocation information of the device:http://www.geeky-gadgets.com/iphone-tracker-app-allows-you-to-read-your-consolidated-db-21-04-2011/Today, this file contains data going back to a very limited time. |
| En_GB-dynamic-text.dat |
Keyboard cache |
| com.apple.accountsettings.plist |
Apple Email accounts data |
| com.apple.network.identification.plist |
Wireless network information (IP address, router IP, SSID and time stamps) |
Probably the most exciting thing stored in the backup is the keychain. The keychain contains mailbox passwords (Fig. 9), Wi-Fi passwords (Fig. 10), cached Web site passwords, and a lot of other sensitive information. If you are using iCloud backups, the keychain can only be restored onto the same device it was backed up from. In order to restore the keychain to a different device (or view it on your computer), you’ll need a password-protected local backup (and you’ll need to know the password). If you have those, Elcomsoft Phone Password Breaker will display the content of the keychain:
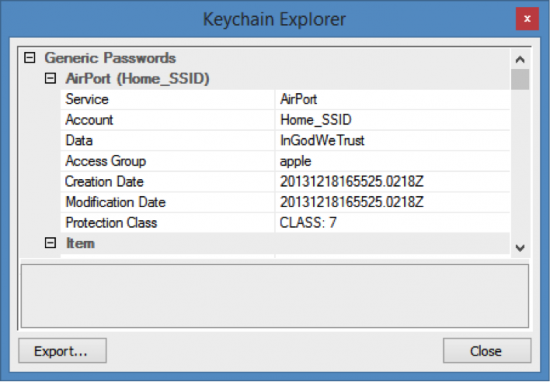
Figure 8: Wi-Fi password
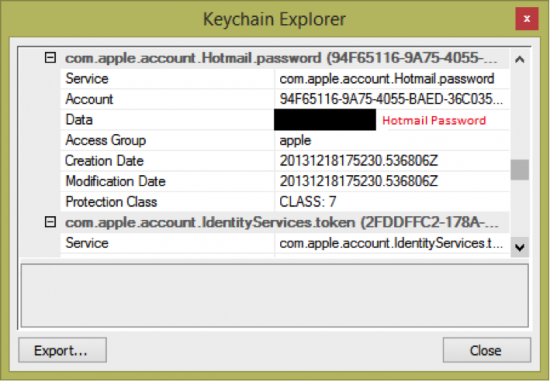
Figure 9: Hotmail password
Note If you were using two-factor authentication to access your mailbox, social account or other resources, the password retrieved from the keychain will not do much as you’ll be able to use it without the secondary authorization factor only from the original device.
Interestingly, not all resources are keeping passwords. Twitter and Facebook, for example, are storing tokens after the first successful authorization. These tokens cannot be used to recover the original password. However, using these tokens to log in to these resources is theoretically possible.
Important If you recover a device from an iCloud backup, the registered email account of the corresponding Apple ID will receive a message notifying that the device has been recovered from a backup copy. Interestingly, if you download the backup with Elcomsoft Phone Password Breaker, the notification message is not sent.
Mobile Forensics
When performing forensic analysis of a mobile backup, you’ll probably need to extract all information down to the last bit. If this is the case, you’ll need the backup in the original iTunes format (e.g. a local backup or one retrieved from the iCloud with the option to restore original files disabled). In addition, you’ll need a mobile forensic tool to analyze the backup such as Oxygen Forensic Suite (http://www.oxygen-forensic.com/). We used the latest version of this tool in its most advanced “Analytic” edition.
System Requirements
To run Oxygen Forensic Suite, you’ll need a PC running a 32-bit or 64-bit version of Windows XP, Vista or Windows 7.
An iTunes backup can be imported into Oxygen Forensic Tools directly if it has no password or if the password is known. If the backup is protected with an unknown password, we’ll need Elcomsoft Phone Password Breaker to recover the password.
After importing the backup into Oxygen Forensic Suite, we can see a lot of interesting information.
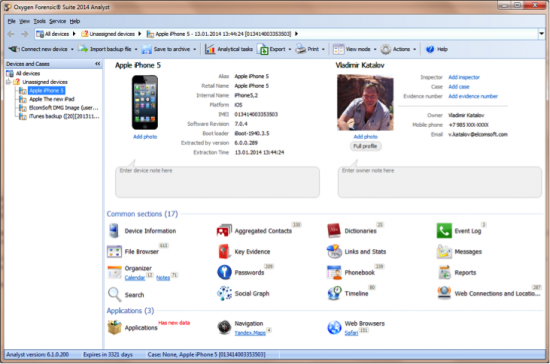
Figure 10: iTunes backup in Oxygen Forensic Suite
Interestingly, Oxygen Forensic Suite can recover and display deleted text messages and certain other types of information. This is possible because text messages (as well as many other types of records) are stored in a SQLite database. When deleting information, SQLite does not erase the content of the record immediately. Instead, blocks belonging to deleted records are moved into a special area until used by the database to store another record.
Oxygen Forensic Suite comes with some of the most powerful analytic functionality available on the forensic market. This, for example, enables you to extract contacts from all possible data sources (not just the address book).

Figure 11: Communication circle
The powerful analytic features of Oxygen Forensic Suite will help forensic experts during investigations. Experts can view communication circles of the device owner, trace his or her routes by mapping historical geolocation, and do much more.
iBackupBot
Another tool that can parse iTunes backups is iBackupBot (http://www.icopybot.com/itunes-backup-manager.htm ). This tool doesn’t come close to Oxygen Forensic Suite when analytic features are concerned, and only supports iOS backups (while Oxygen Forensic Suite recognizes several thousand devices). Unlike Oxygen Forensic Suite, iBackupBot cannot be used for mobile forensic purposes.
However, if you need is a tool to peek inside an iTunes backup, control and manage your iOS devices, iBackupBot may be the right tool for you.
iBackupBot for iTunes allows managing information stored in iOS backups, and offers control over iPad, iPhone and iPod devices. You can also use iBackupBot for iTunes to modify iTunes backups.
With iBackupBot for iTunes on your computer it is easy to:
- Browse through all critical backup files and quickly find the ones you need;
- View, edit and export your files with iBackupBot’s built-in plist Editor, Text Editor, Hex Editor, Database viewer, Image viewer, SMS Message Viewer, Notes Viewer, Call History Viewer, Address Book Viewer and more.
- Browse, view and export media files with iBackupBot’s built-in Media Browser, media files include: photos from camera roll, voice memo, voicemail, multimedia SMS message and media file of APPs.
Before iBackupBot for iTunes, your only option was to restore all of your files to your iPad, iPhone or iPod touch. Now, you can select, view and even modify files before you replace them on your handheld device.
Note Edits are made to a backup copy and not to the device. You can restore your iOS device using the modified backup. Do note, however, that random edits to a backup file being restored to your iOS device can brick the device.
System Requirements
- iTunes 8.0 or later
- iPad/iPad 2/iPhone/iPhone 3G/iPhone 3GS/iPhone 4/iPhone 4S/iPod Touch/iPod Touch 2G/iPod Touch 3G/iPod Touch 4G with iOS 2.0 or later.
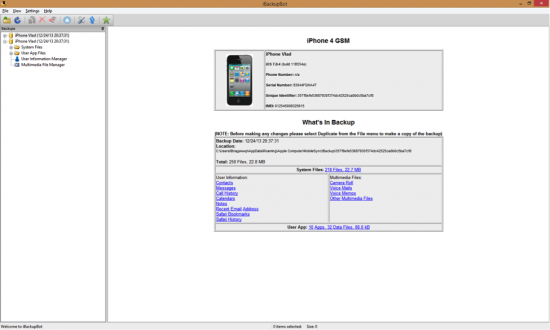
Figure 12: iBackupBot main window
Transferring SMS, MMS and iMessages from an iPhone to the PC
iBackupBot can help you copy SMS, MMS and iMessages from your iPhone to a Windows or Mac PC.
You can export SMS, MMS and iMessages into a SQLite database, Excel spreadsheet or CSV file.
- Back up your iPhone with iBackupBot or iTunes.
- Select a backup in iBackupBot, go to User Information Manager and switch to Messages tab.
- Click Export to select export format and file name:

Figure 13: Exporting messages
You’ll get an Excel file containing all your text messages.
You can use a similar procedure to export address books and other items. You can edit them and import into the same or another iPhone.
Speaking of mobile forensics, you can extract a lot more information by making the complete copy of a device by performing physical acquisition. Physical acquisition extracts more information than is contained in backup files, and enables experts to recover deleted files. In order to perform physical acquisition, you’ll need a different tool such as Elcomsoft iOS Forensic Toolkit (http://www.elcomsoft.com/eift.html). However, physical acquisition is a big topic well suited for a separate article.
Conclusion
So what is the final conclusion on iOS backups?
- If you own an iPhone, iPad, or iPod, having a backup of your data is a must.
- Best practice: let your device make daily iCloud backups, and create local backups manually at bi-weekly.
- Using a password to encrypt your local backup is a must.
- Make sure the password is at least 8 characters long and contains characters from at least three character sets from the four sets available (small and capital letters, numbers, special characters).
- Keep your backup password in a safe place. Losing that password effectively makes your backups useless.
- Exercise care when using third-party software to edit your backups. By making careless edits and restoring a modified backup, you can brick your device.
- Don’t assume that any degree of security in Apple devices means absolute safety of your information.
- iCloud backups are available at least to Apple, Microsoft and Amazon. You don’t know who else may have access to them.
- We analyzed iOS backups and concluded that if you are using a smartphone, any talks about reasonable privacy or protection of your personal information must be taken with a grain of humor.
- There is no single choice between convenience, security and privacy. Apple’s implementation of personal data protection is not ideal, but still bests many other solutions. Just make sure to understand the risks and take preemptive measures.
Source (in Russian): http://www.osp.ru/win2000/2014/02/13039465/
Apple, backup, Elcomsoft Phone Password Breaker, GPU acceleration, iBackupBot, iCloud, iPhone, iTunes, Oxygen Forensic Suite, password cracking, password recovery


