Breaking VeraCrypt: Obtaining and Extracting On-The-Fly Encryption Keys
June 3rd, 2021 by Oleg AfoninCategory: «General»
Released back in 2013, VeraCrypt picks up where TrueCrypt left off. Supporting more encryption algorithms, more hash functions and a variable number of hash iterations, VeraCrypt is the default choice for the security conscious. VeraCrypt has no known weaknesses except one: once the encrypted disk is mounted, the symmetric, on-the-fly encryption key must be kept in the computer’s RAM in order to read and write encrypted data. A recent change in VeraCrypt made OTF key extraction harder, while the latest update to Elcomsoft Forensic Disk Decryptor attempts to counter the effect of the change. Who is going to win this round?
Applicability
The RAM imaging and key extraction attack described in this publication is aimed at live system analysis. If a running PC was acquired with an authenticated session during the time the encrypted container is mounted, you may be able to dump the content of the computer’s RAM into a file and scan that file for on-the-fly encryption keys used in multiple encryption tool (BitLocker, TrueCrypt, VeraCrypt, PGP disk and PGP WDE). The absolute requirement is that the encrypted disk or container is mounted (unlocked) during the RAM dumping process.
Why VeraCrypt is tough
There is no lack of encryption tools and crypto containers. BitLocker, LUKS, FileVault 2 and multiple third-party tools can protect one’s data. What makes VeraCrypt so special?
It’s about the choice of hashing and encryption methods that aren’t stored in the disk header in any way. Attacking BitLocker, LUKS or FileVault 2 is straightforward: read the disk header, figure out the encryption algorithm and KDF (Key Derivation Function), set up an attack and wait. Depending on the hash algorithm and the number of hash iterations specified in the KDF, attacks may run faster or slower, but they never get particularly slow.
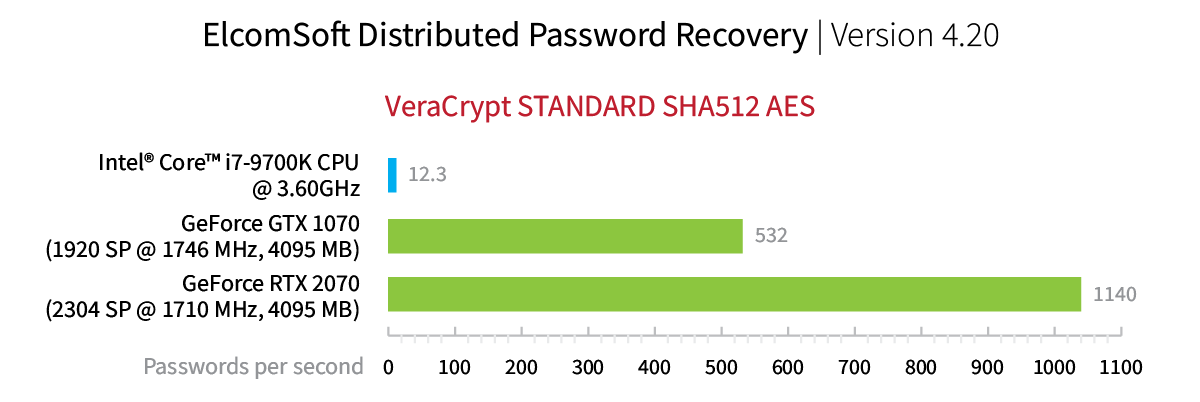
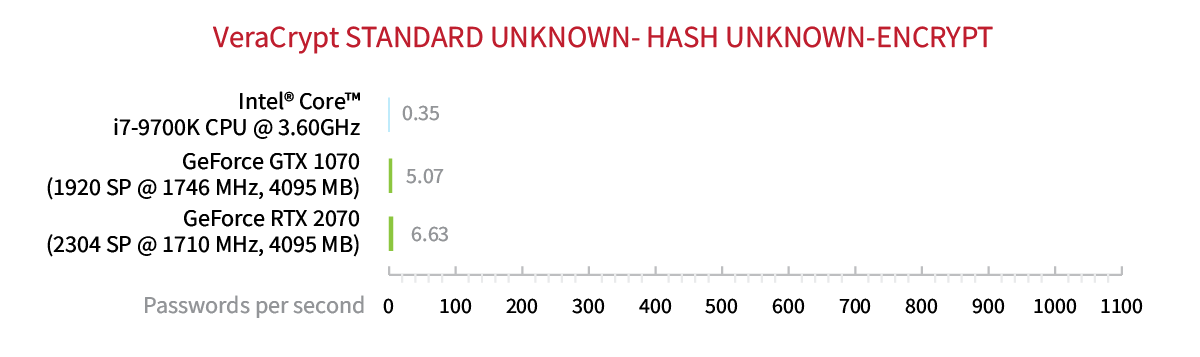
In VeraCrypt, information about the encryption algorithm or the KDF is never saved in the disk header. When encrypting the disk, users have the choice of 15 encryption algorithms (including combinations) and 5 hash functions. That makes it 15×5=75 possible combinations of symmetric ciphers and one-way hash functions to try. If you don’t know exactly which cipher and which hash function has been used to encrypt the container, you’ll have to try all of the 75 combinations during the attack starting with the default combination of AES-256 encryption and SHA-512 hash function. Either way, the attack is going to be slow. Very slow, even if the default combination of cipher and hash has been used. To give you an idea, the default combination (AES-256+SHA-512) can be attacked at a rate of 1140 passwords per second with a single NVIDIA RTX 2070 board. The same board delivers the speed of only 6.63 passwords per second if you know nothing about the hash function or the encryption algorithm.
In addition to the choice of encryption algorithms and hash functions, VeraCrypt offers yet another dimension for securing the data. When creating an encrypted disk, the user can opt to use a non-default number of hash rounds (this is used in the Key Derivation Function to turn the password string into a binary key). In Strong security for the Paranoid, VeraCrypt developers define this feature in the following way:
PIM stands for “Personal Iterations Multiplier”. It is a parameter that was introduced in VeraCrypt 1.12 and whose value controls the number of iterations used by the header key derivation function. This value can be specified through the password dialog or in the command line.
If no PIM value is specified, VeraCrypt will use the default number of iterations used in versions prior to 1.12 (see Header Key Derivation).
When a PIM value is specified, the number of iterations is calculated as follows:
For system encryption that doesn’t use SHA-512 or Whirlpool: Iterations = PIM x 2048
For system encryption that uses SHA-512 or Whirlpool, non-system encryption and file containers: Iterations = 15000 + (PIM x 1000)
Prior to version 1.12, the security of a VeraCrypt volume was only based on the password strength because VeraCrypt was using a fixed number of iterations.
With the introduction of PIM, VeraCrypt has a 2-dimensional security space for volumes based on the couple (Password, PIM). This provides more flexibility for adjusting the desired security level while also controlling the performance of the mount/boot operation.
Needless to say that VeraCrypt does not store the number of hash rounds in the disk header. If the user specifies a non-standard PIM value, the already slow attacks start falling apart. Now, in addition to trying the 75 combinations of hash functions and encryption algorithms, you’ll have to try all reasonable PIM values. With all this uncertainty, validating just a single password could take from several seconds to several minutes. Obviously, this rules out brute-force attacks completely, emphasizing the importance of small, targeted dictionaries that can be compiled from the list of the user’s other passwords.
The easier way
The only weakness of VeraCrypt and all other crypto containers except disks encrypted with Apple T2 chip are on-the-fly encryption keys (OTF keys). The binary, symmetric encryption key is stored in the computer’s volatile memory at all times while the encrypted disk is mounted. This is by design: the encryption key is required in order for the encryption tool to read and write encrypted data. Fixing this weakness took Apple a dedicated security processor, the T2 chip that handles the encryption internally without leaking the encryption keys to the computer’s RAM. Since VeraCrypt does not (and cannot) use T2, the encryption keys are in fact stored in the computer’s RAM. By extracting these keys, examiners can instantly mount or decrypt encrypted disks without running password attacks and bypassing the associated complexity altogether.
Until recently, extracting VeraCrypt OTF encryption keys was straightforward. Dump RAM image on the computer where the encrypted disk is mounted, bring the memory dump to your own computer, launch Elcomsoft Forensic Disk Decryptor and process the dump. In counted minutes (or several hours if the host computer has lots of RAM) you’ll have the keys discovered and extracted. EFDD can then be mount or decrypt the disk using the extracted OTF encryption keys.
Back in 2019, VeraCrypt 1.24 implemented a new mechanism for storing the OTF encryption keys in the RAM that made the extraction of OTF encryption keys significantly more difficult. Elcomsoft Forensic Disk Decryptor 2.18 becomes the only forensic tool on the market to extract all types of protected OTF encryption keys from all versions of VeraCrypt including the current 1.24 Update 7.
Steps to extract VeraCrypt OTF encryption keys
If you are able to image the computer’s volatile memory while the encrypted disk is mounted you can use Elcomsoft Forensic Disk Decryptor to analyze the memory image, detect and extract the decryption keys. You can then use these keys to have Elcomsoft Forensic Disk Decryptor decrypt the volume or mount it.
We can break down the workflow to the following steps:
- Obtain a memory dump
- Analyze the dump and find encryption keys
- Decrypt or mount the disk
RAM imaging
To capture an image of the computer’s RAM, run EFDD on the computer on which the VeraCrypt disk is currently mounted. This tool will invoke the UAC prompt (you must have admin privileges). The memory dump will be saved to the path specified during the extraction process. The following requirements apply:
- The VeraCrypt disk must be mounted at the time of imaging.
- You must be logged on as a user with administrative privileges to capture the dump.
- You may use a pluggable external storage media to launch the tool from. Ensure that the storage media has sufficient space (larger than the amount of RAM installed in the computer). The storage media must be formatted with NTFS or exFAT. FAT32 has a 4GB limit on file size, which is smaller than the amount of RAM installed in most modern computers; you may get a write error even if the computer only has 4GB of RAM.
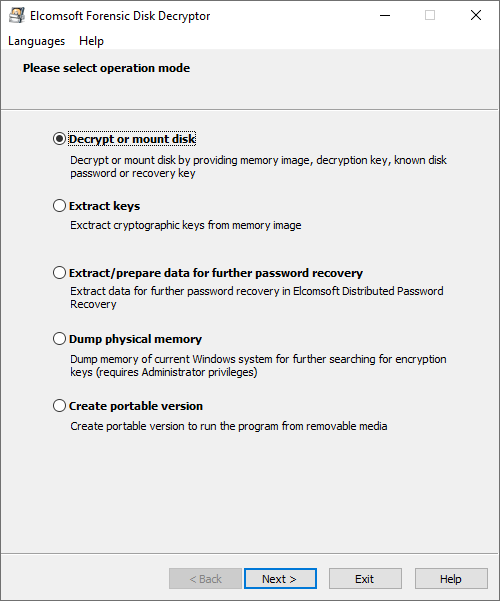
To begin, run EFDD and select “Dump physical memory” from the main window. Click Next.
Specify path to store the memory dump and click Next. The extraction process will begin.
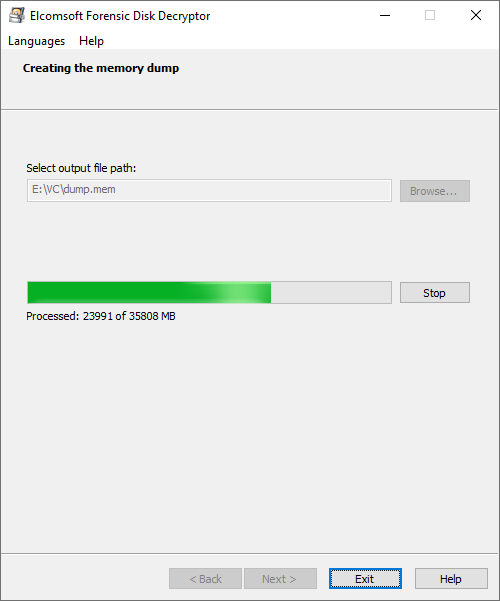
Once the extraction is finished, you can run the analysis.
Note: To discover the OTFE keys, the RAM image must be captured specifically Elcomsoft Forensic Disk Decryptor 2.18 or newer. Memory dumps produced with third-party tools cannot be used for searching for encrypted/obfuscated OTFE keys. However, you may scan third-party RAM images for OTFE keys produced by versions of VeraCrypt older than 1.24.
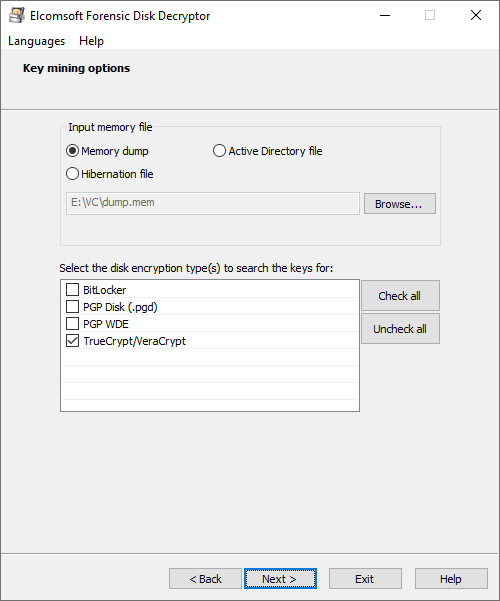
Analyzing the image
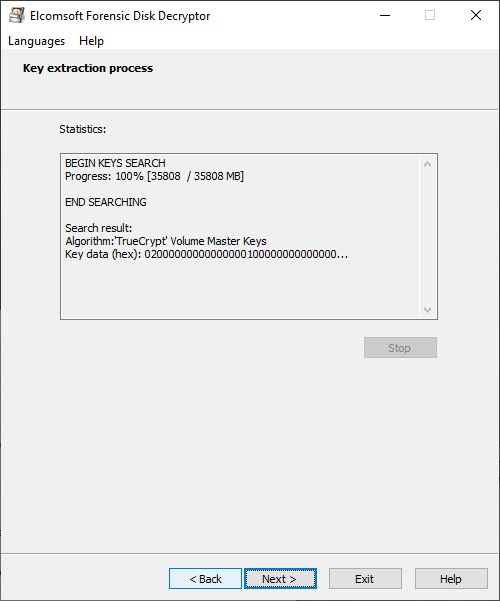
Searching for OTF encryption keys can be time-consuming, especially for the newer versions of VeraCrypt. Deselecting containers other than VeraCrypt will speed up the search.
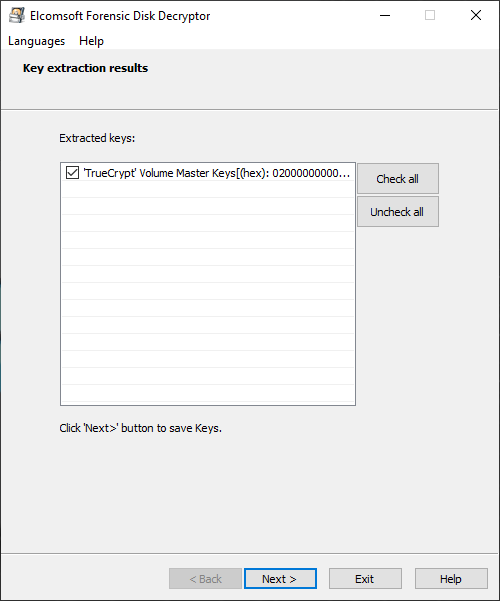
Once the keys are discovered, they will be displayed. You can now save them into a file. You can save multiple keys of different types into a single file.
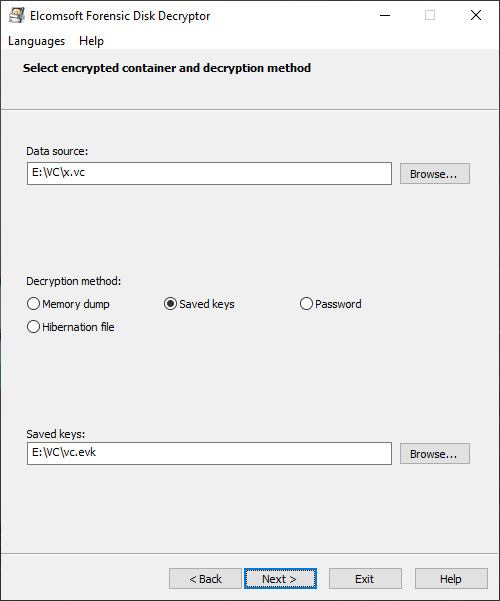
Having the decryption keys, you can proceed to decrypting the disk.
Specify the type of the crypto container, select the file with decryption keys, and click Next.
If the encryption keys have been located, the tool will prompt you to either do full decryption (creating a raw image that can be mounted or analyzed with a third-party tool) or mount the volume into the current system. Mounting is implemented via ImDisk virtual disk driver (installed with Elcomsoft Forensic Disk Decryptor). Normally, you won’t need to change any settings and simply press the Mount button:
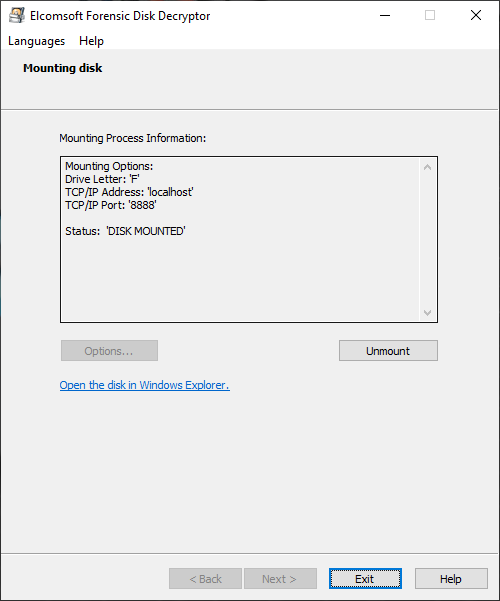
As you can see, this method is convenient and efficient. Whether or not you can use it depends entirely on the possibility of acquiring the decryption key from the computer’s RAM image.
Speeding up the key search
Note that the key search may take a while. Our test computer with 32GB of RAM took about 40 minutes to complete the search with all variables (encryption and hash) unknown. You can significantly reduce this time by specifying the type of the crypto container and deselecting containers other than TrueCrypt/VeraCrypt.
Troubleshooting: RAM encryption
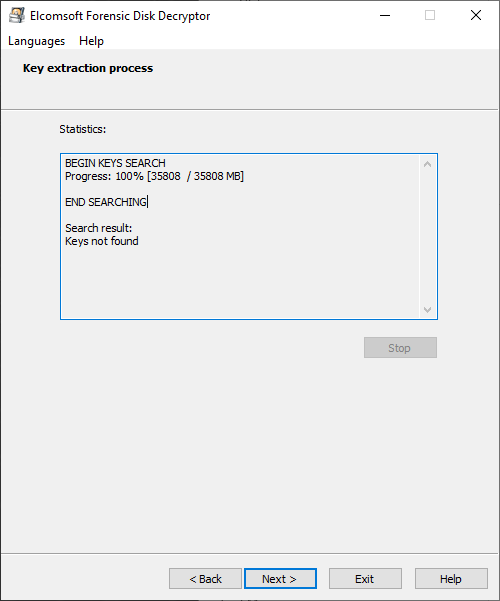
From time to time, you may experience situations when Elcomsoft Forensic Disk Decryptor will spend significant time analyzing the captured RAM image and fail to discover the encryption keys regardless of the scan settings you specify.
If this happens, verify that the user’s VeraCrypt installation is not configured to encrypt keys and passwords stored in RAM. To check this option, open VeraCrypt Settings – Preferences – More settings – Performance/Driver configuration and check if the Activate encryption of keys and passwords stored in the RAM box is selected.
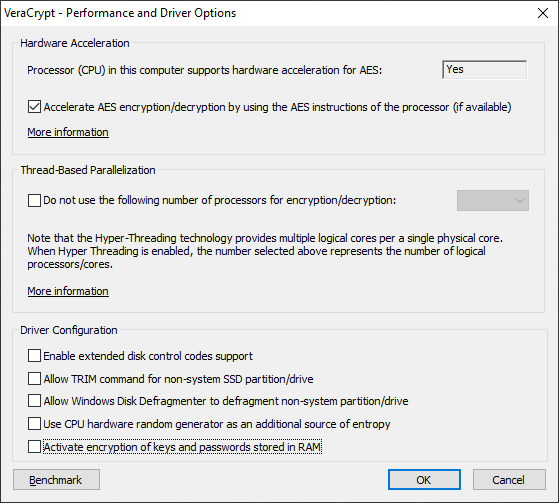
If this option is selected, EFDD will be unable to locate the encryption keys. Note that disabling this setting requires a reboot, so the point of this action is lost as the encrypted container will be locked/unmounted after the reboot.
What is RAM encryption?
According to Mounir IDRASSI, “RAM encryption mechanism serves two purposes: add a protection against cold boot attacks and add an obfuscation layer to make it much more difficult to recover encryption master keys from memory dumps , either live dumps or offline dumps (without it, locating and extracting master keys from memory dumps is relatively easy).” (We strongly recommend reading Mounir’s entire post as it contains important details on how this protection is implemented).
Known limitations
As you already know, breaking VeraCrypt is extremely complex. VeraCrypt presents one of the strongest encryption options we have encountered. Even a thousand computers or a network of powerful Amazon EC1 instances with top GPUs may spend years if not hundreds of years to break a strong password. Extracting and using OTFE keys remains one of the few usable method to break in to encrypted containers. Yet, this method has a number of limitations.
One of the most restricting limitations is the requirement to obtain physical access to the computer during the time a VeraCrypt disk is mounted: only in that case the encryption keys are available in RAM. That computer must not be locked, and the authenticated user session must have administrator’s privileges (you need them to obtain the memory dump). Finally, the memory encryption option in VeraCrypt must not be used. On the bright side, the choice of encryption and hashing algorithms does not matter, as well as the PIM number.
We agree that this scenario with this combination of factors is not very common, yet our customers continue to report successful cases when this exact approach has been used successfully to access critical evidence from child exploitation images to drug sales. We’ve supported this workflow for years for multiple disk encryption packages, and now we have it for VeraCrypt, one of the most commonly used disk encryption package in the criminal world.
REFERENCES:

Elcomsoft Distributed Password Recovery
Build high-performance clusters for breaking passwords faster. Elcomsoft Distributed Password Recovery offers zero-overhead scalability and supports GPU acceleration for faster recovery. Serving forensic experts and government agencies, data recovery services and corporations, Elcomsoft Distributed Password Recovery is here to break the most complex passwords and strong encryption keys within realistic timeframes.
Elcomsoft Distributed Password Recovery official web page & downloads »

Elcomsoft Forensic Disk Decryptor
Elcomsoft Forensic Disk Decryptor offers forensic specialists an easy way to obtain complete real-time access to information stored in popular crypto containers. Supporting desktop and portable versions of BitLocker, FileVault 2, PGP Disk, TrueCrypt and VeraCrypt protection, the tool can decrypt all files and folders stored in crypto containers or mount encrypted volumes as new drive letters for instant, real-time access.
Elcomsoft Forensic Disk Decryptor official web page & downloads »


- Elcomsoft Phone Breaker 11.04: more reliable downloads from iCloud Drive30 July, 2026
- Elcomsoft Phone Breaker 11.03: universal binary for Macs, SMS two-factor authentication restored16 July, 2026
- iOS Forensic Toolkit 10.10 adds pairing-free sideloading of the extraction agent24 June, 2026
- Elcomsoft Phone Breaker 11.2: downloads iOS 26 iCloud backups18 June, 2026
- Elcomsoft Phone Breaker 11.1: reliable iCloud backup extraction26 May, 2026