Automating DFU Mode with Raspberry Pi Pico
April 12th, 2023 by Vladimir KatalovCategory: «Elcomsoft News», «Mobile», «Tips & Tricks»
The latest update to iOS Forensic Toolkit brings two new features, both requiring the use of a Raspberry Pi Pico board. The first feature automates the switching of iPhone 8, iPhone 8 Plus, and iPhone X devices into DFU, while the second feature adds the ability to make long, scrollable screen shots in a semi-automatic fashion. In this article we will show how to build, program, and use a Raspberry Pi Pico board to automate DFU mode.
Auto-DFU
Placing devices into DFU is a pre-requisite to forensically sound low-level checkm8 extraction. Placing a device to DFU mode involves a sequence of button presses with precise timings. The procedure is even more complex if one or more buttons on the device are defective. Automatic DFU mode is indispensable when one has a device with broken buttons, which would otherwise require disassembly to be placed into DFU.
We’ve been able to make the process much easier and straightforward for the iPhone 8, iPhone 8 Plus, and iPhone X devices by developing a special firmware for the Raspberry Pi Pico board. We have already discussed the benefits of a Raspberry Pi Pico board in checkm8: Unlocking and Imaging the iPhone 4s, where we have published instructions on building one. The auto-DFU feature requires a slightly different build.
Notes on compatibility:
- The process is not compatible with previous-generation iPhones (iPhone 7 and older)
- This process may or may not work with newer iPhones (iPhone Xs/Xr and newer)
You will require:
- A Raspberry Pi Pico board (with pins)
- USB-A to micro-USB cable (to flash Pico board using your Mac)
- A special Lightning cable
Preparing the special Lightning cable
The cable is quite simple – a Lightning connector on one end, and 4 Dupont connectors on the other side (to connect to the Pico board). We only need the following lines from Lightning:
- GND (Black)
- 5V (Red)
- ID0 (Yellow)
- ID1 (Blue)
Note: The colors might be different for your cable. We recommend checking the pinout using a voltmeter.
The important point: the cable should not have a chip inside. All standard Lightning cables and adapters do have one, with a single exception of a Lightning extender (Lightning male to Lightning female) like the following one:
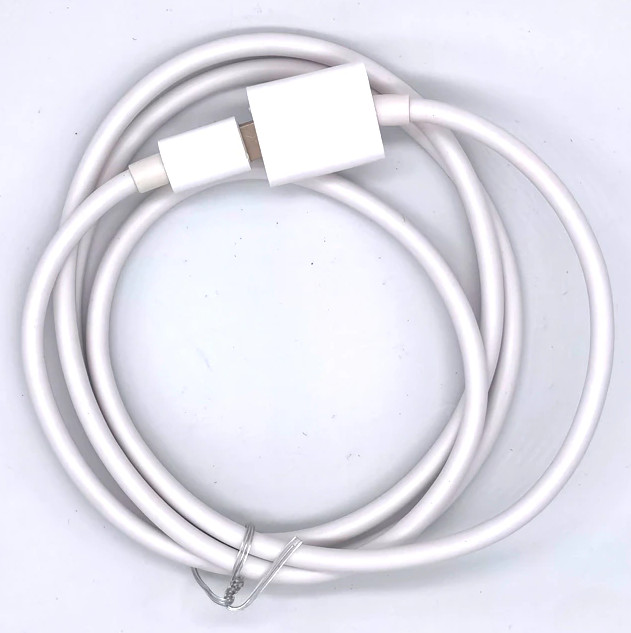
You will need one of those. The cheapest one is OK, the average price of these cables is usually around $1.5 to $2. In fact, you may want to buy a few as the cable will be used as a “donor”: you’ll cut in half and solder connectors to the above mentioned lines/wires.
Alternatively, you can use any Dupont Cable Female (usually sold as “Hookup Wire for Arduino cable” or something like that) and solder just the wires. If you don’t care about the looks, you can just solder the wires directly to Arduino connector.

Preparing and connecting the Pico board
All you need to do with the Pico board is install proper firmware. For that, connect the Pico board to your Mac using a USB to micro-USB cable, while pressing the button on the Pico board; it will be recognized as an external storage. Then, drop the following file from the EIFT installation folder:
/pico/picoDFU.uf2

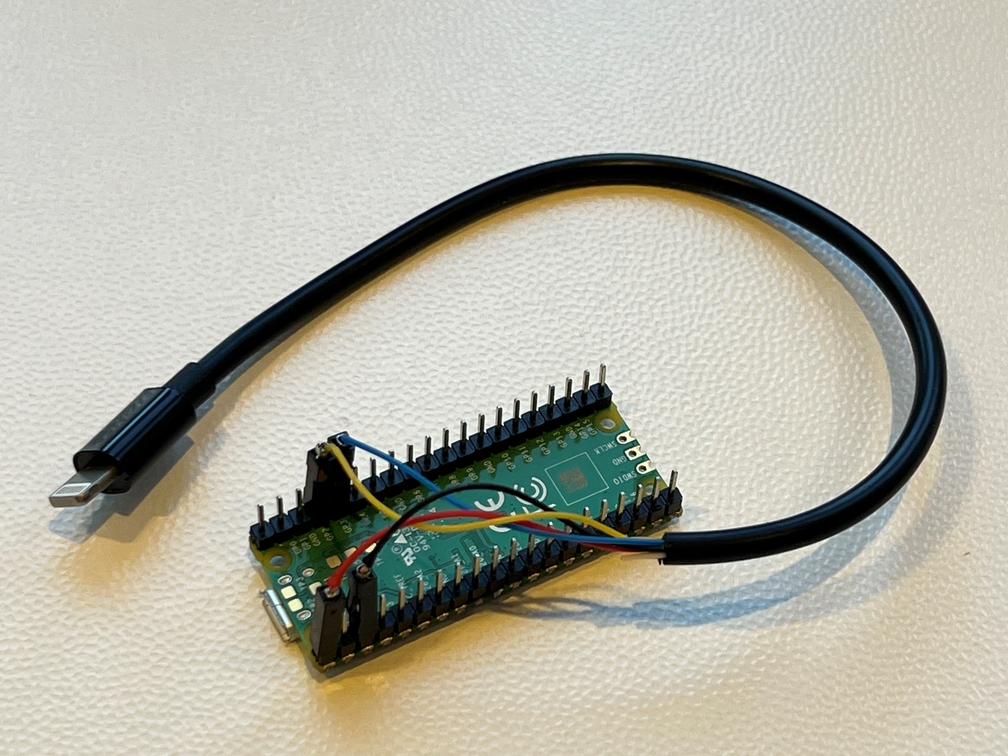
The Pico will flash and disconnect, and you’re done with that. Reconnect it to your Mac (the board will get power), and connect the cable as follows to proper Pico pins:
5V (Red)     <-> VBUS
GND (Black)  <-> GND
ID0 (Yellow) <-> GP2
ID1 (Blue)   <-> GP3
Note: you may also connect the last two pins in reverse order: ID0 to GP3, and ID1 to GP2.
Entering DFU
Once you’ve built the Pico board and wired the special Lightning cable to the Pico’s pins, the rest is easy. To place the device into DFU, follow these steps.
- Turn off the device is it is powered on
- Place the device into Recovery mode: press and hold the Vol- button, then connect it with a USB cable to the computer and keep holding the button until the device enters recovery
- Run ./EIFT_cmd tools autobootFalse to disable auto-boot (to ensure the device never accidentally boots into iOS)
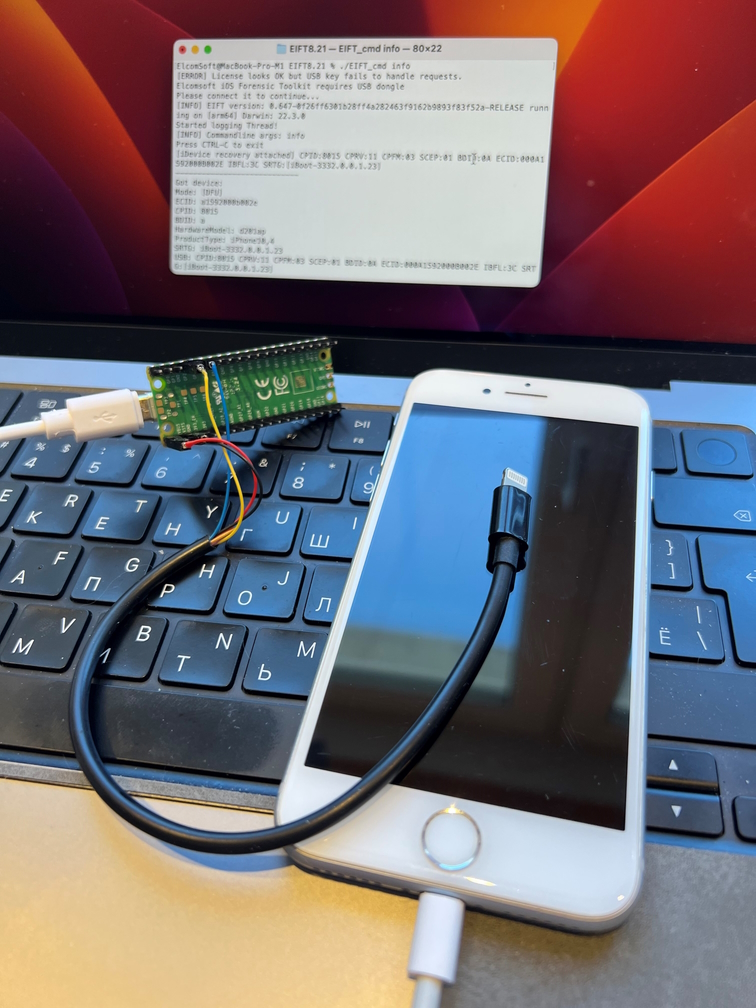
- Bring the device to DFU mode by connecting the Pico board (powered via micro-USB) via the Lightning cable wired to Pico’s IO pins as described above

That’s it, now you can connect the iPhone to a Mac and use the EIFT to extract the iPhone with checkm8.

Copyright notice
The code for picoDFU is mostly taken from the Tamarin firmware which is available under GPLv3, so we will make it available under the same license shortly.
REFERENCES:

Elcomsoft iOS Forensic Toolkit
Extract critical evidence from Apple iOS devices in real time. Gain access to phone secrets including passwords and encryption keys, and decrypt the file system image with or without the original passcode. Physical and logical acquisition options for all 64-bit devices running all versions of iOS.
Elcomsoft iOS Forensic Toolkit official web page & downloads »


- Elcomsoft Phone Breaker 11.03: universal binary for Macs, SMS two-factor authentication restored16 July, 2026
- iOS Forensic Toolkit 10.10 adds pairing-free sideloading of the extraction agent24 June, 2026
- Elcomsoft Phone Breaker 11.2: downloads iOS 26 iCloud backups18 June, 2026
- Elcomsoft Phone Breaker 11.1: reliable iCloud backup extraction26 May, 2026
- ElcomSoft Phone Breaker 11: full overhaul of iCloud extraction30 April, 2026