Installing and Troubleshooting the Extraction Agent (2025)
July 2nd, 2025 by Oleg AfoninCategory: «Mobile», «Tips & Tricks»
Over the years, we’ve published numerous guides on installing the iOS Forensic Toolkit extraction agent and troubleshooting issues. As both the tool and its environment evolved, so did our documentation – often leading to outdated or scattered information. This article consolidates and updates everything in one place, detailing the correct installation and troubleshooting procedures.
Introduction
The extraction agent is a lightweight, in-house developed iOS app that plays a key role in low-level forensic acquisition. The agent packs all known and iOS exploits into a single tool. Once sideloaded onto a compatible iOS or iPadOS device, the agent:
- Applies a chain of exploits to elevate privilege level, escape the iOS sandbox, and gain access to the root of the file system as well as the encryption keys required to decrypt the keychain.
- Establishes a communication channel between the device and the expert’s computer running iOS Forensic Toolkit.
- Grants full file system access and Keychain extraction capabilities
This method allows forensic experts to extract crucial evidence from iPhones and iPads at a low level, providing access to user data that would otherwise be impossible to retrieve.
Important: Prior to using the extraction agent, make sure that the version of iOS/iPadOS installed on the device is compatible with the agent. Do not assume! Many old versions of iOS are not compatible because all devices that are capable of running those old versions of the OS are supported via a different extraction method: the bootloader exploit.
If the device supports both bootloader-level extraction via checkm8 and the extraction agent, we recommend using bootloader-level extraction for its being more forensically sound and offering better compatibility.
Prerequisites
Before initiating the installation process, ensure the following prerequisites are met:
- Computer date/time and online connectivity: Ensure that the date and time settings on the computer are accurate, and the computer is connected to the internet.
- All Apple accounts that are used to sign the extraction agent: You must use that Apple ID on an Apple device at least one to sign into an Apple cloud service.
- Trusted device is required at the time of sideloading: You must have a trusted device for the Apple ID that you use for signing the extraction agent. A trusted SIM card/phone number alone is no longer sufficient.
- Non-developer Apple accounts: Regular, non-developer Apple accounts, including disposable Apple IDs, can be used for sideloading the extraction agent. However, using a firewall is strongly recommended to prevent unwanted Internet connectivity.
- Establish trusted relationships (before agent installation): Verify and establish trusted relationships between the phone and computer before installing the extraction agent.
- Recommended USB-C cable: We recommend using a USB-C cable. While not critical for sideloading and signing purposes, using this cable is beneficial for subsequent extractions.
Preparing the device
To ensure smooth installation and subsequent operation of the extraction agent, ensure that the device you are installing it on has sufficient charge and is correctly configured.
- Check date and time on the phone
- Ensure that the date and time on your phone are accurate. If needed, adjust them to the current time. This step is crucial for the correct installation, signing, and validation of the extraction agent.
Installing the extraction agent
To install the extraction agent, you will need to sign the IPA file with a digital certificate; otherwise, iOS will reject to launch the app. That digital certificate is tied to a particular Apple ID. That Apple ID is usually different than the Apple ID used on the device. For signing the extraction agent, you can use a regular Apple ID (e.g. a dedicated Apple ID or even throwaway one registered solely for this purpose), or an Apple ID enrolled into Apple Developer Program.
Checking pairing:
EIFT_cmd normal info
The command returns “Paired: YES/NO”.
Installing the agent:
EIFT_cmd agent install
- Install the extraction agent (do not run it yet)
- Install the extraction agent on the device but refrain from launching it at this stage.
- Restart the phone
- Perform a clean restart of the phone (clean power off and reboot).
Note: If you don’t do the reboot and the device panics, the pairing records or even the agent app itself may become corrupted due to unclean reboot. You may need to re-install the agent app if that happens.
Offline installation with Apple Developer Account
Important: A paid developer account is required. If you enrol an Apple ID as a developer without paying the annual fee, you will be unable to use that account to sign the extraction agent.
Starting with iOS Forensic Toolkit 8.70, the extraction agent can be sideloaded and launched completely offline with any Apple Developer account – regardless of when it was created or enrolled in Apple’s Developer Program. In other words, if you are using an Apple ID enrolled into Apple Development Program, you will have the following benefits:
- No more worrying about the enrolment date of your Developer account.
- No more Internet connection needed during sideloading or on the first launch.
- Safe, offline extraction is now fully available once again.
- The firewall is no longer required to install the extraction agent if you use a developer account.
Note: If using a corporate developer account, make sure to enable additional permissions as shown on the following image:
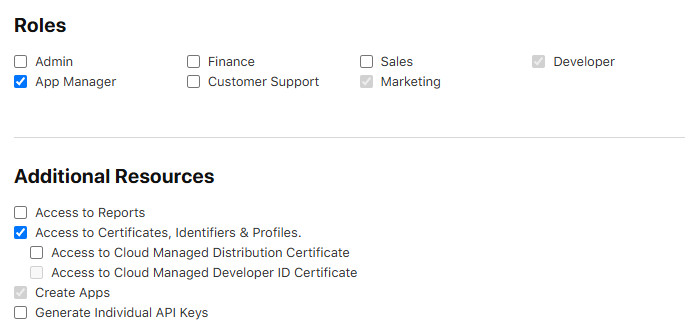
Thanks to this improvement, we are once again recommending the use of Apple Developer accounts for sideloading the extraction agent. This change dramatically simplifies the preparation and installation steps, reduces operational risks, and improves the overall forensic workflow.
Sideloading with regular Apple IDs
Depending on the type of the Apple ID account, you may need to validate the agent’s digital signature before the first launch; otherwise, you won’t be able to run it. This process occurs on the device being investigated and requires connecting the device to an Apple signing server, which in turn poses a set of known risks.
You can use any of your own Apple IDs to sign the agent, but it must be created on an Apple device. If you’re unsure, you may want to create a new one using an Apple device. Keep in mind that each Apple device can only be used to create up to three Apple IDs per year.
There have been cases where signing the agent failed, even though all other conditions were met. Creating a new Apple ID directly on an Apple device resolved the issue. We suspect the problem was caused by the original Apple ID having been created on a Windows PC.
Note: this chapter only applies if you need to have the agent’s digital signature validated when using a regular/non-developer Apple ID for agent signing. Apple developer accounts created before June 2021 waive this requirement.
- Connect to hardware firewall / Mac with firewall script
- Physically connect your phone to a hardware firewall (Raspberry Pi or Orange Pi) or a Mac computer using the functional firewall script.
- Verify agent signature via device settings
- Navigate to “Settings -> General -> VPN and Device Management.”
- Verify the digital signature of the extraction agent. Do not launch the agent yet; this step is solely to confirm the application’s signature.
- Restart the phone again
- Perform another clean reboot of the phone.
- Launch extraction agent on the phone
- Tap the agent app on the phone home screen to launch it. If prompted for “Developer Mode”, proceed to the next step.
- Enable Developer Mode (if prompted)
- Navigate to “Settings -> Privacy and Security -> Developer Mode.”
- Activate Developer Mode (this might require another reboot of the device).
- Confirm developer mode activation (only if enabling Developer Mode):
- After the reboot, verify that Developer Mode is successfully enabled on your device.
Limitations and observations
Our solution works in all three editions of iOS Forensic Toolkit, covering Windows, macOS, and Linux PCs. Please note the following limitations and observations.
Regular Apple IDs
The following applies to regular Apple IDs only.
- The signing certificates produced with regular, non-developer accounts are short living, expiring after 7 days. Certificates made with developer accounts are valid for a year.
- If the signing certificate expires after initial sideloading, one must reinstall the extraction agent.
- In addition, there is a limit of enrolling a maximum of 3 devices per week.
- If you need to process more devices, you will need to enroll additional accounts.
Developer accounts
The following applies to developer Apple IDs only.
- You can only digitally sign the extraction agent on up to 100 devices of each type per year with a single Developer Account (e.g. 100 iPhones and 100 iPads and so on).
- When sideloading the extraction agent, the Toolkit will now ask about the type of the Apple ID used (regular or developer).
- You’ll have to provide the correct answer, or the signing will fail.
- The first 10 devices are enrolled immediately; each subsequent device is only added after a certain waiting period (usually around one day).
- You’ll have to wait until the device is added.
Using the extraction agent
At this point, you can finally launch the extraction agent:
- Run the extraction agent
- Launch the extraction agent on the device by tapping its app icon on the home screen.
- Disconnect from firewall (if used) and connect to computer
- If you were using a hardware firewall, disconnect your phone from it and reconnect it to the computer.
- Start EIFT and follow instructions
- Run iOS Forensic Toolkit on your computer and proceed.
Notes and recommendations
- File system integrity and device panic
- Device panic causes unclean reboots. If you experience a device panic, the file system may be rolled back to a state prior to the panic to avoid corruption issues.
- Rollback impact on extraction agent
- Be aware that a rollback following an exploit might affect the functionality of the agent app and/or cause the pairing record to disappear. A clean reboot of the device between major steps helps to minimize potential issues.
- Reinstalling the extraction agent
- In case of corrupted records or application issues post-device panic, you may need to reinstall the agent app.
Following these steps should ensure a smooth setup and operation of the low-level extraction agent, minimizing the risk of potential cloud, device, and application-related problems.
Note: This manual is based on specific user experiences and testing scenarios. Adjustments may be necessary based on individual device configurations or software versions.
Additional notes
Not following the above instructions may result in unexpected behavior. The symptoms may include the agent launching, successful exploit execution, smooth keychain retrieval, but encountering an unexpected disruption at the file system extraction stage.
Please also note that the latest release of iOS Forensic Toolkit changed the behavior of the “-o” parameter following the “keychain/tar” command. The “-o” option should now denote a folder name, not a file name. File names are automatically assigned based on the device’s UDID and date/time.
Finally, it’s worth noting that both the image and keychain can be further loaded for analysis into a third-party forensic tool.
Troubleshooting
In this tutorial, we will address common issues faced by users of the iOS Forensic Toolkit when installing and using the low-level extraction agent for accessing the file system and keychain on iOS devices. This troubleshooting guide is based on the valuable feedback and data received by our technical support team.
What kind of troubles are we shooting?
In this guide, we won’t dive into the inner workings of the extraction agent, which leverages known vulnerabilities to elevate privileges in Apple iOS. Instead, we’ll focus on what to do when you encounter a difficulty installing or using the extraction agent.
Common mistakes
First, let us cover the two most common mistakes our users regularly make when using the extraction agent.
- Attempting to Sideload the Agent Without a Firewall: If you try to install and run the extraction agent without using a firewall (software-based or the one using our Raspberry Pi or Orange Pi solution), you may expose the device to the risk of remote lock or wipe.
- Solution: Follow the installation instructions provided in the user’s manual. Understand how to configure and use a firewall to install the extraction agent without putting the data at risk.
- Alternative: Use an old Apple Developer account registered before 6 July 2021. In this case, you will not have to verify the signing certificate on the device.
- Extracting Only the File System Image Without Keychain: Only imaging the file system image without extracting the keychain is a common mistake.
- Solution: Always perform keychain extraction before imaging the file system. We recommend going after the keychain in the first place, which is nearly instant, followed by file system extraction, which may take a while.
Preparing the Device
Before you start sideloading and using the extraction agent, make sure to perform all of the following checks.
Compatibility check: iOS version
The extraction agent supports a wide range of iOS releases. Before you begin, get the exact version of iOS installed on the device, and check it against the iOS Forensic Toolkit compatibility list. Make sure that the version of iOS Forensic Toolkit you are using supports the version of iOS installed on the device.
Important: We are continually working on expanding the list of supported iOS versions for the extraction agent. You may find that your installed version of iOS Forensic Toolkit does not support a given iOS build, while a newer version does. If this is the case, you will need to update iOS Forensic Toolkit to the latest version.
Date and time on the target device
When launching the extraction agent, iOS checks if its digital signature is valid. If the device has been deeply discharged, its time and date settings may be way off, which will cause the verification to fail.
Solution: Set the correct date and time in the device’s settings. You may need to reinstall the extraction agent.
Check device pairing
Ensure that the target device is correctly paired to the computer. To do that, run the following two commands:
EIFT_cmd normal unpair
EIFT_cmd normal pair
Make sure the device is requesting pairing, not access to media
Please note: In some cases, the device may prompt for media access instead of pairing with the computer. This can happen if the Apple Devices or iTunes app (Windows) is not installed, or if it is installed but has never been launched.
Solution: Install the Apple Devices app from the Windows Store and make sure to open it at least once (then close it) before connecting the device to the computer.
Disable Internet sharing after signing the extraction agent
Do not forget to disable internet sharing after signing the agent app.
If you forget to disable internet sharing from your computer after signing the agent on the target device, there’s a risk of data loss due to receiving a command for remote locking or remote device wipe during operation.
Do not use VPN or proxy when signing the extraction agent
Signing the extraction may fail if the computer has an active VPN or proxy connection. Disable VPN and proxies when signing the extraction agent.
Use USB Type-C to Lightning cable
While checkm8 extraction usually requires a USB-A to Lightning cable, agent-based extraction works better with a certified USB Type-C to Lightning cable. We found that using Type-C to Lightning cables delivers extractions that are both faster and more reliable.
Errors Installing and Using EIFT
In this section, we’ll cover the common problems that may arise during the installation and usage of the extraction agent and iOS Forensic Toolkit.
“Insufficient Permissions” or “Not Found” errors
If you receive the “Insufficient Permissions” error when running iOS Forensic toolkit or the firewall script, this can mean that the tool had not been correctly installed on the computer. These problems can be broken down into the following cases.
The xattr command was not run correctly
To fix this issue, follow these steps:
- Open Terminal.
- Navigate to the folder containing containing iOS Forensic Toolkit.
- Execute the following command (mind the dot at the end of the command):
- sudo xattr -d com.apple.quarantine .
iOS Forensic Toolkit folder is located on the desktop
Solution: Move EIFT to a different location, such as the local Applications folder.
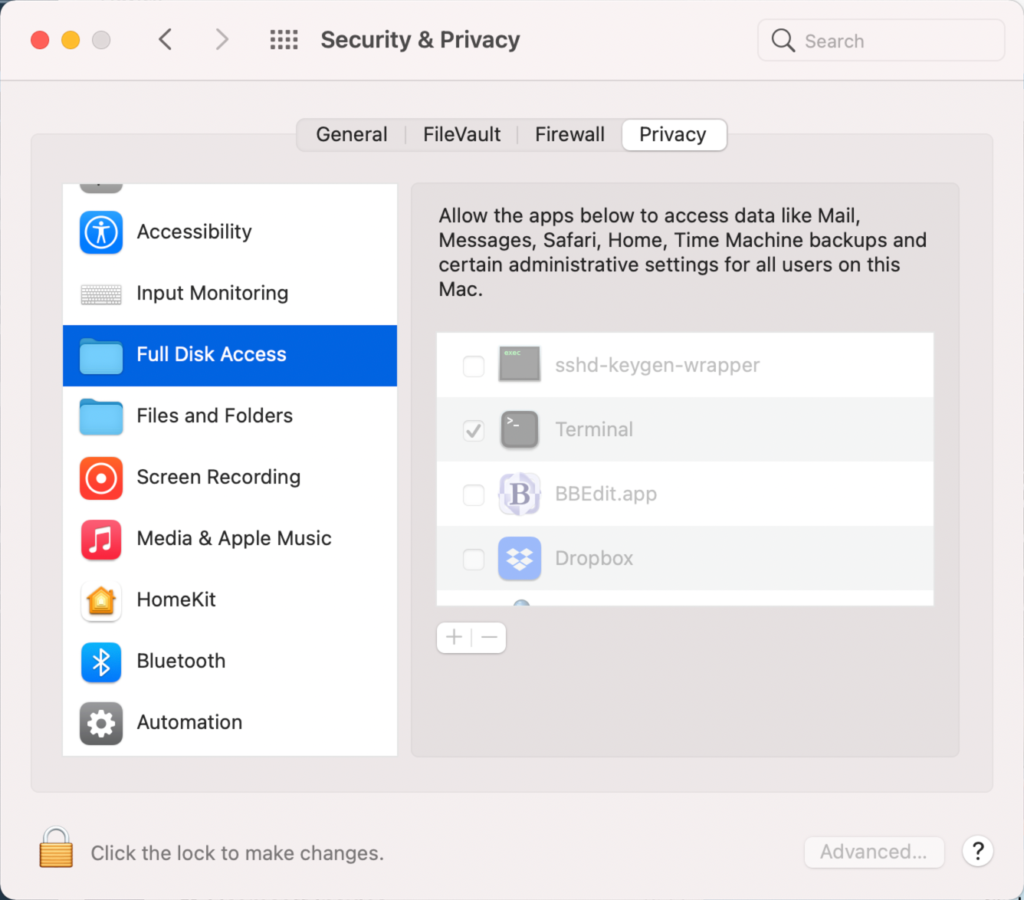
Shell does not have full disk access permissions
You must grant full access permissions to the OS shell.
- Go to System Preferences -> Security & Privacy -> Full Disk Access
- Click on the padlock icon to allow changes
- Click the ‘+’ button
- Press ‘cmd + Shift + .’ to display hidden files
- Select /bin/sh as a path
Misconfigured Internet sharing for USB devices
Typically, the problem arises from selecting the wrong internet source. Sometimes, more than one iPhone/iPad connection may appear in the list.
Solution: You need to manually identify the correct connection, often through trial and error, using a designated test device.
The firewall is running, tested OK, but sideloading does not work on the target device
- MDM profile on the device disallows sideloading
- Solution: do risk assessment and either remove MDM profile (risking to lose some types of data) or use a different extraction type (e.g. advanced logical)
The firewall is running, tested OK, but signing does not work on the target device
- Incorrect date and time on the target device
- Solution: check and set current time and date on the target device; repeat the process starting with agent sideloading
Not enough disk space or FAT32-formatted external drive
You need enough free disk space to fit the file system image. If using an external drive, make sure to format it in a file system other than FAT32, which limits file sizes to 4GB.
The extraction agent is not running or running in background
Ensure that the extraction agent runs as a foreground app during the entire extraction.
Wireless networks not fully disabled
First and foremost, the device must be placed into airplane mode during the extraction. However, depending on the last settings, the Wi-Fi and Bluetooth toggles may not be automatically disabled when the device enters airplane mode.
Solution: place the device into airplane mode first, then check and manually disable the Wi-Fi and Bluetooth toggles.
Error: “All exploits failed”
Cause: too long or too short a delay after booting or restarting the device.
Explanation: the exploits used by the extraction agent are time-sensitive. Some iOS versions require a delay of no more than 10 seconds after a reboot before launching the extraction agent, while iOS 16 requires a delay of approximately one minute to allow all kernel-level processes to stabilize. Providing an exact waiting time for each iOS version is challenging, so if you encounter issues with the exploit, try both shorter and longer delays, rebooting the device between attempts. In some cases, you may need to try up to five times.
Note: if the device has been running for a very long time (e.g. while sitting on a charger), the exploit will almost certainly fail. In this case, you will need to reboot the device.
Solution: reboot the device, wait 10 seconds to 1 minute.
Troubleshooting Guide
If none of the above resolves the issue, try identifying the issue by following steps from the Troubleshooting Guide.
Important: for the troubleshooting guide, always use a designated test device! Do not perform troubleshooting steps using the target device unless specifically instructed.
Step 1: Ensure Internet Connectivity on the Test Device
Ensure that the Internet sharing is working properly by checking that the Internet is accessible on the test device while wireless network interfaces (such as WiFi and mobile data) are disabled, and the text device is connect to your Mac computer via a cable. If you encounter issues with Internet sharing, refer to the “Misconfigured Internet Sharing for USB devices” section for solutions.
Step 2: Try Sideloading and Signing the Extraction Agent Without a Firewall
- Try signing the agent on the test device without running the firewall script. If successful, the issue may be related to firewall settings.
- If the agent signing fails even without a firewall, consider creating a new disposable Apple ID. Your goal is reaching a point where the entire process works correctly on the test device at this stage. If the agent signing still fails with a fresh Apple ID, contact our support team. You may need to update iOS Forensic Toolkit to the latest version.
Step 3: Try Sideloading and Signing the Extraction Agent With a Firewall
- Try sideloading and signing the extraction agent with the firewall script running.
- If the agent signing fails with the firewall script running, the issue is likely related to firewall settings. Occasionally, rebooting the test device while keeping the firewall script running may help resolve the issue. If rebooting doesn’t solve the problem, please contact our support team.
Step 4: Troubleshoot on the Target Device
If all previous steps were successful on the test device but signing the agent still fails on the target device, follow these steps:
- Disconnect the target device from the computer and reconnect it, then attempt to sign the agent again (ensure that the firewall script is running).
- If the issue persists, try disconnecting and rebooting the target device, and then reconnect it (with the firewall script running).
By following these steps, you should be able to troubleshoot and resolve common sideloading and signing issues. If you encounter any persistent problems, do not hesitate to contact our support team for further assistance.
Final remarks
Finally, when you delete the extraction agent from the device, some traces will be left in the device file system (namely, some records in system logs). However, none of the records will contain information on which Apple ID was used to sideload the extraction agent.
REFERENCES:

Elcomsoft iOS Forensic Toolkit
Extract critical evidence from Apple iOS devices in real time. Gain access to phone secrets including passwords and encryption keys, and decrypt the file system image with or without the original passcode. Physical and logical acquisition options for all 64-bit devices running all versions of iOS.
Elcomsoft iOS Forensic Toolkit official web page & downloads »

- Elcomsoft Phone Breaker 11.1: reliable iCloud backup extraction26 May, 2026
- ElcomSoft Phone Breaker 11: full overhaul of iCloud extraction30 April, 2026
- iOS Forensic Toolkit 10.02 adds agent-based extraction for iOS 2629 April, 2026
- Elcomsoft Quick Triage receives a major update28 April, 2026
- Elcomsoft System Recovery 8.37 expands support for Microsoft Accounts, adds Entra ID23 April, 2026