Perfect Acquisition: The True Physical Acquisition
February 16th, 2026 by Vladimir KatalovThe release of the checkm8 exploit was a breakthrough for mobile forensics, finally granting investigators verifiable access to the file systems of various Apple devices. This accessibility established the current “gold standard” for extraction: using the bootloader exploit to access the file system and dump it into a simple tar archive. While convenient, a tar archive is merely a logical copy, not a physical one. It may fail to capture the device’s true state, missing certain low-level nuances. Truth be told, these nuances are rarely relevant to real investigations, but why settle for less when a better method is available? More importantly, this approach avoids the “teething problems” of traditional bootloader extraction – such as the mishandling of large sparse files – that continue to plague even the largest forensic vendors.
Big news is coming – and this time, it’s from the living room. Our team has successfully extracted a complete file system image from an Apple TV 4K running tvOS 26. This marks the first-ever low-level extraction of Apple’s 26th-generation operating systems, including iOS 26, iPadOS 26, and tvOS 26. No one – not even the major forensic players! – has been able to achieve this before.
Which Versions of iOS Are Supported, and Why “It Depends” Is The Best Answer
November 12th, 2025 by Oleg AfoninOur customers often ask us which exact iOS versions are supported by iOS Forensic Toolkit. There’s always a temptation to answer “all of them,” and while that answer is technically correct, there are a lot of caveats. The devil is in the details, and the real answer depends on what you mean by “support”.
The latest update to iOS Forensic Toolkit brought bootloader-level extraction to a bunch of old iPads, Apple TVs, and even the first-gen HomePod running OS versions 17 and 18. This enabled full file system and keychain extraction on a those older Apple devices that can still run these versions of the OS.
Extracting Apple Unified Logs
October 13th, 2025 by Elcomsoft R&DIn our previous post, Extracting and Analyzing Apple sysdiagnose Logs, we explained the difference between sysdiagnose logs and Apple Unified Logs. Today we’ll show how the latest build of iOS Forensic Toolkit can pull Unified Logs directly from an iPhone or iPad during advanced logical extraction.
Cheat Sheet: Perfect Acquisition (32-bit)
October 13th, 2025 by Elcomsoft R&DPerfect Acquisition is the most sophisticated method for extracting data from compatible iOS devices. This method is completely forensically sound; it doesn’t modify a single bit of the filesystem. When supported, this method should always be used over alternatives. This guide outlines the entire process, from acquiring the data dump to decrypting and mounting it for analysis. Note: this guide applies to iOS Forensic Toolkit 8.80 and newer, in which the process has been made easier to use.
Evidence Preservation: Why iPhone Data Can Expire
October 9th, 2025 by Elcomsoft R&DWhen an iPhone is seized and later re-examined, forensic teams sometimes find that data present in an earlier extraction are missing from a subsequent backup or filesystem image. Why exactly does that happen, what kinds of data are affected, how long do they usually live, and what can you do to preserve volatile and semi-volatile artifacts? Let’s try to find out.
Perfect Acquisition Part 5: Perfect APFS Acquisition
July 21st, 2025 by Elcomsoft R&DWelcome to Part 5 of the Perfect Acquisition series! In case you missed the previous parts, please check them out for background information. This section provides a comprehensive guide to performing the Perfect APFS Acquisition procedure.
Installing and Troubleshooting the Extraction Agent (2025)
July 2nd, 2025 by Oleg AfoninOver the years, we’ve published numerous guides on installing the iOS Forensic Toolkit extraction agent and troubleshooting issues. As both the tool and its environment evolved, so did our documentation – often leading to outdated or scattered information. This article consolidates and updates everything in one place, detailing the correct installation and troubleshooting procedures.
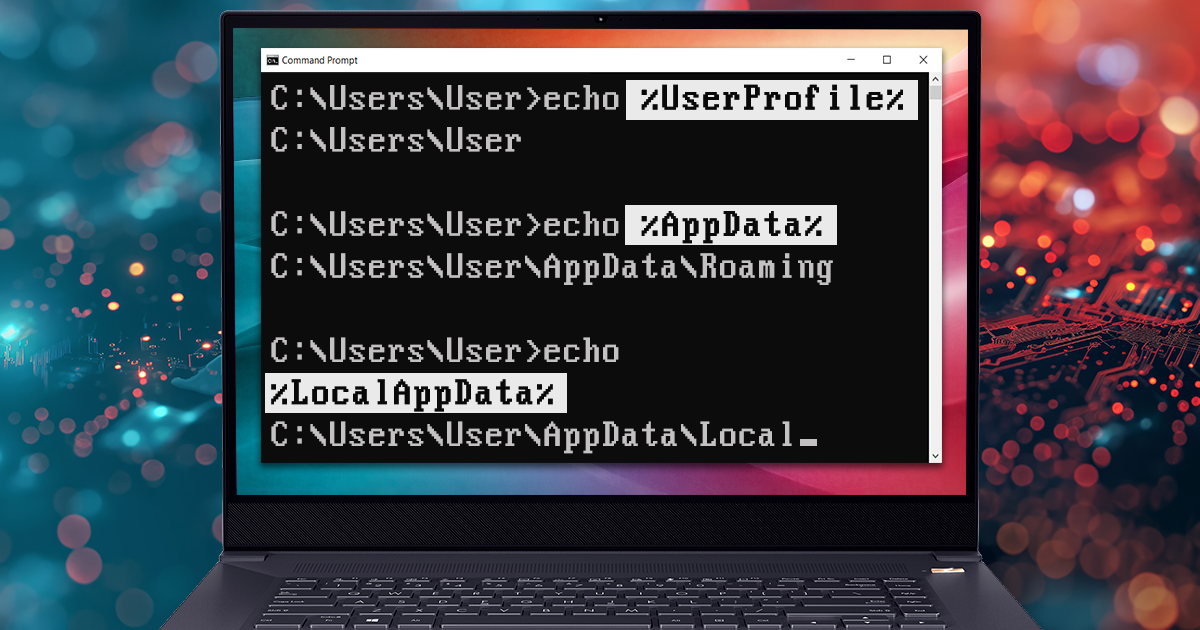
Extracting and Analyzing Apple sysdiagnose Logs
June 27th, 2025 by Oleg AfoninApple’s unified logging system offers a wealth of information for forensic investigators analyzing iOS, iPadOS, watchOS, tvOS, and other devices from Apple ecosystems. Originally designed for debugging and diagnostics, these logs capture a continuous stream of detailed system activity – including app behavior, biometric events, power state changes, and connectivity transitions. In digital forensics, where traditional sources of evidence like backups or app data may be encrypted or inaccessible, the logs provide an alternative and often untapped reservoir of forensic artifacts. This article explores the content, availability, and forensic value of Apple logs collected via sysdiagnose across different device types, focusing on practical methods for extraction and analysis using modern forensic tools.

- iOS Forensic Toolkit 9.0: full unlocking and perfect acquisition support for iPhone 6/6 Plus and other Apple A8/A8X devices11 February, 2026
- Elcomsoft Quick Triage30 December, 2025
- Introducing free forensic tools12 December, 2025
- Elcomsoft System Recovery 8.36 adds Windows Server 2025 support, BitLocker key exporting, and enhanced SRUM analysis14 November, 2025
- iOS Forensic Toolkit 8.81 adds iOS 17 and 18 support for checkm8 extractions 6 November, 2025