A Comprehensive Guide on Securing Your System, Archives and Documents
January 23rd, 2020 by Oleg AfoninCategory: «General», «Passwords & Human Factor», «Security»
How can you make your system and documents secure? Today, 256-bit AES encryption is offered by everyone and their dog. However, AES encryption does not mean much (or anything at all) when it comes to the real security of your data. Implementing encryption at the right time and in the right spot is no less important than choosing strong encryption credentials and managing the encryption keys.
While the previous part may sound a bit complicated, it all comes down to much simpler things than choosing the strongest encryption algorithm or selecting the length of the encryption key. If you are a Windows user, it all comes down to choosing the optimal data protection strategy for your particular usage scenario; protecting your storage media and the data you keep on them.
Defining your goals
Before you start considering encrypting your hard drives and files, make sure to define your objectives. What information would you like to protect? What threats do you consider important, less important and quite improbable?
Full-disk encryption part I: protecting your boot device
A reliable system protection is impossible without protecting your boot device. An unencrypted boot device (disk C: on most systems) allows for way too many vectors of attack ranging from hibernation and page file analysis to instant extraction of stored passwords from your Web browser vault. In other words, securing your boot device with BitLocker is an absolutely mandatory preliminary step and the most important security layer.
- Availability: Windows 10 Professional and higher with TPM2.0, Intel PTT or Group Policy edit; all Windows editions for device encryption in thin and light devices meeting minimum requirements.
- Note: although Windows 10 Home cannot natively create new BitLocker volumes, it can unlock BitLocker encrypted drives with full read-write access
- Physical access, hard drive only: strong protection
- Physical access, entire computer: it’s complicated
- Other users on the same computer: not applicable
- Malware/ransomware: not applicable
- Online attacks: not applicable
- Usage cases: protect data against theft of computer or hard drive; protect data if hard drives are sold or RMA’d; protect data against physical extraction.
If your computer meets the requirements (namely, the presence of a hardware TPM2.0 module or software-based Intel Platform Trust Technology), enabling BitLocker on your computer can be as easy as opening the Control Panel and launching the BitLocker Drive Encryption applet. Note that not all editions of Windows 10 can use BitLocker protection.
We have a comprehensive article on BitLocker protection in our blog, which is highly recommended. Introduction to BitLocker: Protecting Your System Disk
What caveats are there when it comes to securing data against physical extraction? The thing is, while BitLocker is nearly a 100% effective solution for protecting the bare drive, it might not be as secure if the intruder has access to the entire computer with the hard drive installed. Even if your computer is equipped with a TPM2.0/Intel PTT module, Windows will still unlock the encrypted hard drive if Secure Boot conditions are met. This in turn opens numerous vectors of attack that may allow the intruder to intercept the on-the-fly BitLocker encryption key and decrypt the hard drive. These vectors of attack include:
- Making a RAM image of a running computer with BitLocker volume(s) mounted. This can be done via a Thunderbolt attack (Windows, by default, does not disable Thunderbolt DMA access when locked) or a cold boot attack.
- Breaking or extracting your Windows logon password (e.g. extracting from your Google account, your smartphone, or from another computer you have logged in and synced your data to).
- Obtaining your BitLocker Recovery Key from your Microsoft Account or Active Directory.
Advanced users and system administrators can read the following guide to secure their BitLocker volumes: BitLocker recovery guide
Full-disk encryption part II: protecting external storage devices
BitLocker is good not only for protecting your boot device, but for encrypting data on other volumes, built-in and removable. BitLocker protects external storage devices with BitLocker To Go, an encryption algorithm based on a password. In addition to passwords, external drives encrypted with BitLocker To Go have an option to unlock with a smart card on another computer by using BitLocker Drive Encryption in Control Panel. Finally, users can opt to make their encrypted external devices automatically unlock when connected to their (trusted) computer.
- Availability:
- Encrypt external devices: Windows 10 Professional and Enterprise
- Access BitLocker encrypted devices: although Windows 10 Home cannot natively encrypt drives with BitLocker, it can access BitLocker encrypted drives with full read-write access
- Physical access, device only: protection as strong as your password
- Physical access, entire computer: it’s complicated (see previous chapter)
- Note: if you enabled the option “Unlock automatically on this PC”, then effectively no protection
- Other users on the same computer: strong protection if offline/not mounted
- Malware/ransomware: strong protection if offline/not mounted
- Online attacks: strong protection if offline/not mounted
- Usage cases: protect data stored on external storage devices such as external drive enclosures, USB flash drives etc.
Unlike system drive encryption, BitLocker To Go does not support multifactor authentication. This means you cannot use TPM protection as an additional form of authentication. You can, however, make BitLocker To Go devices unlock automatically when they are inserted in your (trusted) computer, which carries obvious security implications.
Full-disk encryption part III: using third-party crypto containers
I put it here just for the sake of completeness. If you are considering using a crypto-container such as VeraCrypt or PGP, you probably know what it is good for and how to use it. I’ll just add several things that aren’t immediately obvious when you set up encryption. In fact, the two things are so non-obvious that many coach experts have it backwards. (The right way: Choosing the right hashing algorithm – it’s all about slowness).
- Availability: VeraCrypt is available on most relevant platforms
- Physical access, hard drive only: very strong protection unless misconfigured
- Misconfiguration examples: volume stays mounted when computer sleeps or hibernates; volume stays mounted when computer is locked (matter of security vs. convenience); volume unlocked with security key (e.g. USB flash drive) and no password (if USB flash drive is discovered)
- Physical access, entire computer:
- volume not mounted at time of analysis: very strong protection
- volume mounted: very little protection
- Other users on the same computer
- volume not mounted at time of analysis: very strong protection
- volume mounted: very little protection
- Malware/ransomware: same as above
- Online attacks: same as above
- Usage cases: protect data against theft of computer or hard drive; protect data if hard drives are sold or RMA’d; protect data against physical extraction.
The choice of encryption algorithm (spoiler: use AES)
Crypto containers such as VeraCrypt offer the choice of several (actually, multiple) encryption algorithms that range from the industry-standard AES to some quite exotic algorithms such as Serpent or Kuznyechik. For the paranoiacs among us, VeraCrypt offers stacked encryption (e.g. the Serpent(AES) option). The thing is, the choice of an encryption algorithm does not affect the security of your data (unless you pick an algorithm with known or suspected vulnerabilities; finger pointed to Kuznyechik).
The choice of encryption algorithm does not affect the security of your data. A single round AES-256 encryption will be exactly as secure as Serpent(AES) or Serpent(Twofish(AES)). Moreover, the choice of encryption does not even affect the recovery speed (the speed of brute-force attacks on your password)!
Considering that AES is the only hardware-accelerated encryption algorithm in all reasonably modern processors, choosing any encryption algorithm other than AES-256 will unnecessarily slow down your reads and writes (expect a difference of 2 to 3 orders of magnitude in theoretical RAM-to-RAM encryption speeds) without providing any additional security benefit.
If choosing an encryption algorithm other than AES does not affect security, then what does?
The choice of hashing algorithm
When VeraCrypt encrypts (or decrypts) your data, it is using a binary encryption key to perform symmetric cryptographic operations. This media encryption key (MEK) is stored along with the encrypted data. The Media Encryption Key (MEK) is encrypted with a Key Encryption Key (KEK), which, in turn, is the result of multiple (hundreds of thousands) iterative hash operations performed on the user’s password.
In other words, when you type a password, the crypto container will perform a calculation of a certain hash function, and repeat that a 100,000 times or more (in order to deliberately slow down brute-force attacks).
If you want to make your encrypted volume more secure, you can change one of the two things:
- Increase the number of hash iterations
- Don’t use defaults
- Choose a slower hash function
VeraCrypt allows modifying the number of hash iterations by adjusting the PIM (Personal Iterations Multiplier); here is the how-to. The PIM value controls the number of iterations that is used to derive the encryption key from the password that you type. This value can be specified through the password dialog or in the command line. If you don’t manually specify the PIM value, VeraCrypt will use the default number of iterations, which is bad because (2). For SHA-512 or Whirlpool (the two recommended choices), VeraCrypt defaults to Iterations = 15000 + (PIM x 1000).
Why would you want to change the number of hash iterations? Because an attacker will first try to break your password using the defaults. Most tools used by the attackers to brute-force your password will first run the attack using all-defaults: the default encryption algorithm (AES), hash function (SHA-512) and PIM. Changing the PIM value is an easy way to substantially increase security without making your password more complex. Changing the hashing algorithm from default (SHA-512) to Whirlpool also makes sense in this context.
Which brings us to the choice of a hashing algorithm. VeraCrypt offers the choice of SHA-512 (slow, good choice), Whirlpool (slower, even better choice), SHA-256 (slow, but not as slow as SHA-512, use other hash instead), and Streebog (untested). Choosing the right hashing algorithm – it’s all about slowness has some benchmarks and some good explanations; highly recommended. Selecting Whirlpool makes a lot of sense because a) it is slower than SHA-512 (thus will be significantly slower to attack), and b) it is a non-default selection, which significantly increases the complexity of the attack.
File system encryption: when and how to use EFS
If you read the Wikipedia article about Microsoft Encrypting File System (EFS), you’ll get that EFS has been introduced in NTFS 3.0 in order to provides file system level encryption. The article reads: “The technology enables files to be transparently encrypted to protect confidential data from attackers with physical access to the computer.”
While all of that is interesting, neither statement explains who and, most importantly, why should be using EFS, and what exactly the encrypting file system protects against.
- Availability: all versions and all editions of Windows 10 (and most older versions of Windows)
- Physical access, hard drive only: as strong as your Windows account password
- Physical access, entire computer: same as above
- Other users on the same computer: effective protection
- Malware/ransomware: not applicable
- Online attacks: not applicable
- Usage cases: protect your documents from other users of your computer; an extra layer of security on BitLocker-protected drives; reasonably strong, very easy and fully transparent document encryption on computers where BitLocker is not supported.
What does EFS protect against, and who should be using it?
The purpose of Encrypting File System is protecting your data from users who share your computer. If you have a PC with several users, and each user has their own Windows login (as opposed to sharing a single Windows account), activating EFS encryption is the easiest way to protect your files from being accessed by those other users.
What is the relation between EFS and BitLocker, and which one should you use?
BitLocker protects your entire system volume. Any user who can log in to your computer will unlock the system volume. If a user has administrative privileges (or can escalate a non-admin account by using an exploit), he or she will also gain access to files and documents stored in other users’ accounts on that computer.
Encrypting File System, on the other hand, only protects selected folders. It won’t, for example, protect your instant messenger databases or encrypt your browsing history. It’s mostly just for documents, pictures and videos you keep in your account. However, EFS will effectively protect those files against other users who can log on to your computer, even if they have administrative privileges.
If an attacker got physical access to the computer, BitLocker is the first line of defence. Relying solely on EFS to secure the PC against attacks with physical access is not the best idea.
How does it all work? It’s actually quite simple. Right-click on a file or folder you’d like to encrypt, select Properties and click the Advanced button in the General tab. In the Advanced Attributes dialog select Encrypt contents to secure data and click OK.
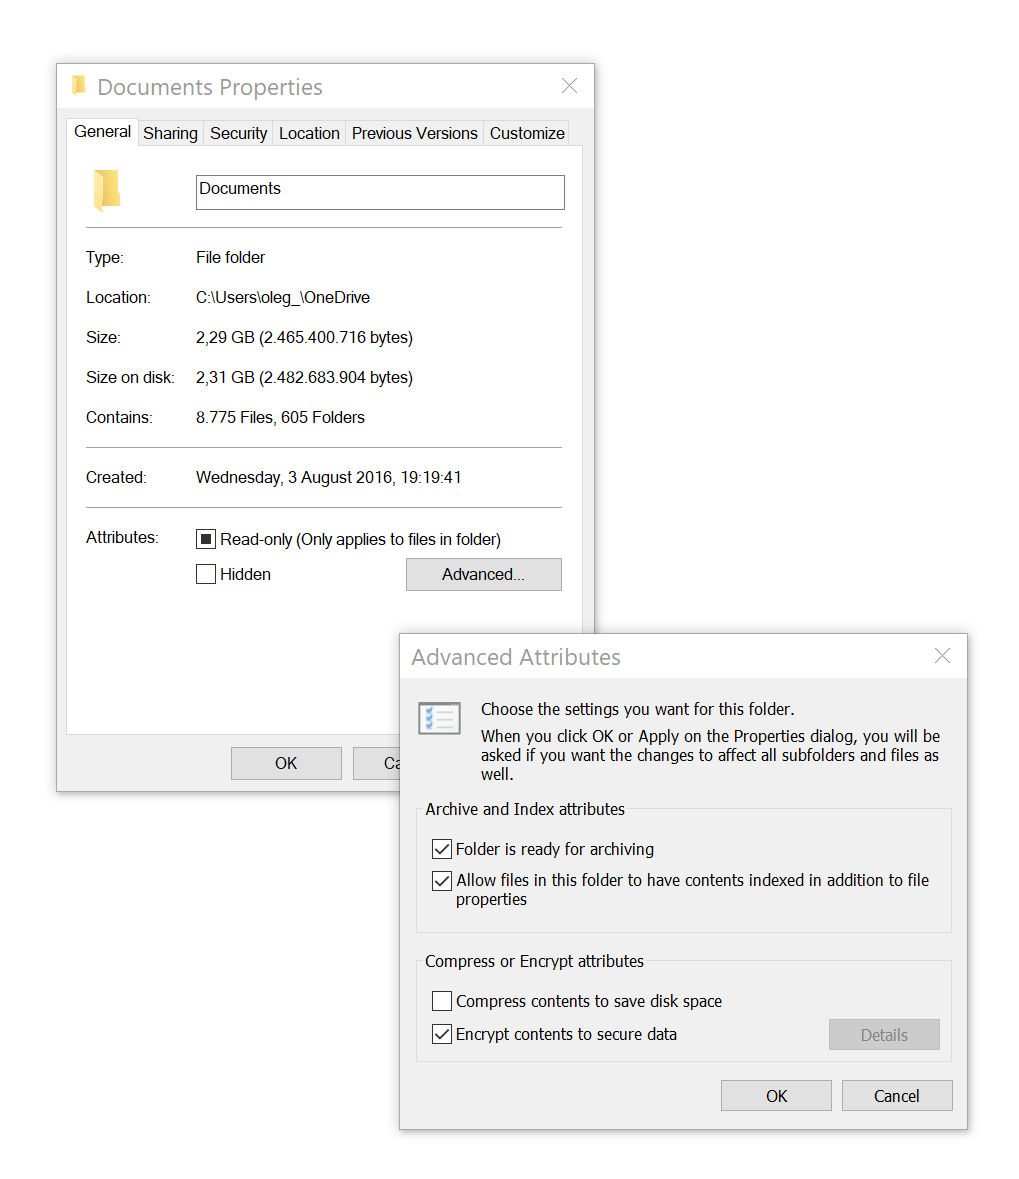
This is it. Windows will now encrypt the selected file or folder with your Windows logon credentials. There are no passwords to type and no encryption keys to save.
There is a certain drawback to using EFS encryption. If you ever forget your Windows password and have to reset it from a separate Administrator account (or your domain administrator resets the password for you), the EFS encryption keys will be lost, and you will be unable to decrypt your data without going through the data recovery process with Elcomsoft Advanced EFS Data Recovery. Note that you must recover your Windows password in order to decrypt the files. However, if you simply change your Windows password by following the normal procedure (typing your old password followed by entering the new one), you will be fine.
Document encryption
Encrypting individual documents is an important part of multi-layer security. Microsoft Office apps can use passwords to encrypt the documents’ content. No one without a password should be able to decrypt the document.
- Availability: all versions of Microsoft Office
- Security: depends on the version of Microsoft Office, the file format you’re using to save the files and the strength of your password.
- Physical access, hard drive only: strong protection (with caveats)
- Physical access, entire computer: strong protection (with caveats)
- Other users on the same computer: strong protection (with caveats)
- Other users on your Local Area Network: strong protection (with caveats)
- Malware/ransomware: content protection. Malware won’t be able to decrypt your files and read your data. However, malware/ransomware can still encrypt your files, effectively locking you out.
- Online attacks: content protection. Strong protection against unauthorized data access; no protection against unauthorized deletion
- Usage cases: protect the content of your documents against anyone who does not know the encryption password.
- How to: Protect a document with a password
A million dollar question: if you are on a local area network, should you use EFS or document encryption to protect documents against other users on the same LAN? In this case, it’s better to use both. EFS will make it impossible to gain access to encrypted files and folders without knowing your Windows account/domain credentials. Password protection of individual documents will make documents difficult to break even if the attacker knows your logon credentials.
The caveats of document encryption
So what exactly does “strong protection (with caveats)” mean? The thing is, your documents are just as secure as the password you use to protect them. If you re-use a password you already stored in your browser cache or in the keychain, extracting that password and decrypting the documents will be a matter of minutes in many types of attacks.
What if you use a cryptographically strong and truly unique password to encrypt documents? Are these documents secure? The thing is, they will be just as secure as the office app permits them to be. In Microsoft Office encryption evolution: from Office 97 to Office 2019 I discussed the encryption algorithms and protection strength of Microsoft Office apps from the early days to the most current release.
Generally speaking, everything before Office 2000 was insecure (no protection). Office 2000, XP and Office 2003 had very weak encryption that can be usually broken in under a day.
Since Office 2007, Microsoft started taking encryption seriously. Office 2010, 2013, 2016, 2019 brought security to the new level, making encrypted documents very secure.
Okay, so you are using the latest Office and selected a strong password; are we secure now? The thing is, you’ll be just as secure as the document format allows. If you are using the newer DOCX/XLSX format (files with .docx / .xlsx extensions), you’re good. If, however, you are saving your documents in “compatibility” mode, you are sacrificing encryption and make your documents as vulnerable as if they were saved by an Office 2003 app.
Best practices:
- Use the latest version of Microsoft Office to save documents. If the latest version is not available, use at least Office 2013 (the newer the better).
- Never save documents in “compatibility” mode. Make sure that the files are DOCX/XLSX as opposed to DOC/XLS.
- Use a unique, cryptographically strong password to encrypt documents. Remember: if the password is broken once (e.g. pulled from your Google account or recovered from a document you accidentally saved in the “compatible” format), it will be used to break everything else, including documents with strong encryption.
- If you email an encrypted document, do use a unique, one-time password for that document, and never send both the document and the password in the same email. In fact, you should never send the password by email since that would allow an attacker who gained access to your email account to decrypt the document. Send the document and the password via separate communication channels (e.g. email / text message, chat or phone call).
Protecting backups and archives
Making regular backups is a common wisdom. Protecting those backups is a wisdom much less common. Once you make a backup, make sure to give it as strong a protection as your boot drive.
- Store backups on BitLocker-protected media. Even if your backup tool (e.g. the one built into Windows) does not support encryption, at very least your storage media is protected with full-disk encryption. Note: Windows 10 does support the recovery from BitLocker-protected disks. Just create a bootable install image from Microsoft Web site (use “Create Windows 10 installation media”).
- If your backup tool supports encryption, it may be a good idea to encrypt your backups (AND store them on a BitLocker-protected media). Note, however, that a backup tool will probably cache (store) your backup password on your computer to automatically encrypt new and incremental backups. For this reason, make sure to have a truly unique, never reused password for encrypting backups.
Individual folders are frequently backed up using common archive tools such as WinZip, 7Zip or WinRar. All of these tools offer the ability to encrypt archives with a password. While the encryption strength is different among the three formats (ZIP, 7Z and RAR), an up to date version of each tool provides adequate protection if you choose a reasonably complex password (e.g. 8 characters or more, combining small and capital letters with numbers and special characters). To achieve the best level of protection, do keep those archives on BitLocker-protected media.
Note that password recovery tools work significantly faster on ZIP/7Z/RAR compared to attacking BitLocker encryption or Office 2013 (and newer) documents. For this reason, never reuse your password, and make sure that your BitLocker media, your documents and your backups/archives use very different passwords (ideally, not based on the same pattern).
More information:
Cloud security: OneDrive Personal Vault
Microsoft started offering an extra layer of security to all users of its cloud storage service in the form of a Personal Vault. OneDrive Personal Vault helps secure your files both on your computer and in the cloud in the event that someone gains access to your account or your device.
Unlike ransomware protection, Personal Vault is available to all users of Microsoft OneDrive and not just to Office 365 subscribers. Technically speaking, Personal Vault is an area in the OneDrive folder on your computer and in the OneDrive cloud storage that features additional protection. You can only access this protected area after passing a strong authentication. If your Microsoft Account is protected with two-factor authentication, you will have to pass the second step of identity verification in addition to typing your Microsoft Account password.
Once configured, Personal Vault must be manually unlocked every time you need access to secured data. To unlock, you must type in your Microsoft Account password and pass the second authentication step if your account has two-factor authentication. Once you’ve finished accessing the data, Personal Vault will automatically relock after a short period of inactivity. Once locked, any files you were using will also lock and require re-authentication to access.
Setting up Personal Vault only takes a few clicks as outlined in Protect your OneDrive files in Personal Vault.
OneDrive Personal Vault is still new; no independent security analysis has been performed until today. In our view, Personal Vault is worth consideration as an extra security layer for some of the most private but rarely accessed types of data. Examples of such data may include BitLocker escrow keys and binary encryption keys, or the list of passwords some users store in encrypted Excel spreadsheets. I personally keep my two-factor authentication secrets (scanned QR codes to initialize the Authenticator app) in the Vault as well.
- Physical access: unknown (not yet analyzed)
- Other users on the same computer: strong protection
- Malware/ransomware: strong protection (unless Personal Vault is unlocked at the time malware is running)
- Online attacks: as strong as your Microsoft Account security
- Usage cases: activate to add an extra layer of security for a handful of personal documents, encryption keys, 2fa secrets etc.
Ransomware protection
One of the most important threats not covered by any encryption is the type of malware called ransomware. Ransomware is a type of malware that threatens to either publish the data stolen from the victim or perpetually block access to the victim’s files by encrypting them with a key that is only known to the attacker. The term ‘ransomware’ has emerged from the fact that, on many cases, attackers demand a ransom payment to decrypt data.
Protecting your data against ransomware is a complex topic in itself. However, computer users can choose one or both of the following two defences when it comes to ransomware protection.
Ransomware protection is effective against the following threats.
- Physical access: no protection
- Other users on the same computer: no protection
- Malware/ransomware: effective protection
- Online attacks: as strong as your cloud account security
- Usage cases: available automatically to Office 365 subscribers. Available to paid Dropbox users. Automatically protects files stored in OneDrive/Dropbox. Automatic alerts (OneDrive only). Automatic restore (OneDrive only); manual restore (Dropbox).
Use cloud storage with automatic ransomware protection
If you are using Windows 10, most likely you already have a Microsoft Account. The Microsoft Account gives you access to OneDrive, Microsoft’s cloud storage solution. The free tier includes 5 to 15 GB of online storage, while Office 365 subscribers receive the whole terabyte of cloud storage.
Microsoft actively promotes OneDrive Ransomware Protection. OneDrive automatically detects when the files are mass-deleted or mass-edited (such as when ransomware encrypts the entire Documents folder), alerts the user and prompts to restore the known-good snapshot. The File Restore feature is only available to Office 365 subscribers (Home and Personal levels are enough to receive protection).
More information at Ransomware detection and recovering your files.
If you prefer Dropbox to Microsoft OneDrive, Dropbox gets you covered against ransomware attacks, but mostly for higher-level paid tiers. Users of the free Basic tier as well as Plus subscribers can roll back individual encrypted files during the first 30 days after the attack (there will be no warning of mass-deletion of mass-encryption of files coming from the Dropbox app). If you want to roll back the entire Documents folder with Dropbox Rewind, you’ll need to be a paid Plus or Professional tier subscriber.
More information:
- What to do if your files were corrupted or renamed by ransomware
- How to recover or restore deleted files or folders in Dropbox
- Recover older versions of files
- How to recover missing files in your Dropbox account
Make backup snapshots. Keep backup media offline
Once ransomware is installed on your computer, it will try to encrypt every document that is accessible. The obvious solution is making documents inaccessible by physically disconnecting backup media (such as using 2.5” portable USB drives to back up). In this scenario, you would only connect backup media to your computer when you actually want to make the backup, disconnecting the disk after the backup tool finishes its job. With this approach, even if your computer is attacked by ransomware, your offline backups will not be affected (unless you connected the external drive to the computer at the time the ransomware was installed).
In addition, configure your backup tool to keep snapshots of your data going back as long as permitted by available storage. In our office, an affordable 4TB USB hard drive can keep approximately 30 to 40 full snapshots of the Documents folder; this number becomes significantly larger if you enable incremental backups, with each snapshot saving only
More information:

- Elcomsoft Phone Breaker 11.2: downloads iOS 26 iCloud backups18 June, 2026
- Elcomsoft Phone Breaker 11.1: reliable iCloud backup extraction26 May, 2026
- ElcomSoft Phone Breaker 11: full overhaul of iCloud extraction30 April, 2026
- iOS Forensic Toolkit 10.02 adds agent-based extraction for iOS 2629 April, 2026
- Elcomsoft Quick Triage receives a major update28 April, 2026