
iOS Acquisition Troubleshooting: Where The Logs Are?
November 3rd, 2026 by Oleg AfoninCategory: «Tips & Tricks»
What do you send as a console log when contacting customer support? On our end, we often see a vague description of the problem with a photo of the monitor taken with a phone. A legible photo if we’re lucky; a blurred one when we’re not. Screenshots come second, copy-paste from the console third. All three leave out most of what we need to diagnose a failed extraction. iOS Forensic Toolkit writes three kinds of log files to disk, and we need them all to investigate the issue.
The toolkit has a tiered log system. Each command produces its own log, agent installation produces a second, and the extraction agent running on the device produces a third. The one thing to know is that these files are not stored next to the executable. This article covers where they are, what each one contains, and which ones to send.
What exactly are we troubleshooting?
The logs are indispensable when hunting the root cause of many issues, such as:
- Bootloader exploit not working where it should;
- iOS version is not detected so the firmware path is not provided;
- The extraction agent is not being signed;
- The agent cannot be sideloaded to the device;
- The device reboots when applying a bootloader or kernel exploit, or during another operation.
Of course, there are many other issues that cannot be solved without the full logs; those above are just the more frequent ones.
Why console log is not enough
The console shows the main log; nothing else goes there, or your screen would be cluttered beyond comprehension. Agent installation details, the requests to the installation service, and everything the agent does on the device go to separate files that contain detailed information on each and every command and response sent and received. A failed agent installation looks like a single error line in the console; the reason for it is logged in a file.
The console buffer is also limited. Long sessions scroll past it, and the lines that matter are usually a few hundred lines above the error, which is usually the part that gets cropped out of a screenshot.
A photo is a special case. We have received register dumps as 12 MP images taken at an angle under office lighting. These are not searchable, and transcribing hex addresses from a JPEG is an error-prone way to spend an afternoon. The log files are plain text; a text file can be opened, searched and compared with other cases.
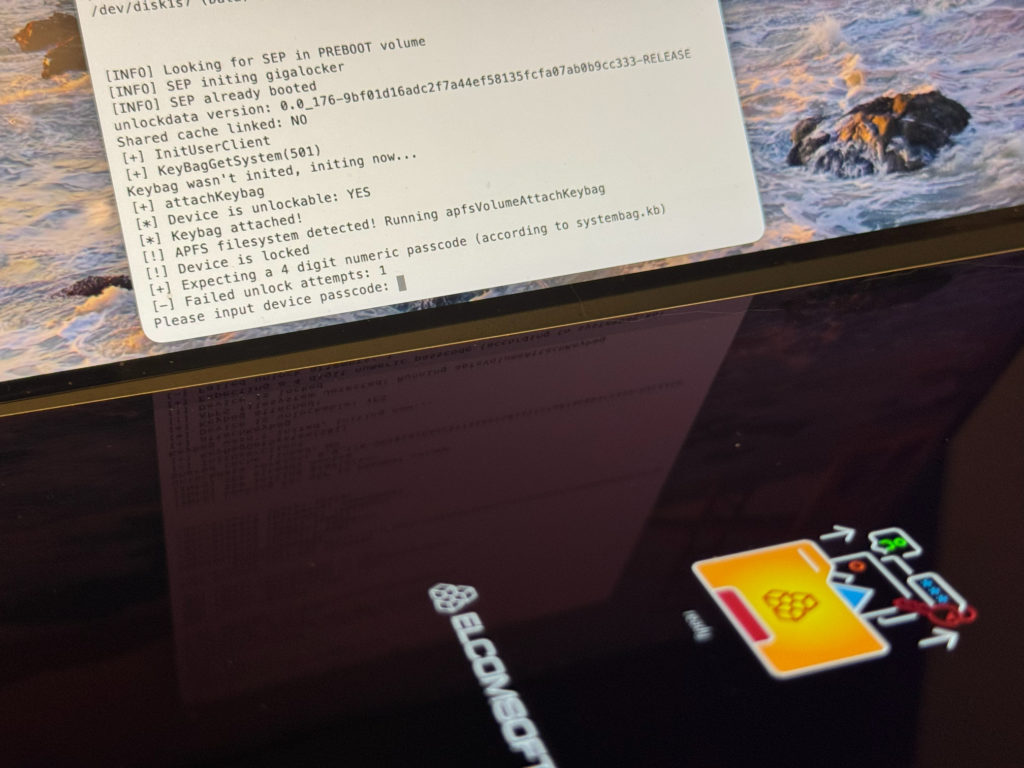
This. Don’t.
Where the logs are
They are in the user profile, under Elcomsoft/EIFT/logs. The folder sits in the same place on all three platforms; only the profile path differs.
| OS | Path |
|---|---|
| Windows | %USERPROFILE%\Elcomsoft\EIFT\logs, which typically resolves to C:\Users\<username>\Elcomsoft\EIFT\logs |
| macOS | ~/Elcomsoft/EIFT/logs |
| Linux | ~/Elcomsoft/EIFT/logs |
~ in Linux and macOS means the user’s home directory; you can simply cd to that folder. You can type this in Finder, too; in Linux, you can use GNOME Files/Nautilus or your favorite file manager.
On Windows, %USERPROFILE%\Elcomsoft\EIFT\logs can be pasted into the Explorer address bar as is; Explorer expands the variable. The folder is created on first run and is not cleaned up by the toolkit, so it accumulates. The system in the screenshot below holds 332 files.
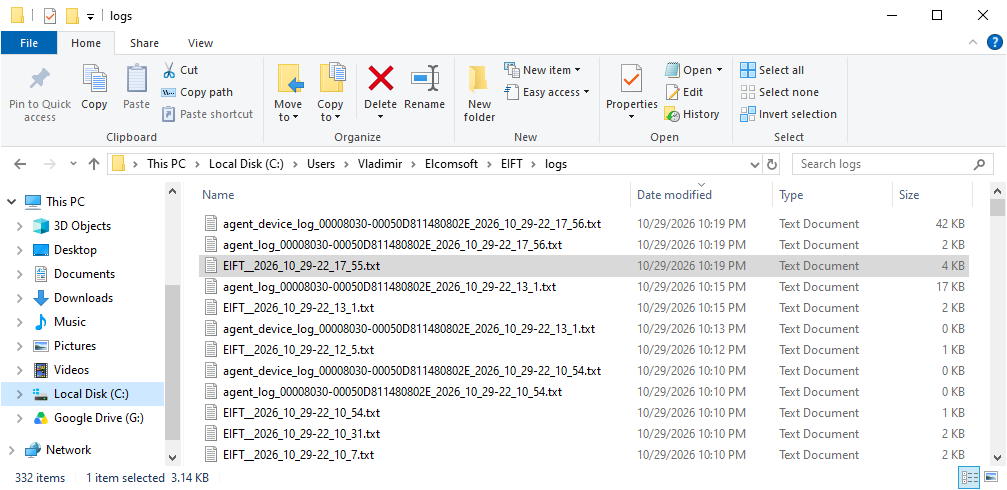
Three filename patterns are visible: EIFT__<date>-<time>.txt, agent_log_<device ID>_<date>-<time>.txt, and agent_device_log_<device ID>_<date>-<time>.txt. The timestamp is in the form YYYY_MM_DD-HH_MM_SS. The device ID is the identifier of the connected device in the same form the toolkit prints in the console.
The three log types
iOS Forensic Toolkit saves three types of log files, two of them only produced when you use the extraction agent.
EIFT__-*
This is the console output written to a file. Everything the toolkit prints on screen goes here. One file is created for every command run: info (device information), boot (bootloader exploit), agent (agent installation), keychain, tar, and the rest. A session with ten commands leaves ten of these files, and the timestamp in the name points at the command that produced it.
This is the file users have in mind when they send a screenshot or a text copy of their console output. The file is the better choice: it is complete and contains everything we need.
agent_log-*
Written during agent installation and while the keychain and tar commands run. The installation part is verbose. It records every request and response during authentication (the login and password of the Apple ID you’re using to sign the agent are not logged, only the exchange around them) and every call to the installation service, with the service’s answers. The main log shows a one-line result of the installation; this file shows the steps that led to it.
When the agent does not install, this is the file that explains why. The main log alone does not contain enough to tell a sideloading problem from an account problem from a network problem.
agent_device_log-*
The logs returned by the extraction agent running on the iPhone are stored in this one. It contains the exploit progress: kernel addresses being patched, register state, and the intermediate results of each stage. When the exploit does not land, this is where the failure shows.
A 0 KB agent_device_log is itself a data point. The 10:13 PM entry in the screenshot is one; the agent produced no output on the device, which narrows the search.
What to send to support
All files from the failed run, as files, in one archive.
- Note the time the command failed. The filenames carry a timestamp down to the second, so a rough time is enough.
- Open the logs folder for your OS (paths above).
- Sort by date and take every file from that run: the
EIFT__file, plus anyagent_log_andagent_device_log_files with a matching timestamp. When in doubt, take the whole day; the files are small. - Zip them and attach the archive. Do not paste the contents into the email body; mail clients wrap long lines and the hex addresses stop being searchable.
- Add one line on what you were doing: the command, the device model, the iOS version, and what you expected to happen.
A word on what is in the archive. Login and password for the Apple ID you use to sign the extraction agent are not logged. Device identifiers, the device’s iOS version and build, and the internal state of the exploit are, and the agent_device_log contains kernel addresses specific to the device. Handle the archive the way the case policy says to handle any other data derived from the evidence device.
Packing the archive is simple: select the logs in the file manager, right-click, Compress. If you’re more familiar with the command line, use whatever compression option is available; we can read a .tar.gz archive if you prefer those.
Getting to the folder quickly
Windows: paste %USERPROFILE%\Elcomsoft\EIFT\logs into the Explorer address bar or the Run dialog (Win+R).
macOS: in Finder, press Cmd+Shift+G and paste ~/Elcomsoft/EIFT/logs. If you need the path on the command line, drag the folder from Finder into the Terminal window; Terminal inserts the full path.
Linux: cd ~/Elcomsoft/EIFT/logs. File managers differ between distributions, so we leave the GUI route to the reader.
Any other logs?
There is one more log we didn’t mention in the main section because it’s rather exotic. The name is “serial log”, and it is made when you use the “serial” command with certain parameters (in a separate console window) while the device is connected with a special adapter (a standard DCSD or Colobus). Usually you don’t need one; if you do, search the manual for “serial”. The file name follows the same convention as the main log (EIFT__).
In short
Three files, one folder. The EIFT__ log is the console; the agent_log explains an installation that did not happen; the agent_device_log explains an exploit that did not land. Send the files from the failed run as an archive, and we can start on the problem instead of on the photo.
REFERENCES:

Elcomsoft iOS Forensic Toolkit
Extract critical evidence from Apple iOS devices in real time. Gain access to phone secrets including passwords and encryption keys, and decrypt the file system image with or without the original passcode. Physical and logical acquisition options for all 64-bit devices running all versions of iOS.
Elcomsoft iOS Forensic Toolkit official web page & downloads »

- iOS Forensic Toolkit 10.12: bootloader extraction for the Apple HomePod mini9 October, 2026
- Elcomsoft Phone Breaker 11.05: iCloud extraction support for iOS 27 and the iPhone 18 range6 October, 2026
- iOS Forensic Toolkit 10.11: bootloader extraction for Apple Watch Series 4 and 5, Apple TV 4K 2nd Gen21 September, 2026
- Elcomsoft Quick Triage 2.2 adds a timeline, a plugin system, and file system snapshots3 September, 2026
- Elcomsoft System Recovery 8.38: Built-In BitLocker TPM Exploit Library, Browser Artefact Extraction, and Imaging Checksums26 August, 2026